ℹHow to Manage Contacts in Mria CRM for Jira #
The Contacts section allows you to manage all people you interact with during the sales process.
1. Viewing Contacts #
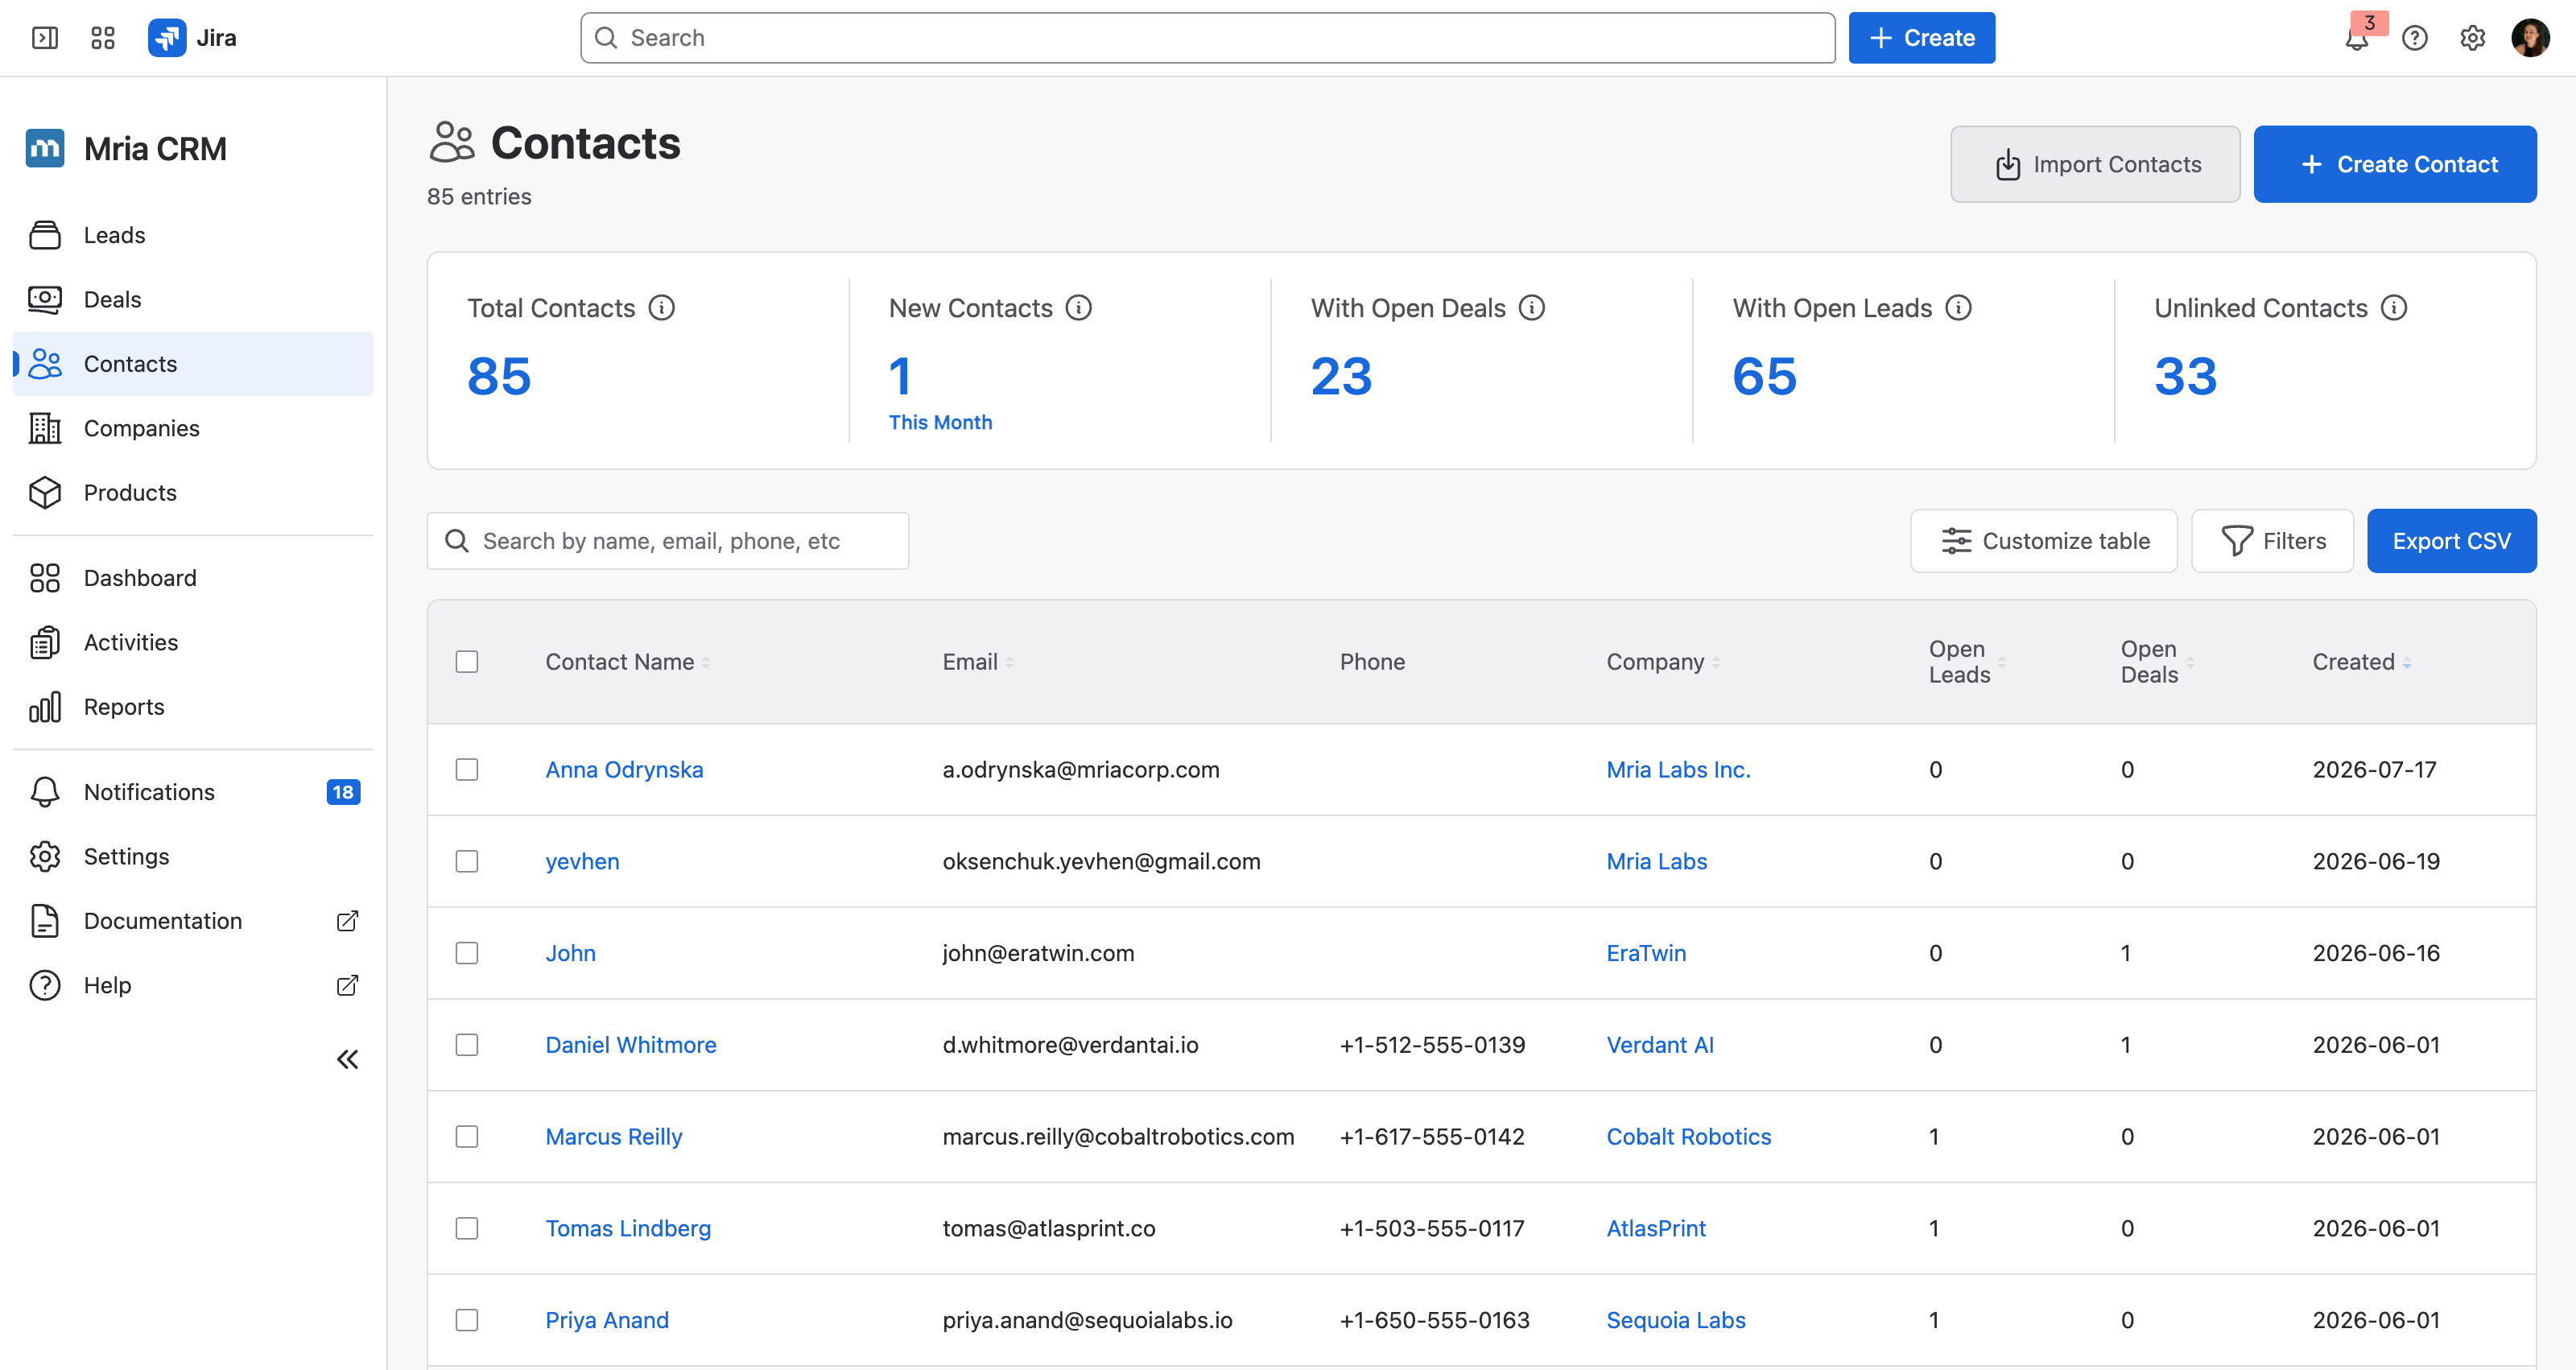
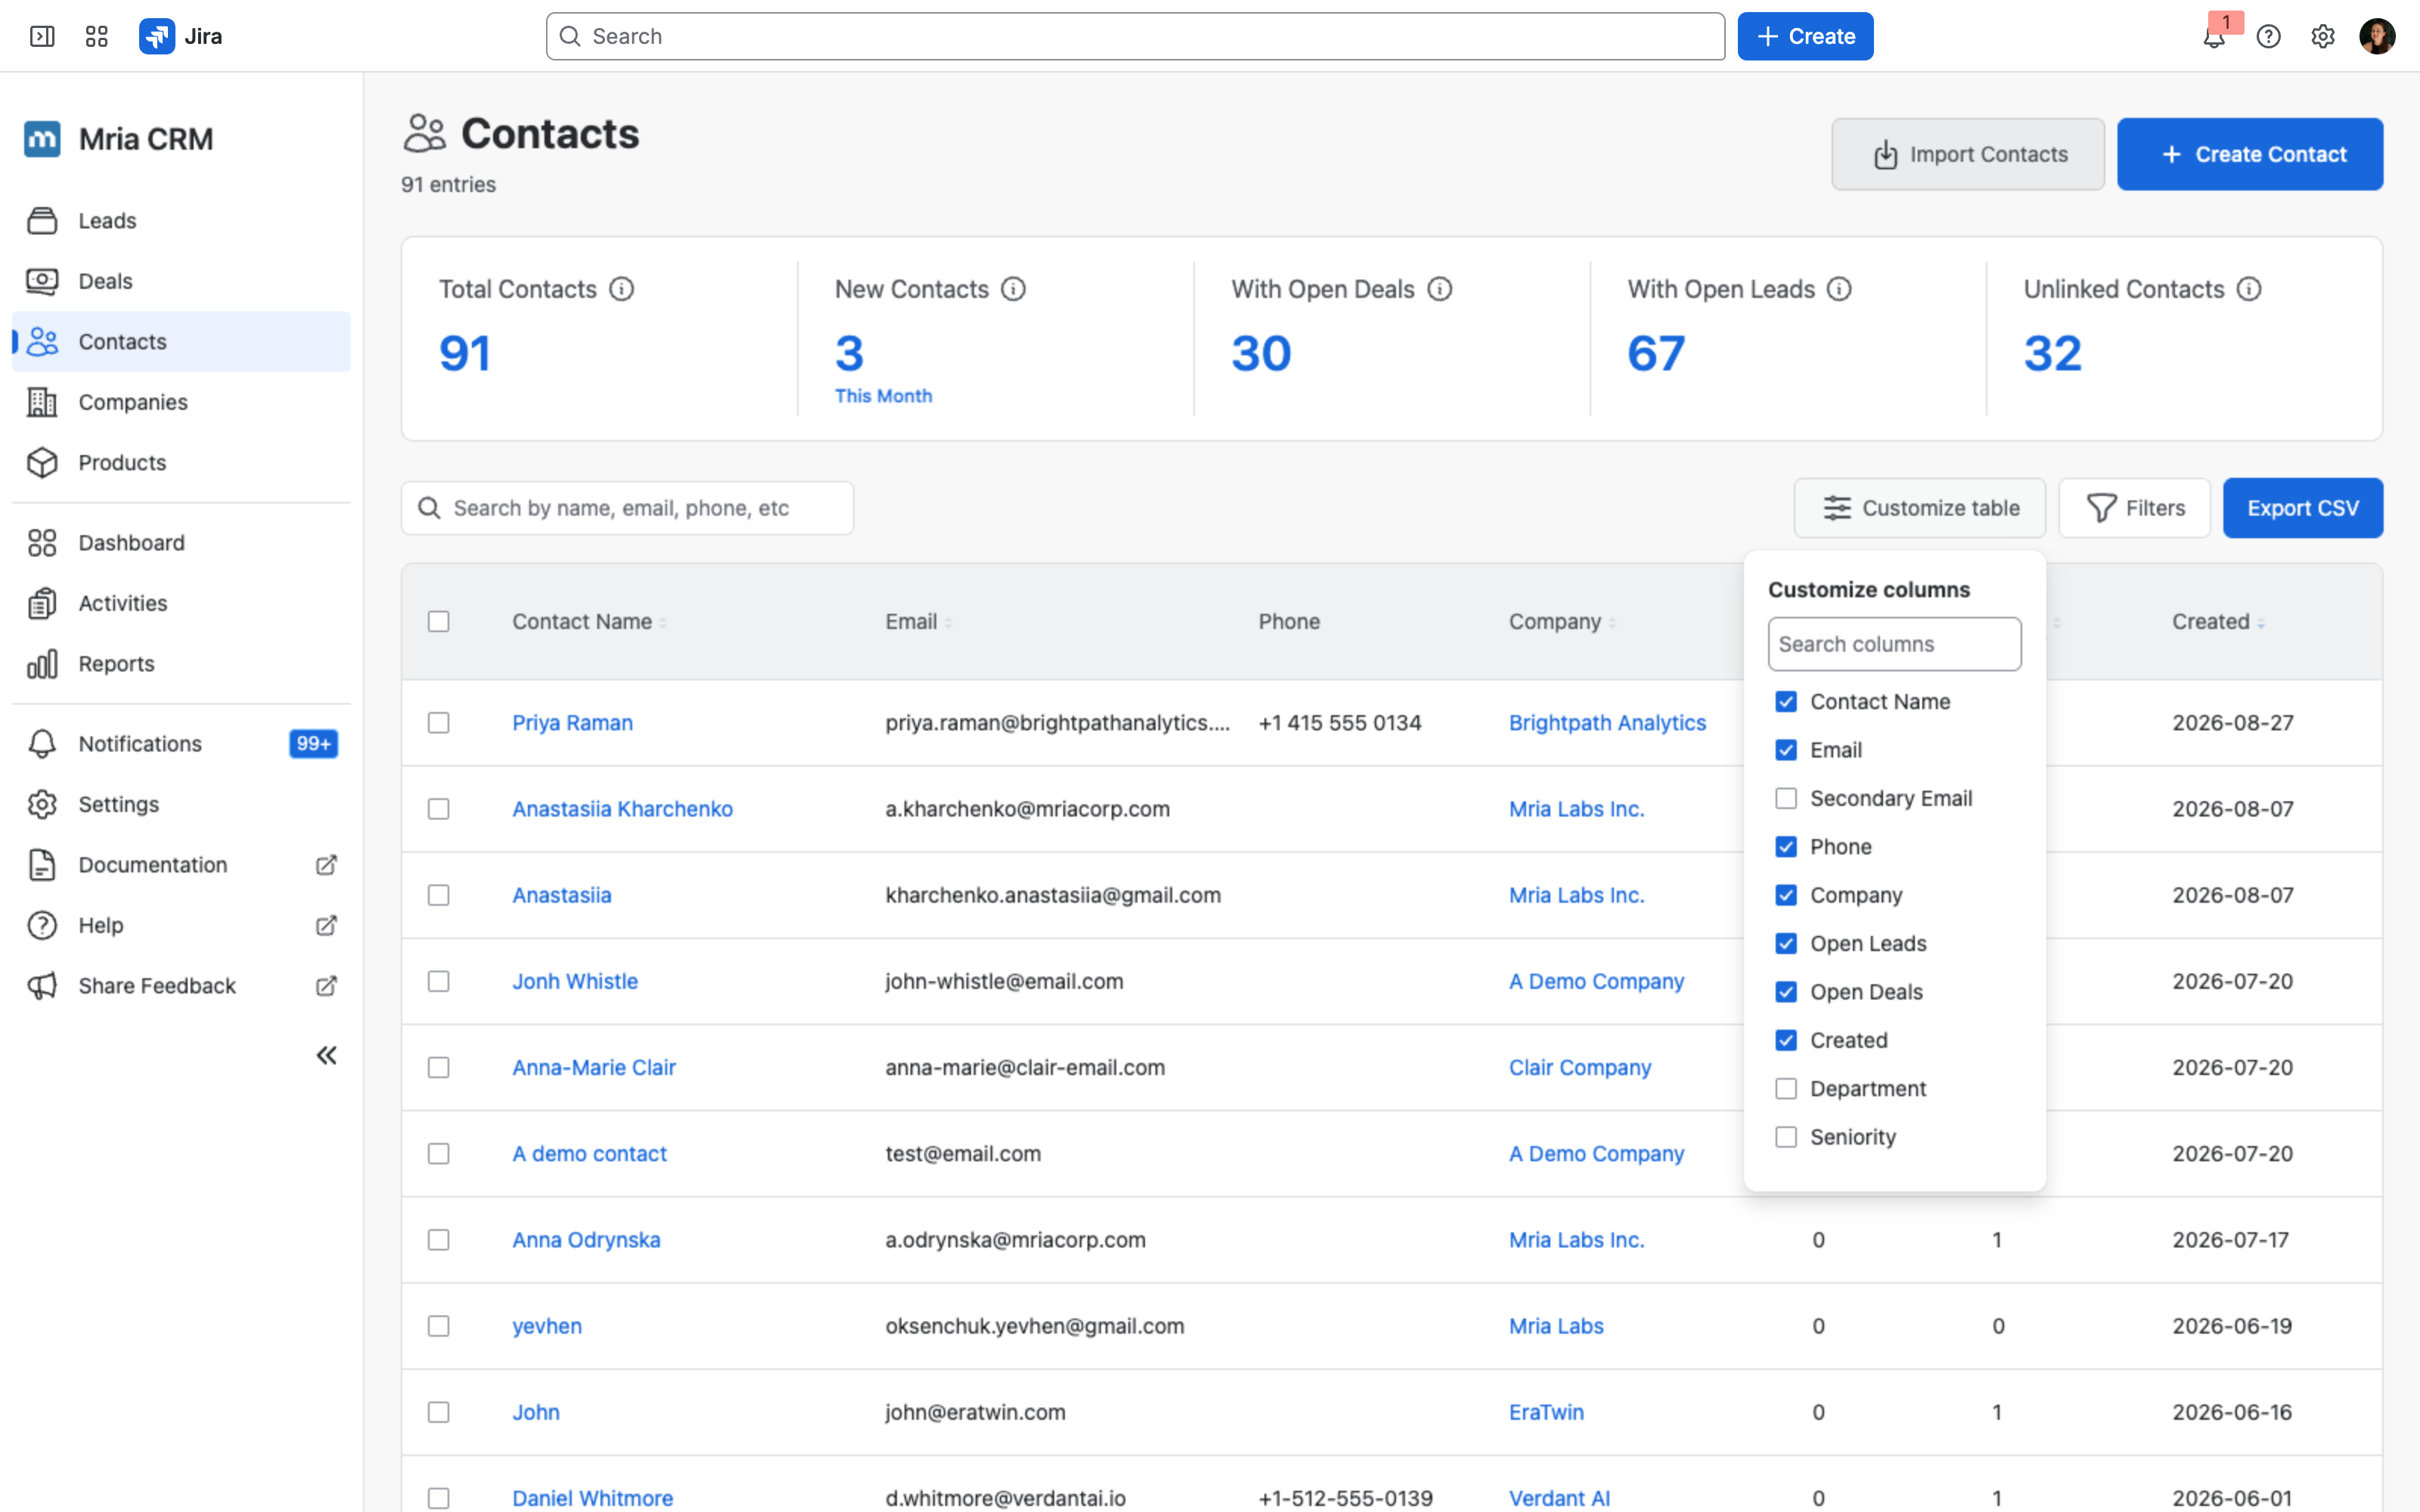
- All Contacts are shown in a table view with key details:
- Name
- Type
- Phone
- Linked Company
- Open Leads
- Open Deals
- Created date
- The top summary shows totals: total contacts, new contacts (this month), contacts with open Deals, contacts with open Leads, and unlinked contacts.
- Export CSV: allows you to export the current list of Contacts (based on applied filters and visible columns) as a
.CSVfile for external use.
2. Creating a Contact #
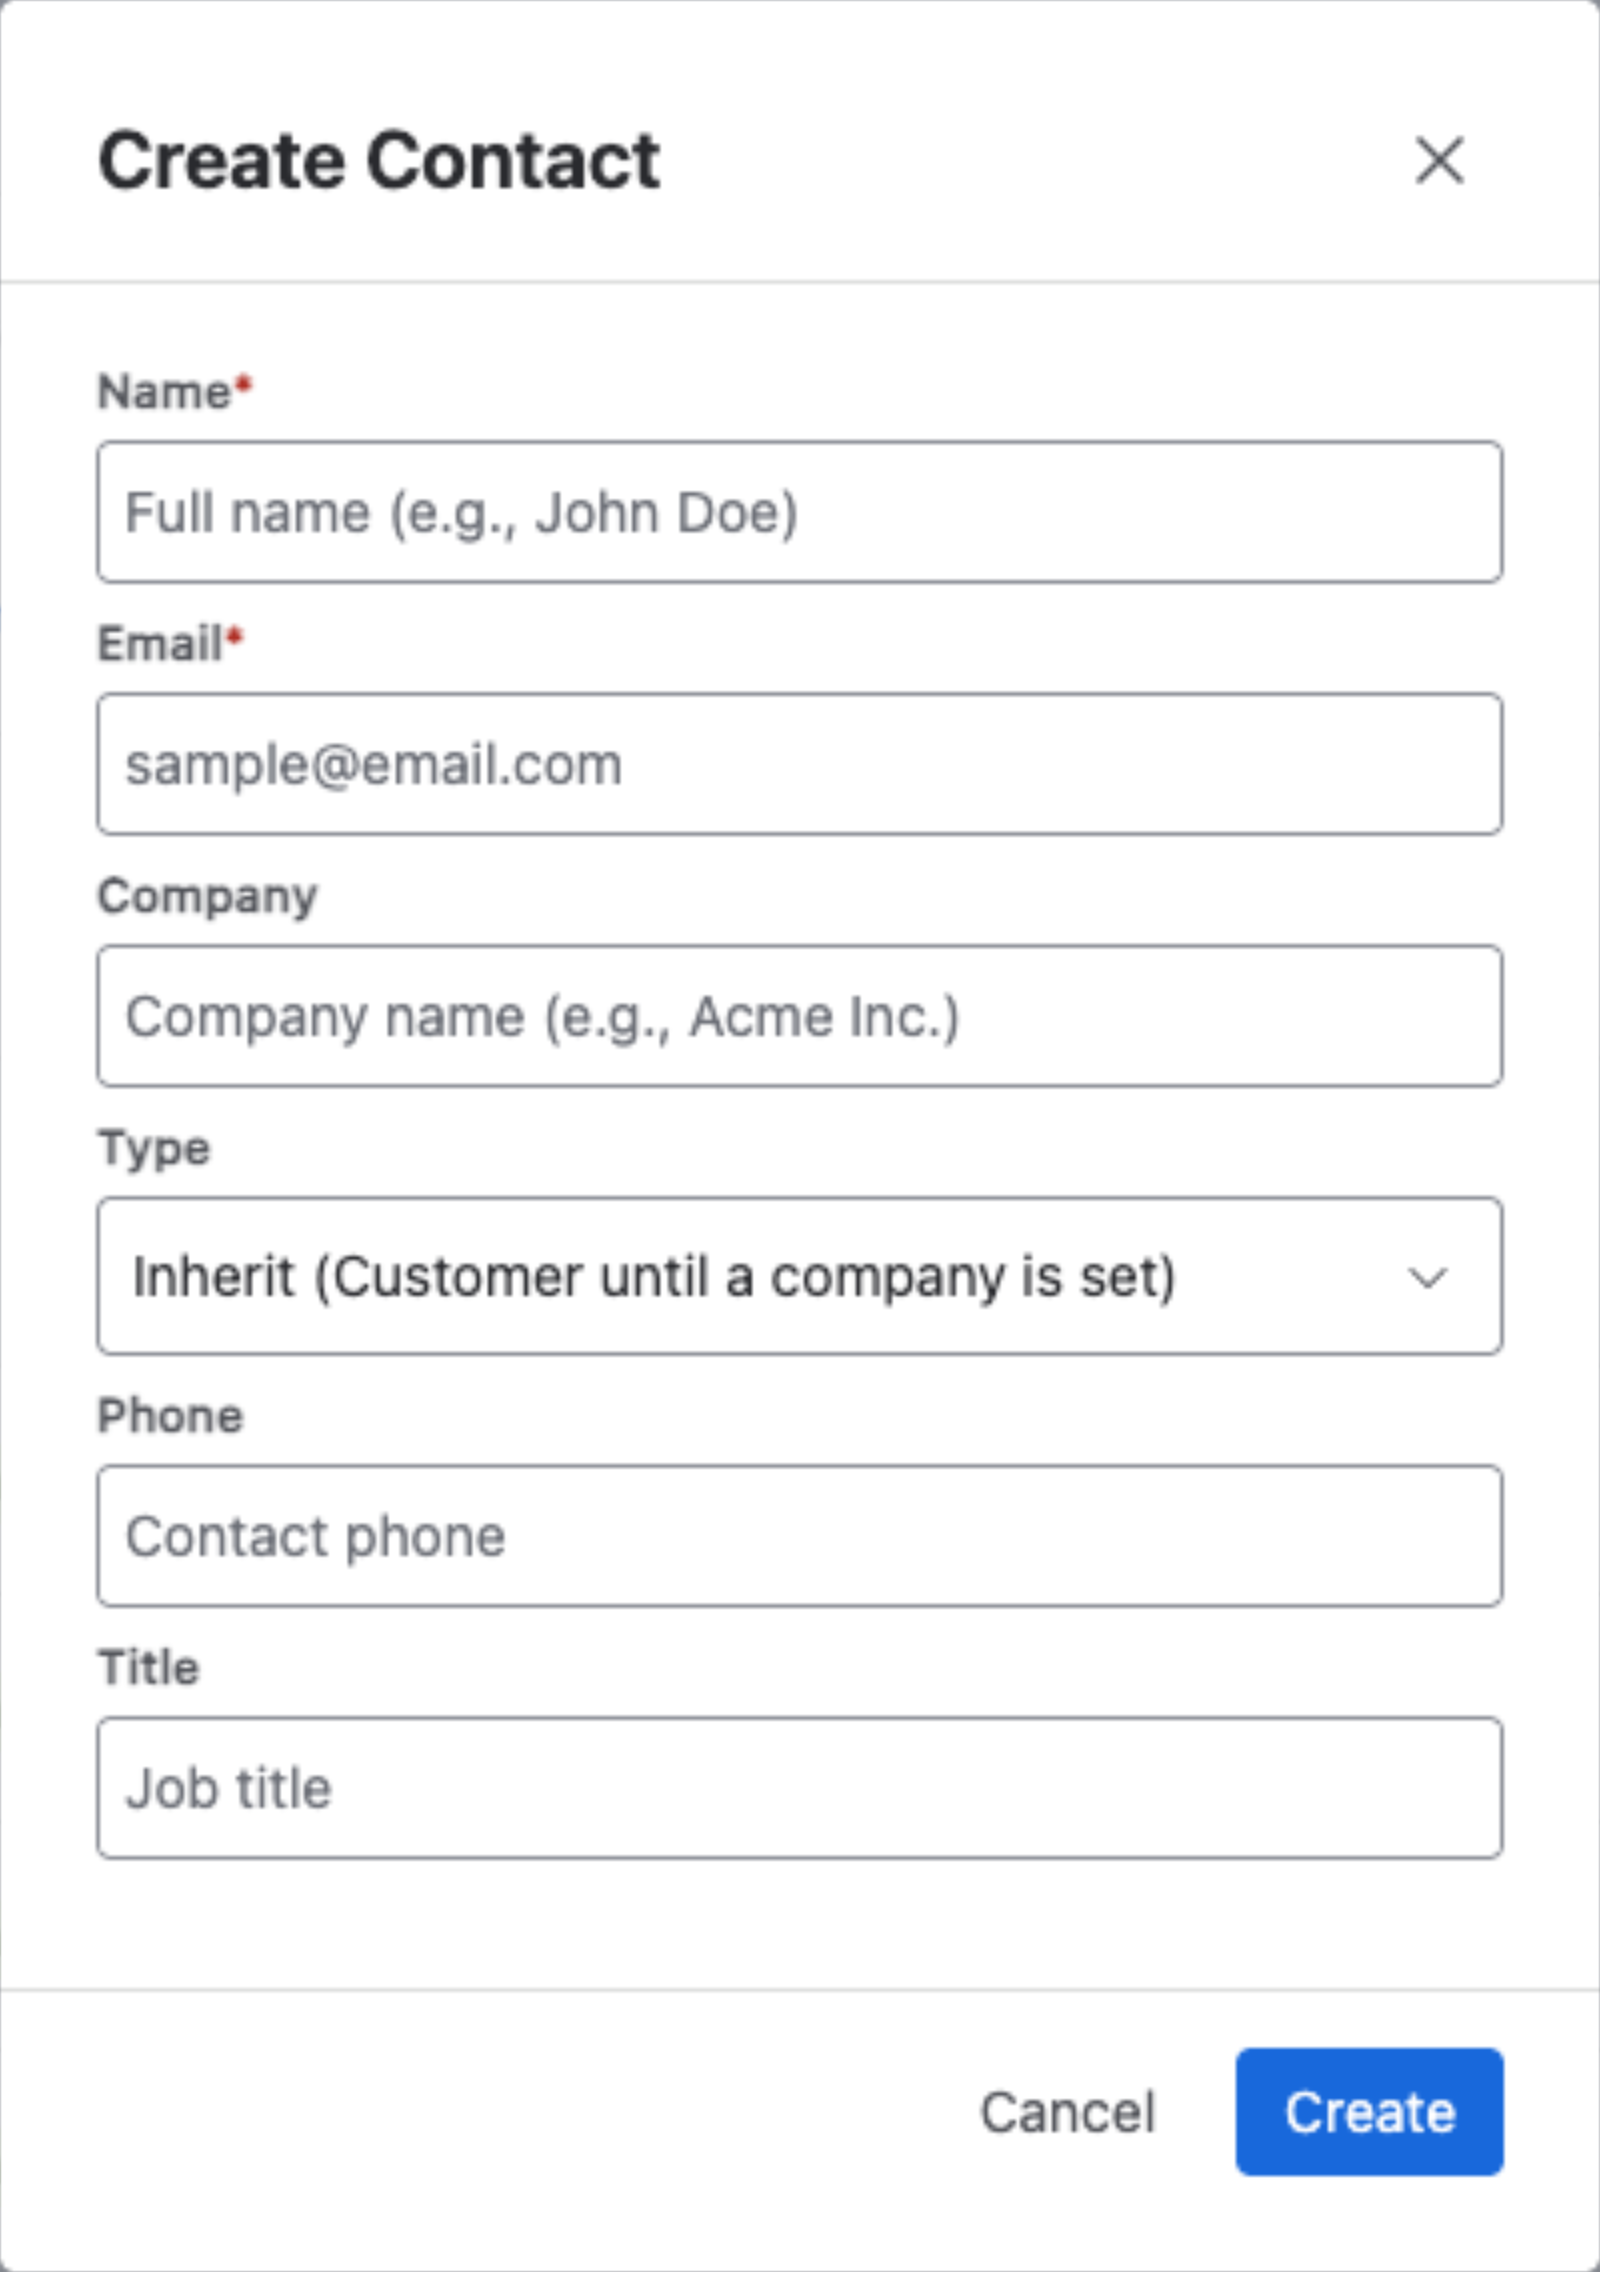
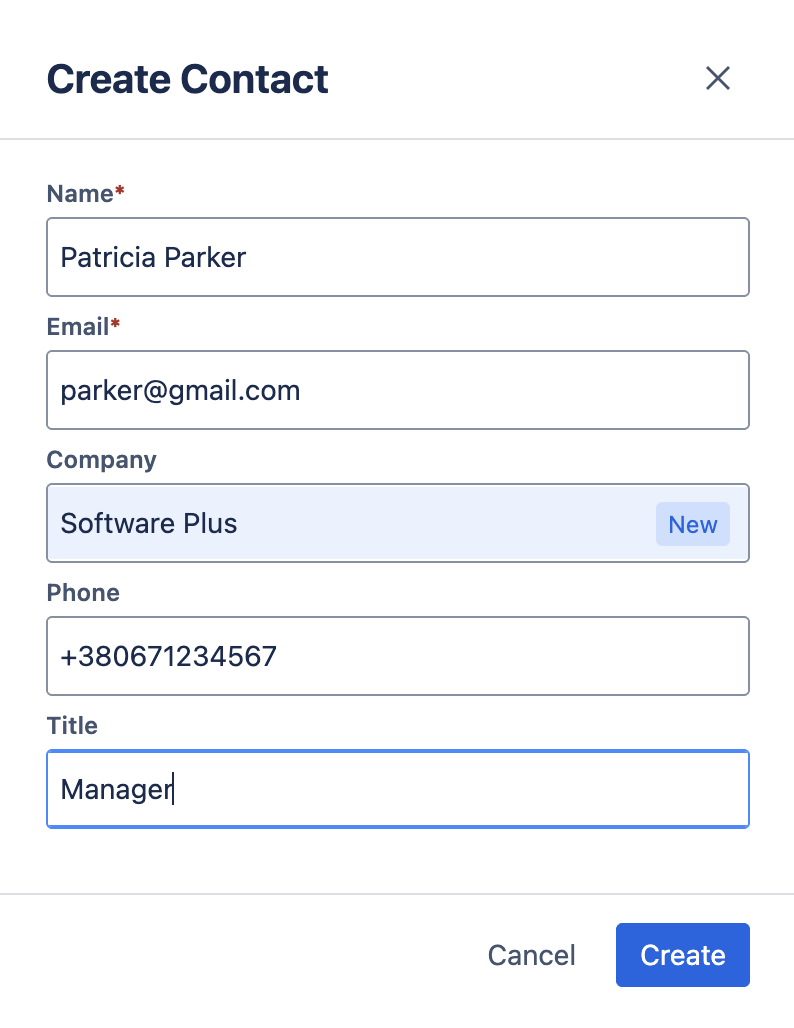
When creating a new Contact, you provide:
- Name (required)
- Email (required, should be unique – no duplicates allowed in CRM)
- Company
- Select an existing Company
- Skip for now (Contact will remain unlinked)
- Or create a new Company directly during Contact creation
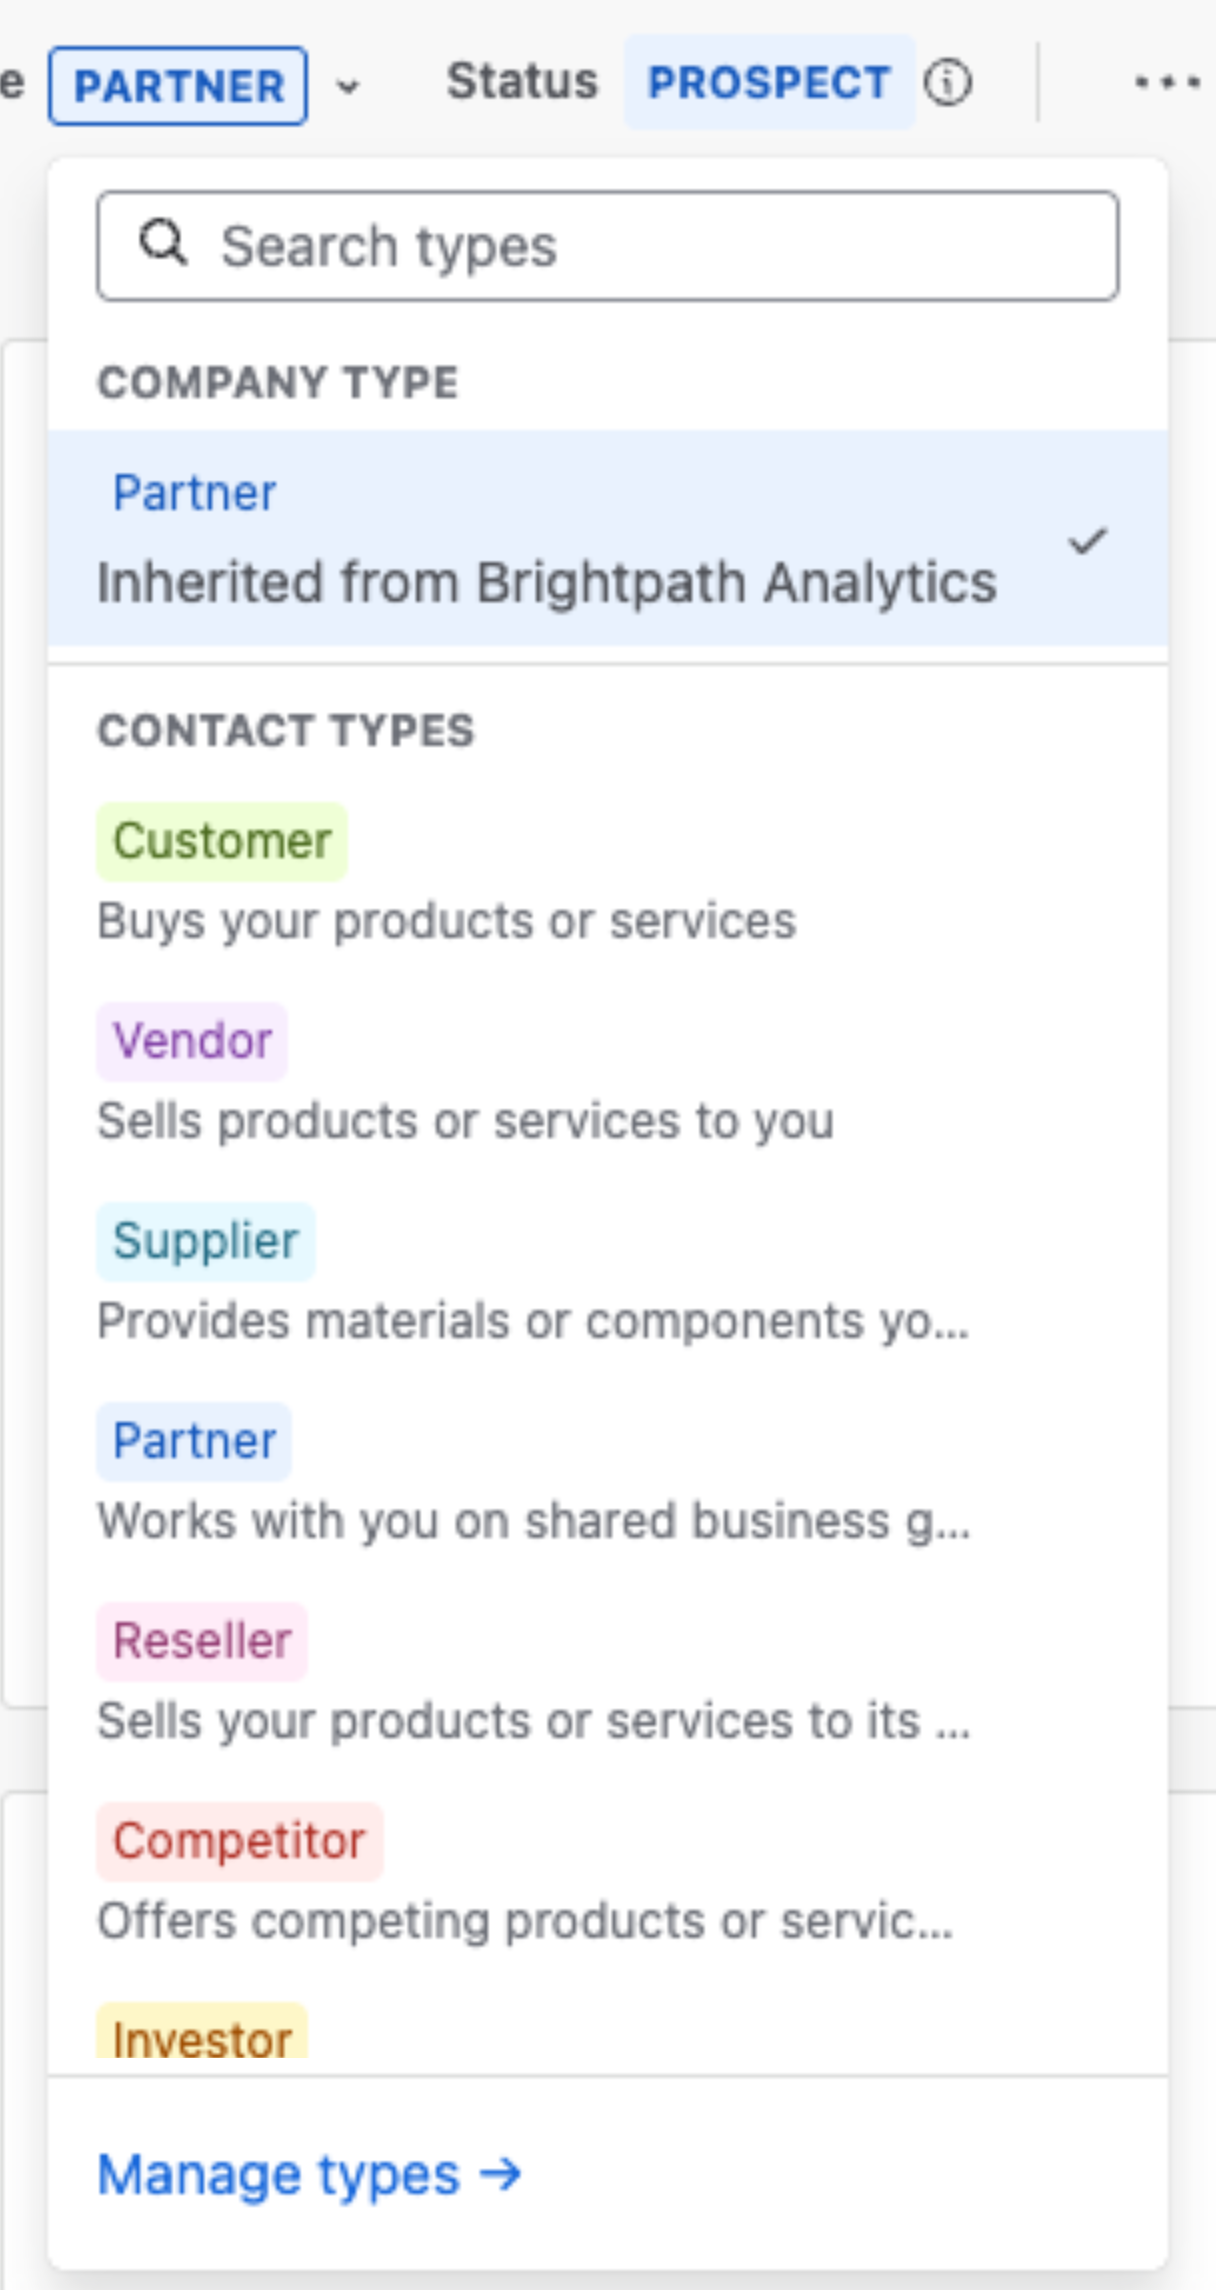
- Type — Inherit by default: the Contact takes its Company’s type, or the default type without a Company. Pick a type to override it. See Company & Contact Types.
- Additional optional details (like Phone and Title) can be added.
2.1. Secondary email #
Alongside the main Email, a Contact can hold a secondary email address. Use it when the same person reaches you from more than one mailbox — a work address and a personal one, an old address they still send from, or a shared team alias.
- The secondary email is optional. The main Email remains the required, unique identifier for the Contact.
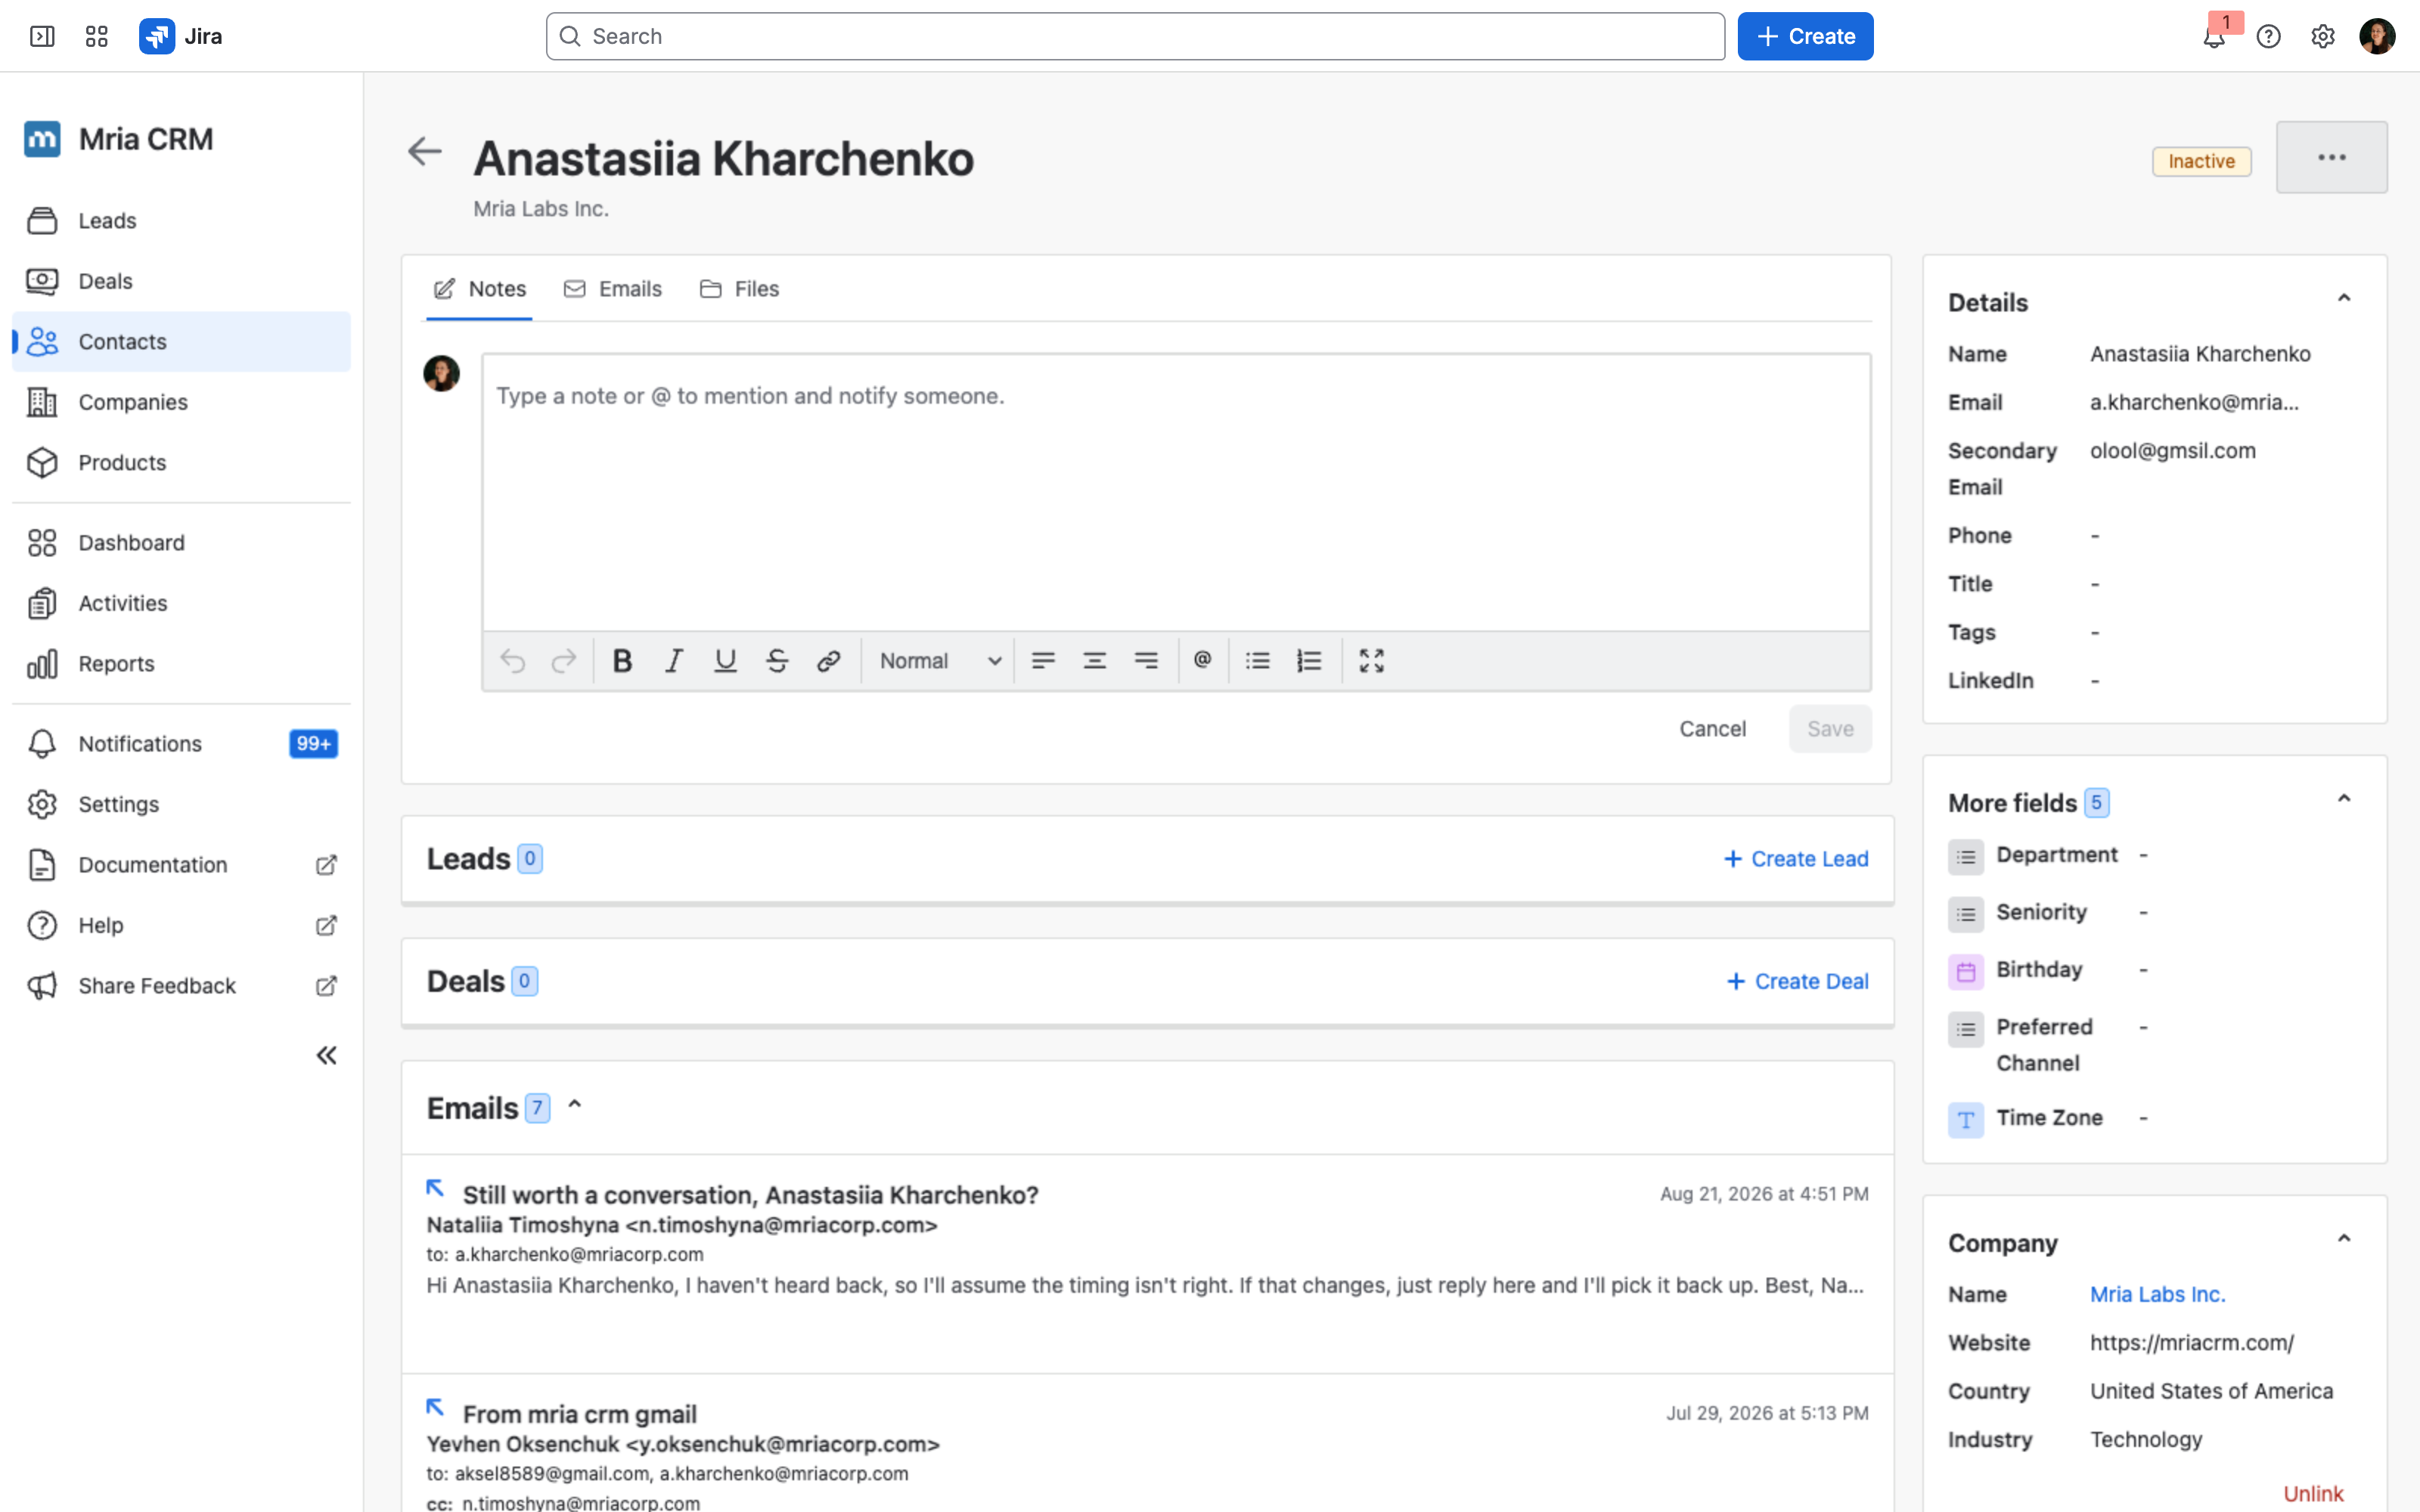
- Add or change it from the Contact full view — it appears as Secondary Email in the Details panel. Click the field to edit it inline, the same as any other Contact detail.
Adding a second address to an existing Contact is usually better than creating a duplicate record: the Contact keeps its full history of linked Leads, Deals, and Products in one place.
3. Contact Full View #
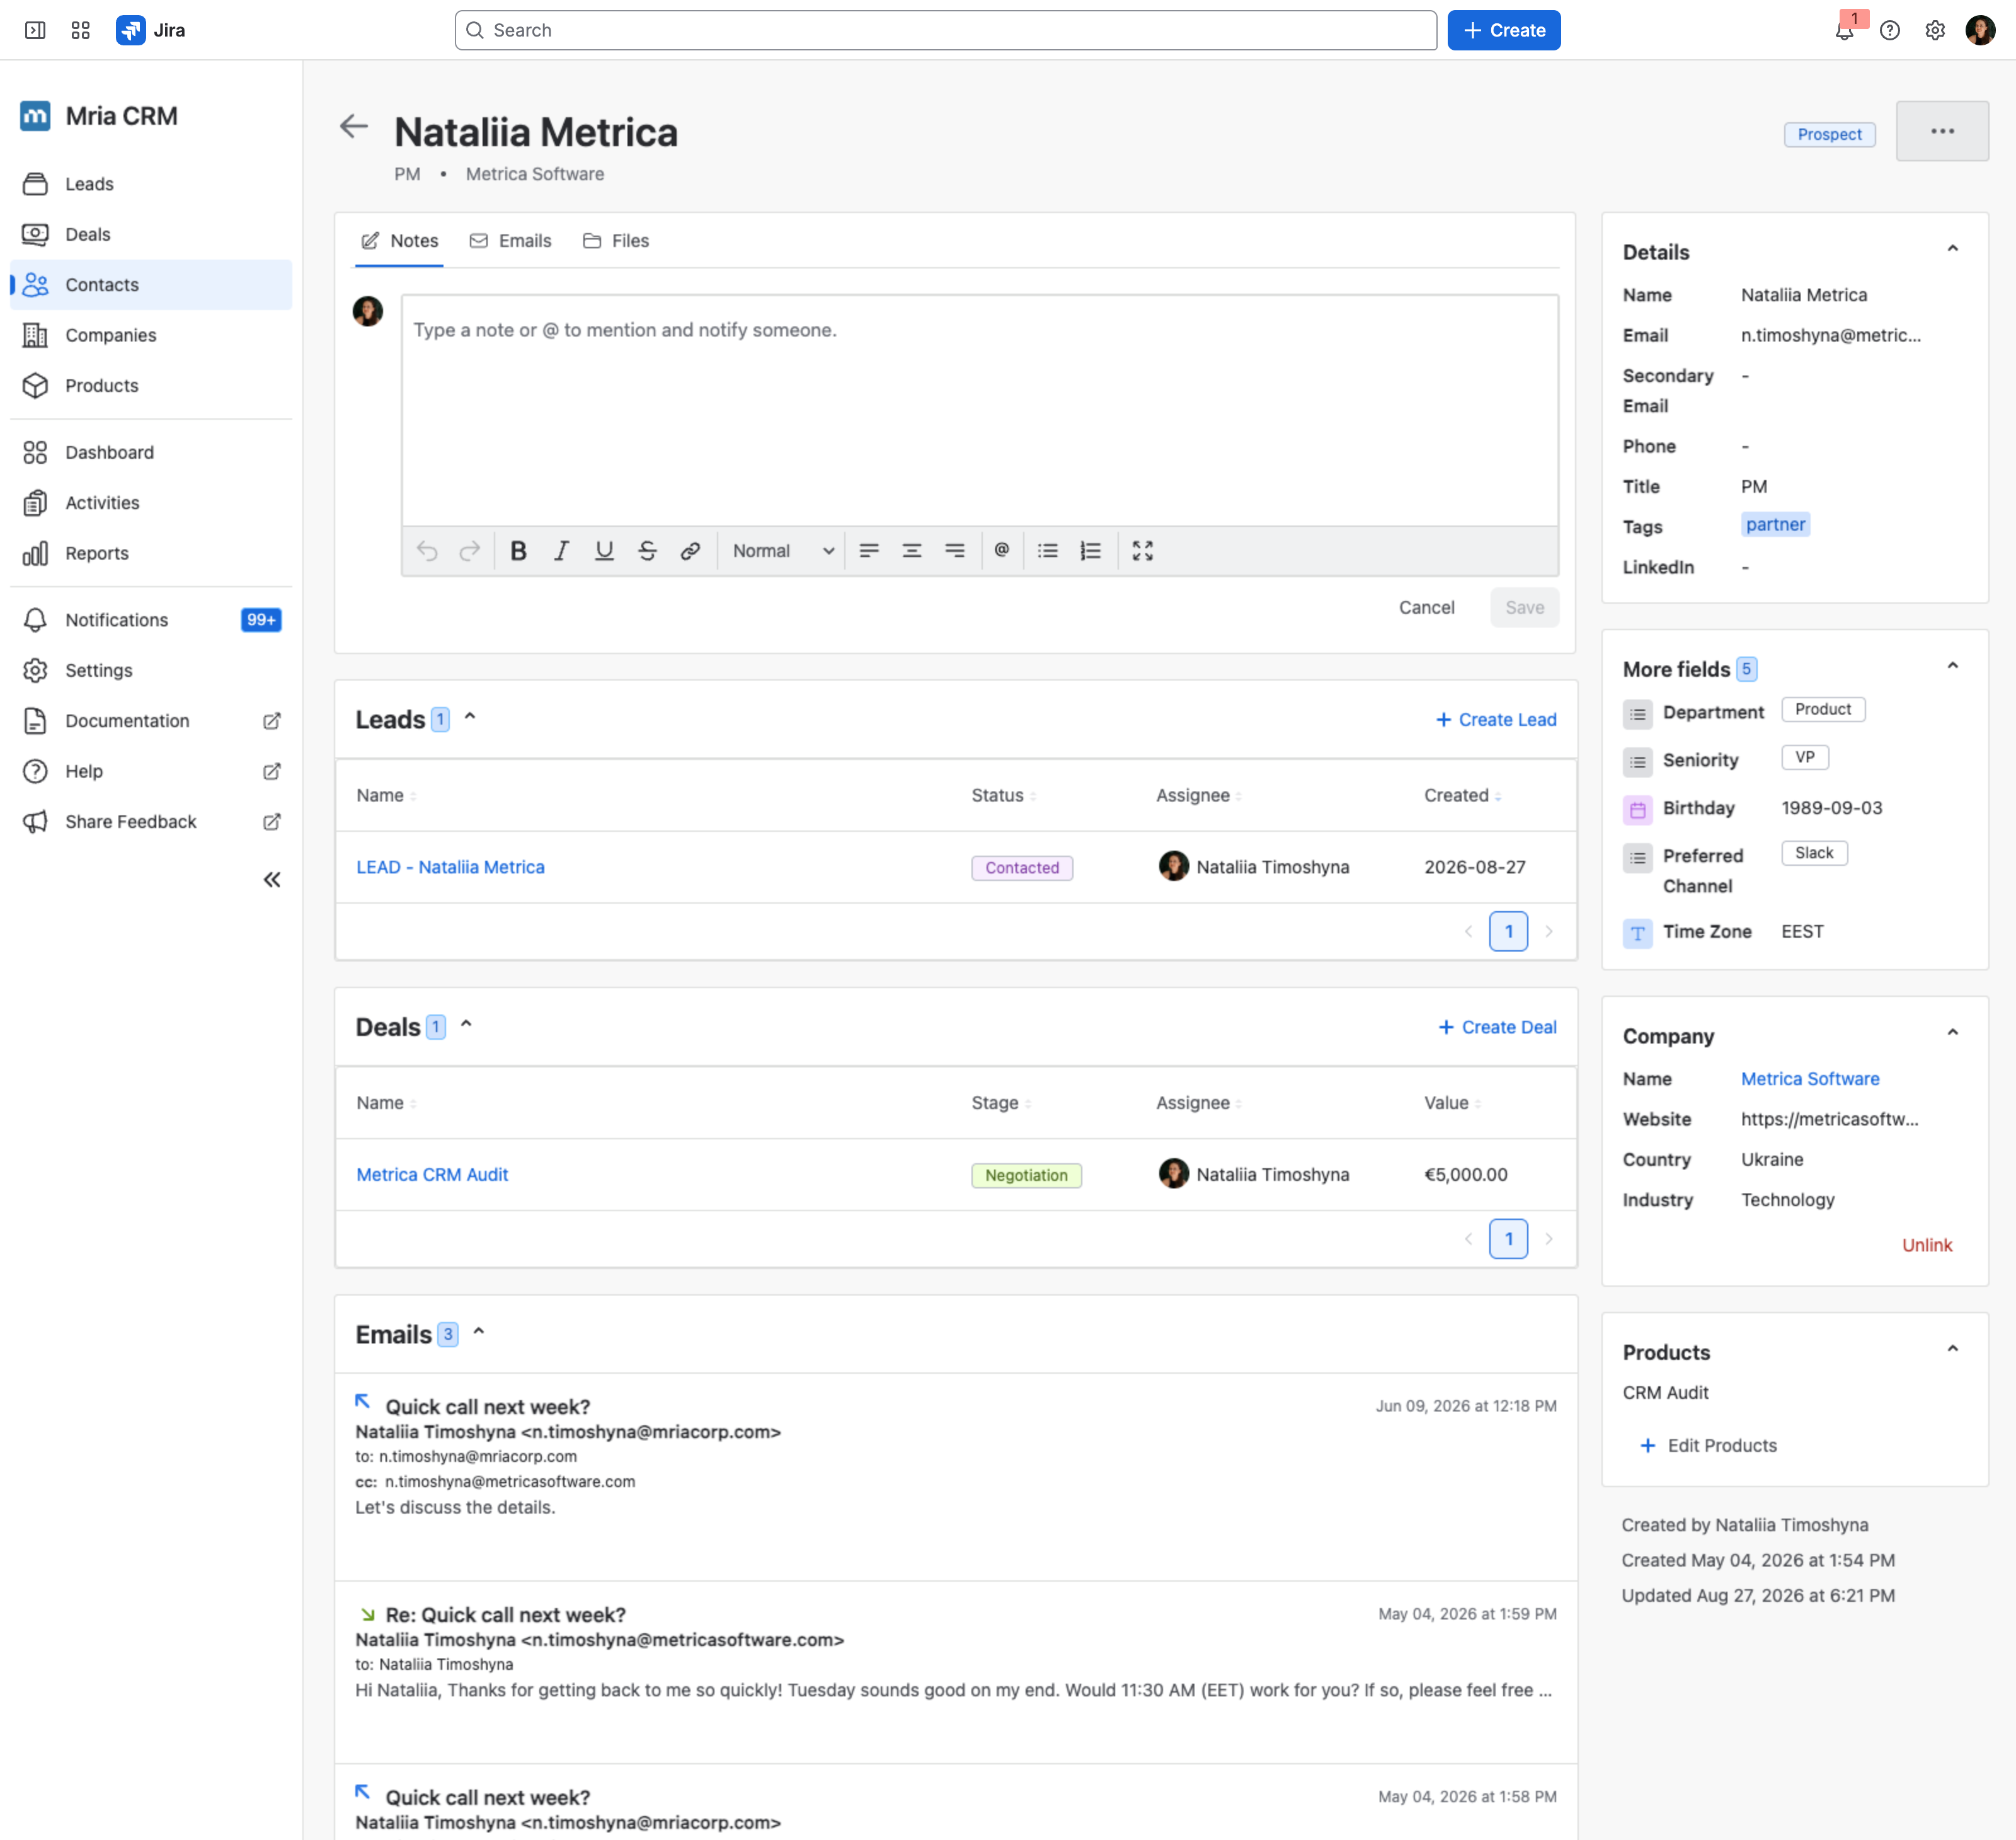
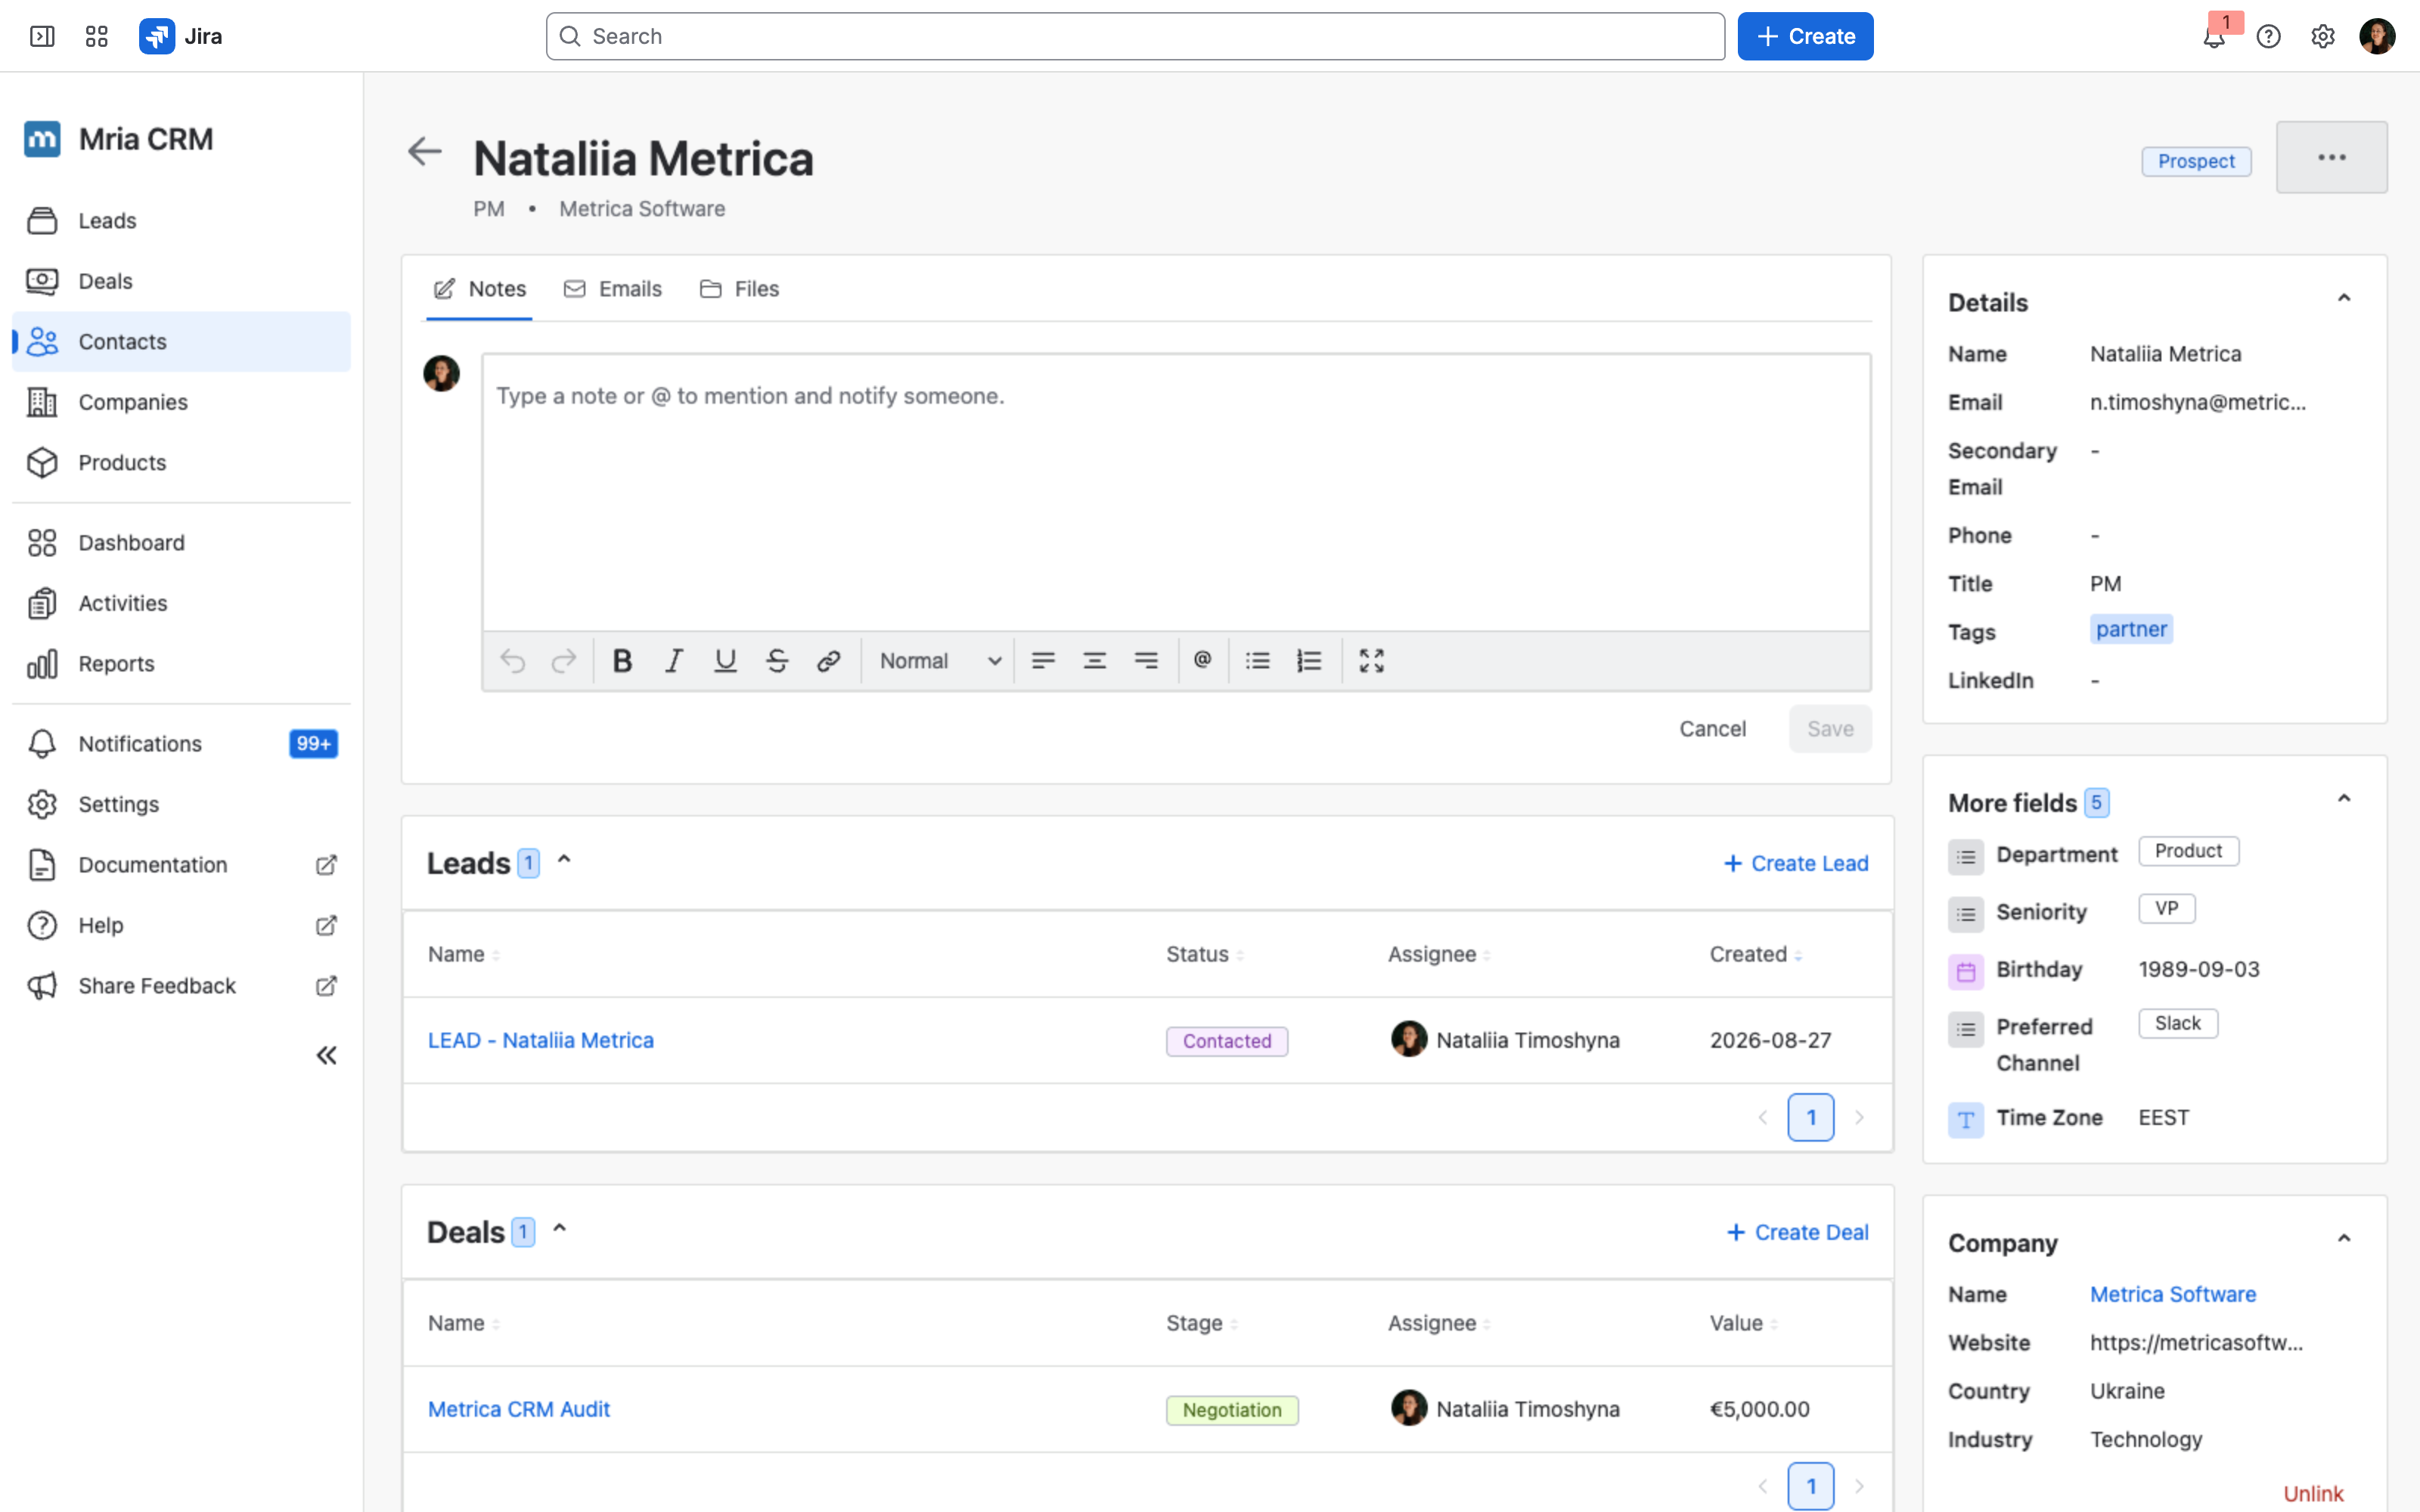
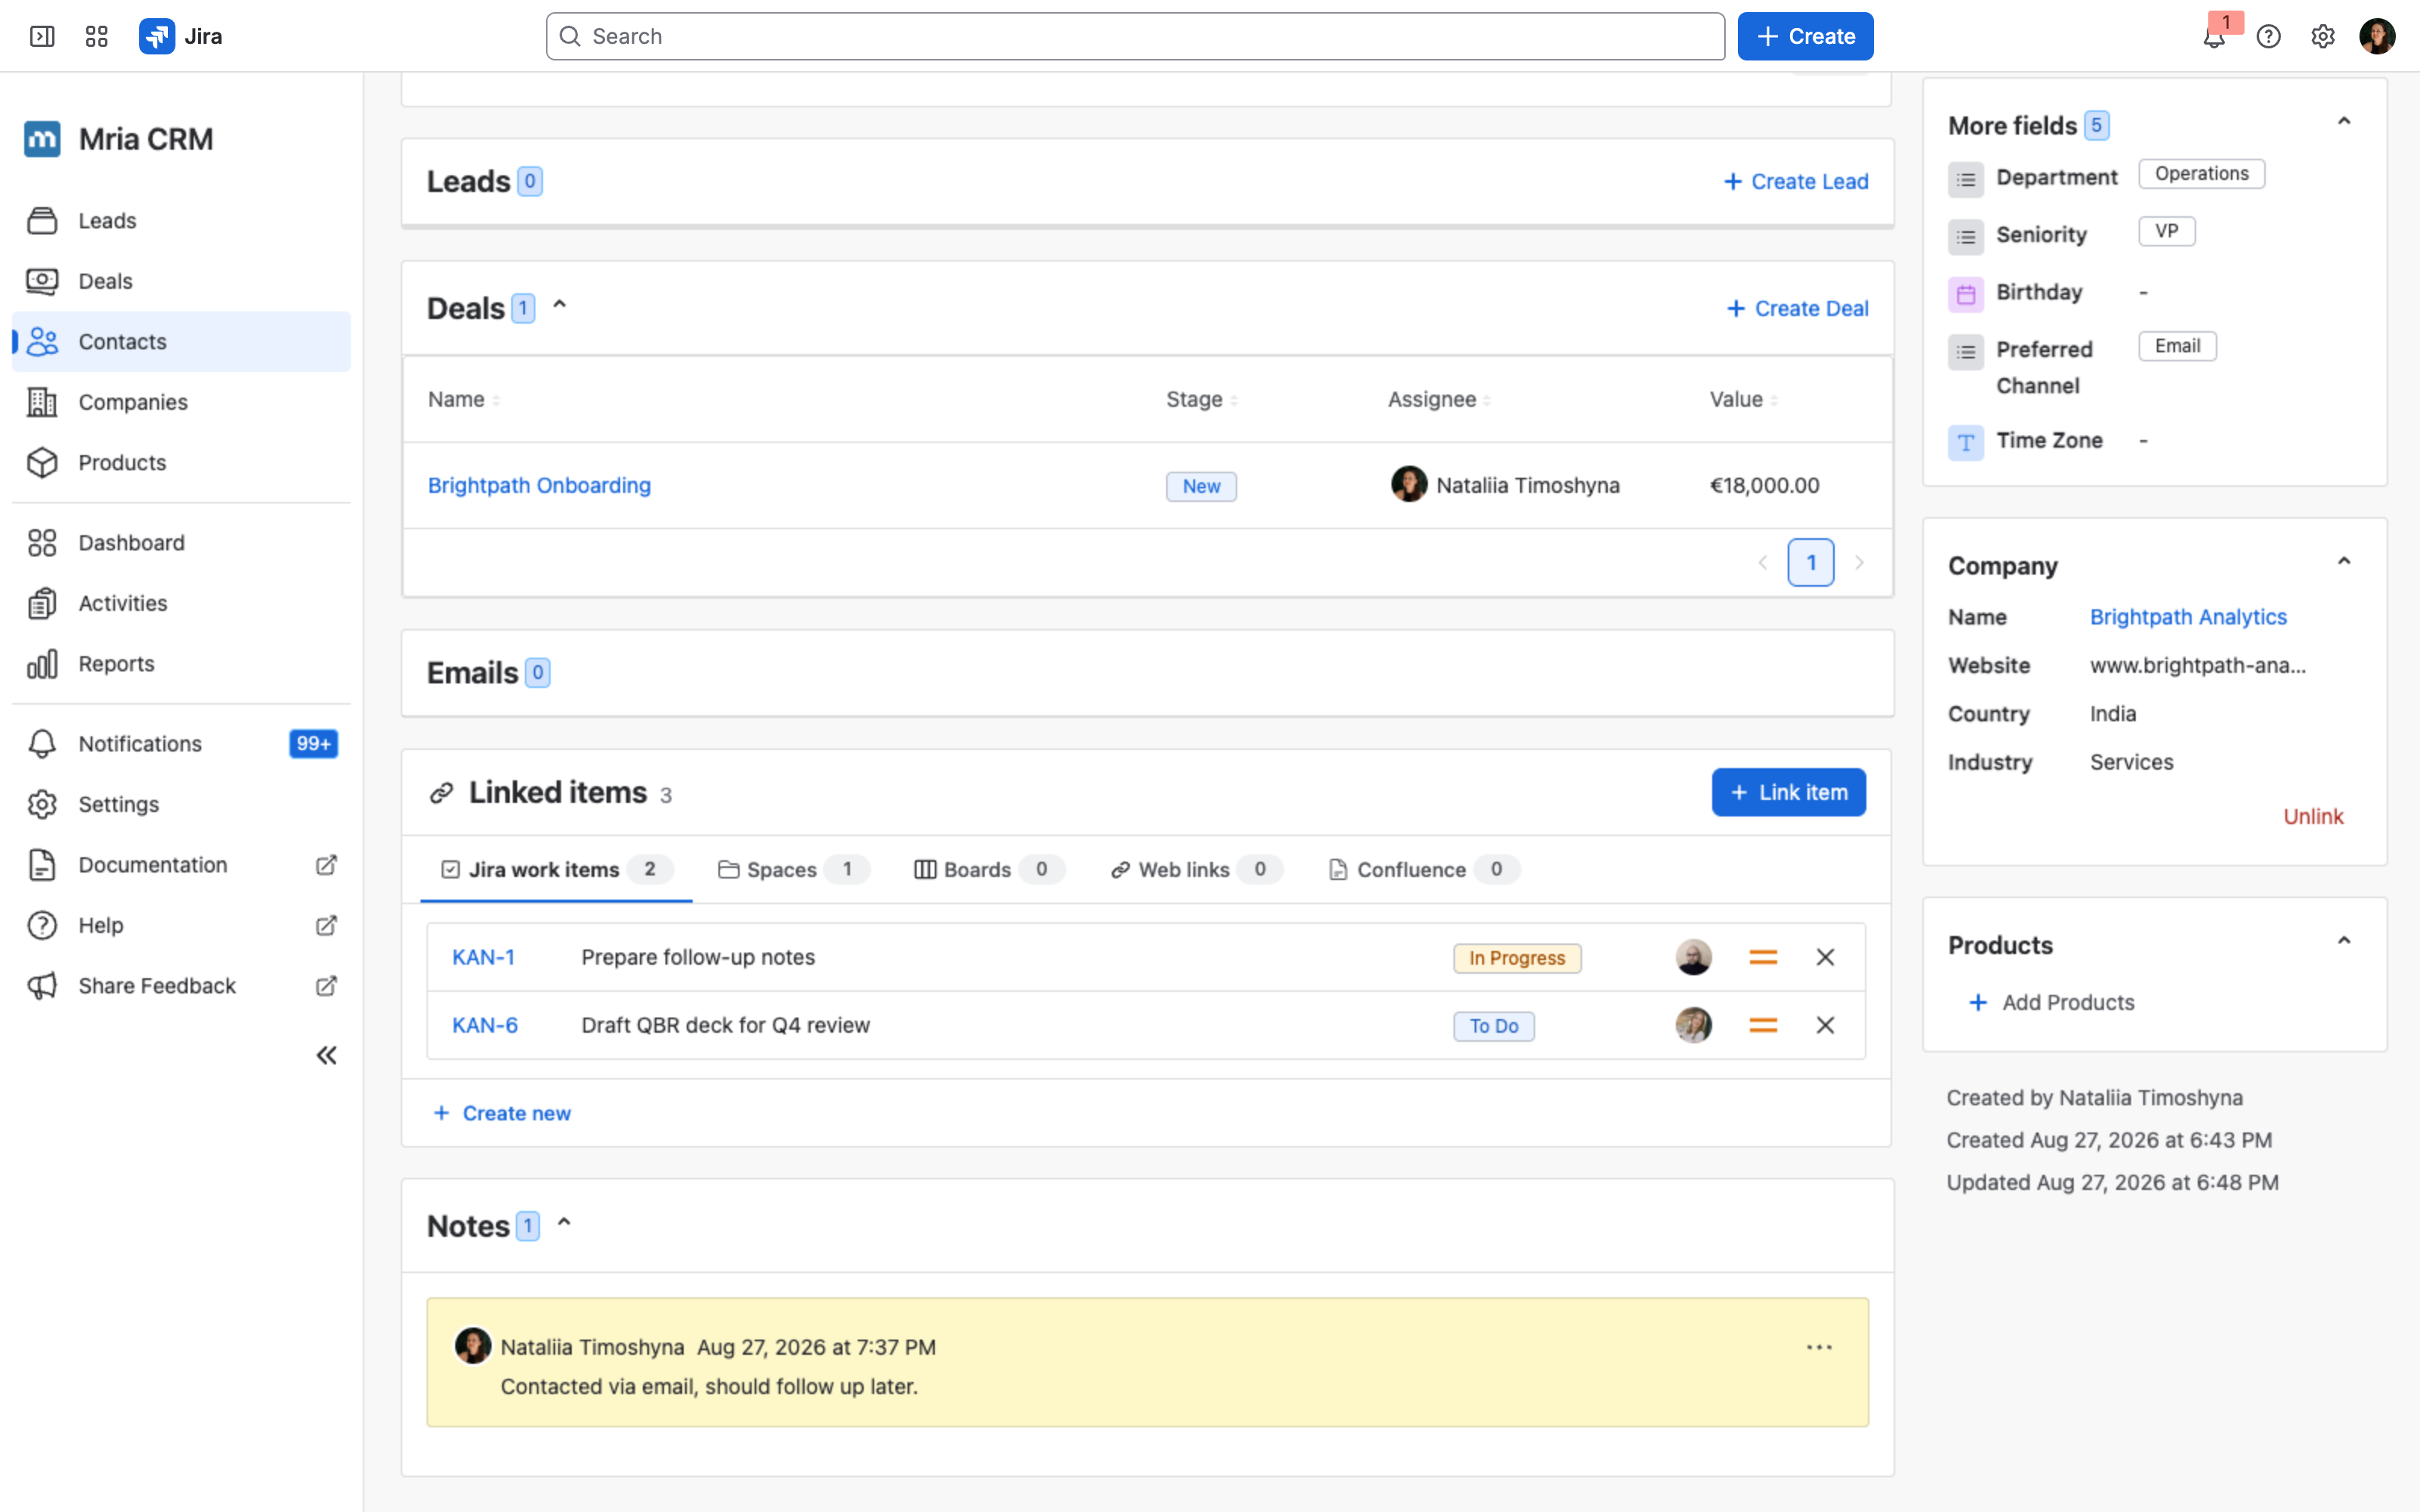
The Contact full view has a Notes / Emails / Meetings / Tasks / Files tab strip at the top of the main column, with linked records stacked below and a Details panel on the right.
In the Contact full view, you can:
- See linked Leads, Deals, and Products.
- See and change the Contact’s Type in the header, next to its Status. The picker shows whether the type is inherited from the Company.
- View and edit Contact details (Name, Email, Secondary Email, Phone, Title, Tags, LinkedIn, etc.).
- View linked Company details.
- Add Notes, attach Files, send or read Emails, and book Meetings and Tasks against the Contact.
Each Contact always shows its relationship to:
- Leads (where they’re involved)
- Deals (associated opportunities)
- Products (items or services the Contact is linked to)
- Company (the organization they belong to)
- Jira work items
📌 You can link Products to a Contact from its full view. Linked Products show on the Contact, and the Contact appears under that Product’s Linked Contacts tab — see Products.
Meetings, Tasks and Timeline #
A Contact is not only a record to read — it is something you work on. Meetings and Tasks can be booked against it directly, the same way they can on a Lead or a Deal.
Adding a Meeting #
Open the Meetings tab. The composer opens ready to use: today’s date, a start time, and an end time exactly one hour later. Move Time From and Time To follows it, keeping the hour, so a straightforward meeting needs nothing but a title and an assignee.
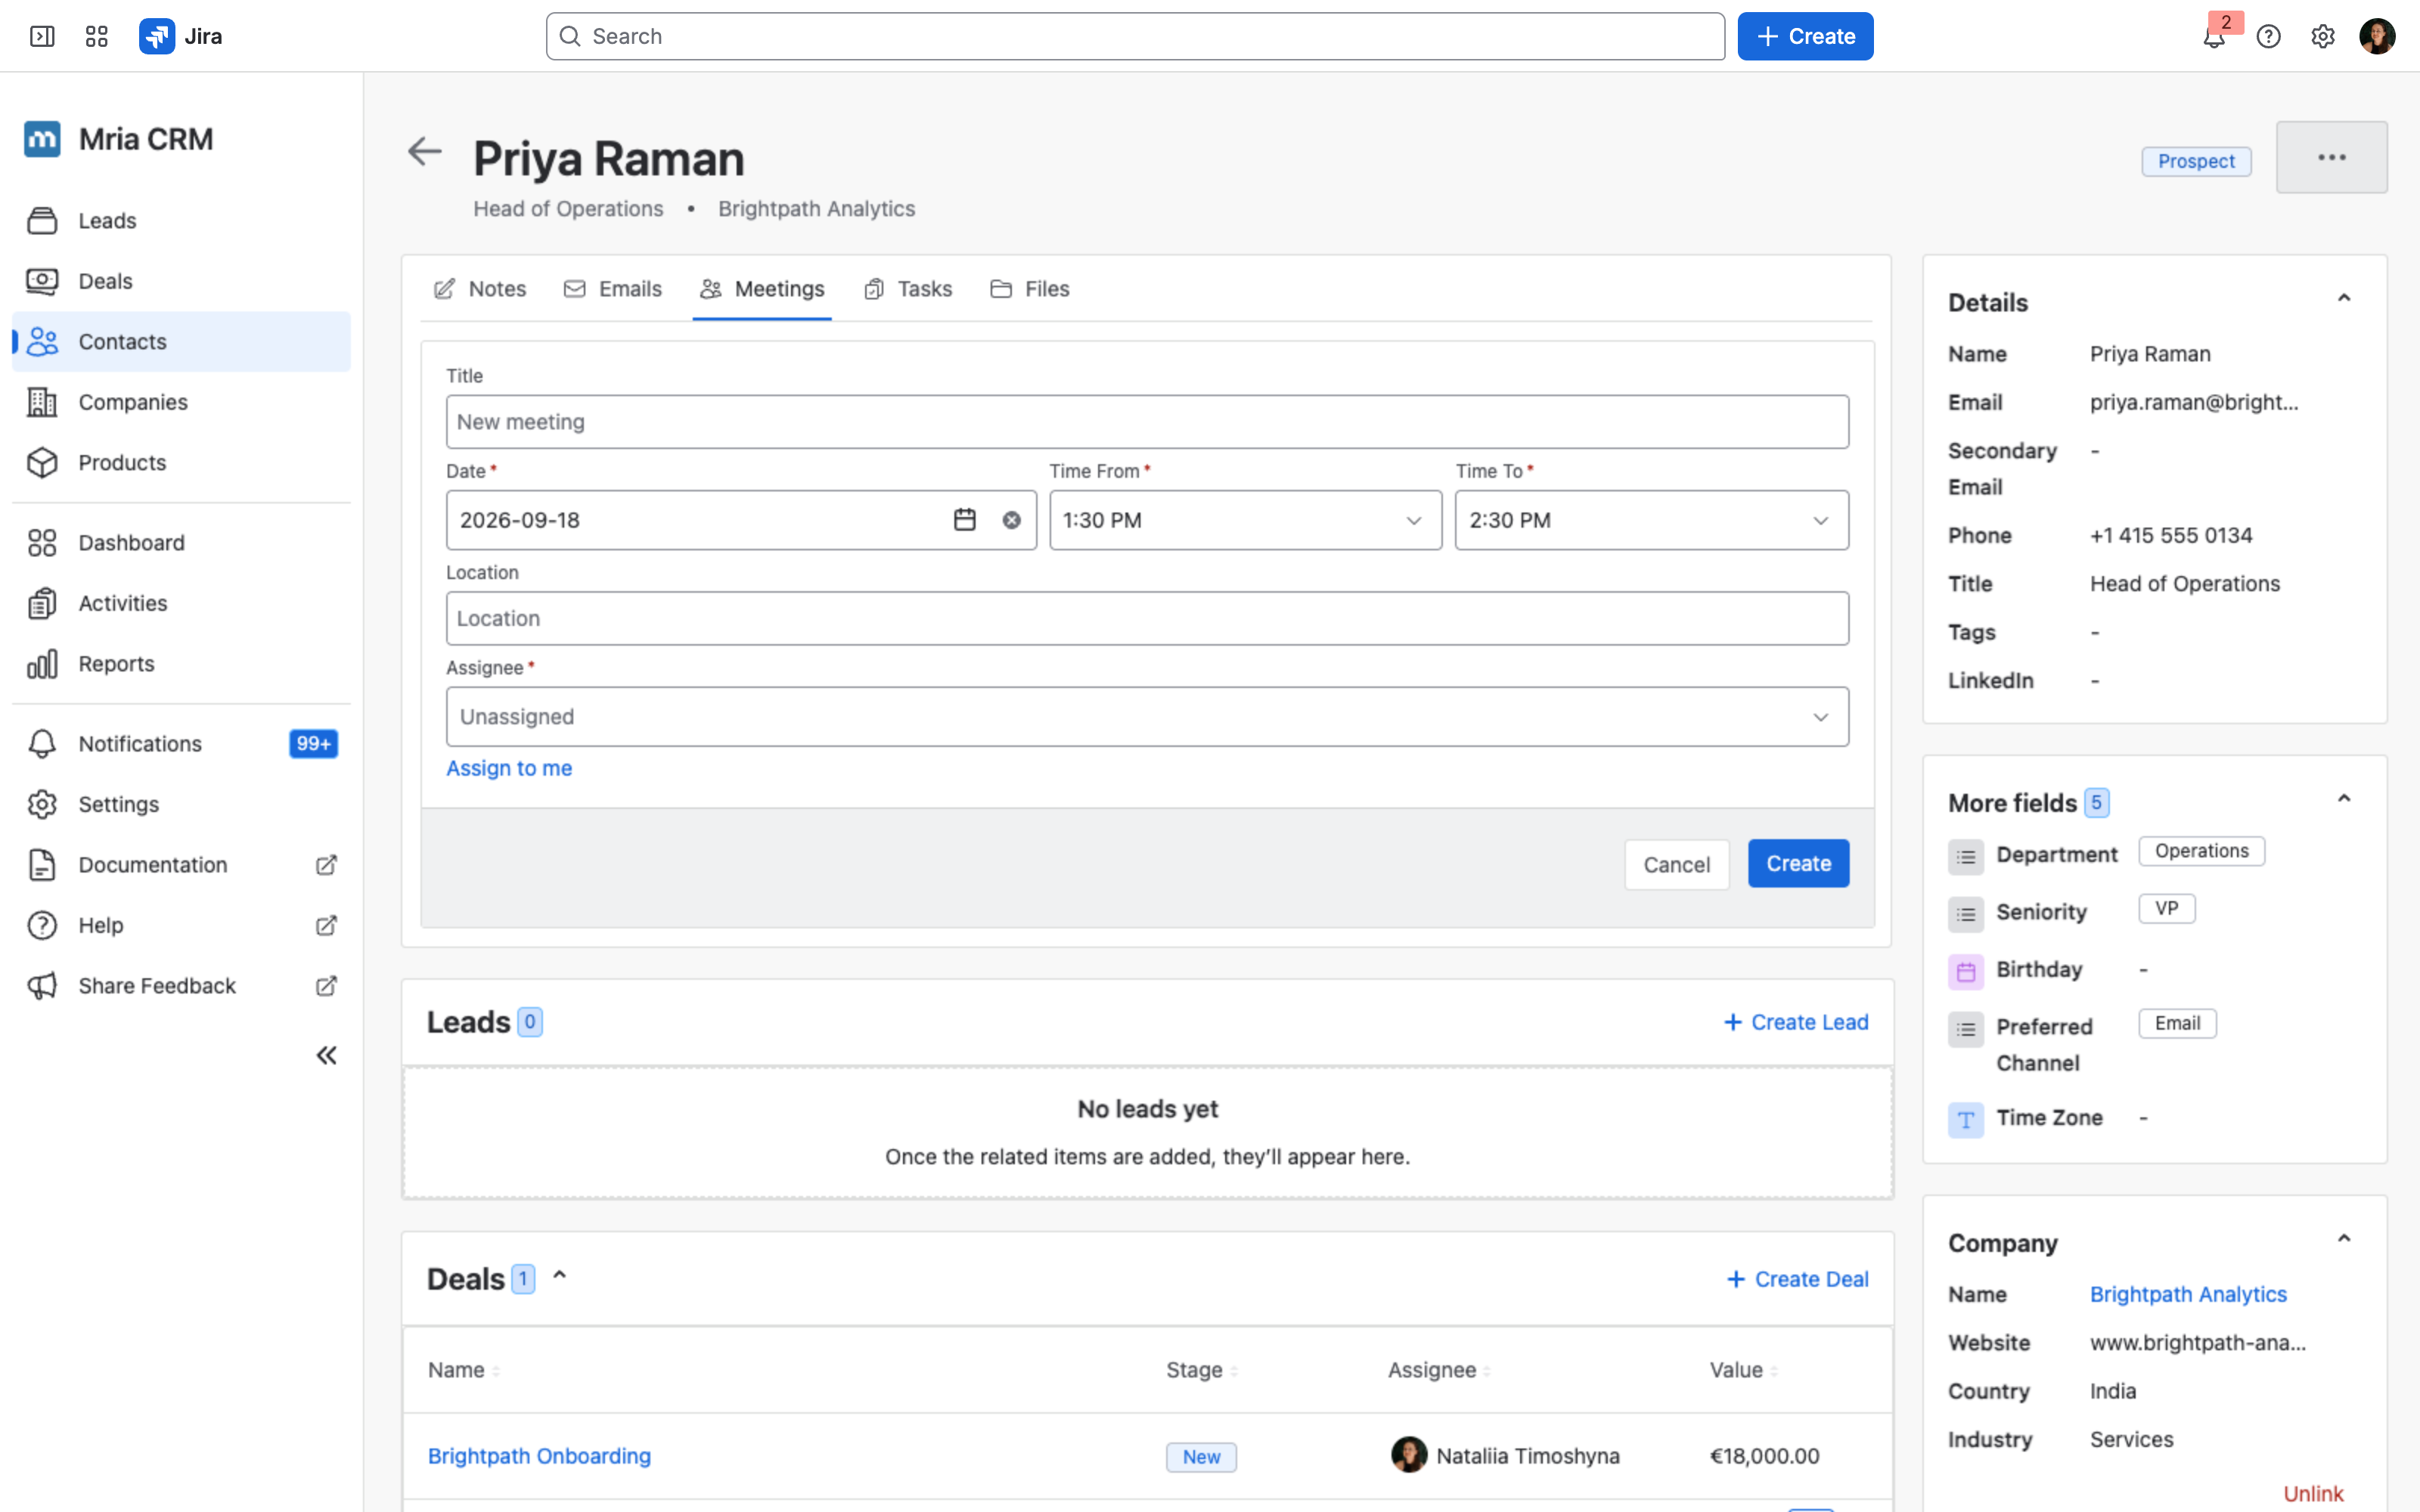
- Assignee is required — Assign to me is the quickest way to set it. (A Task does not require one.)
- Title and Location are optional. Location is where a video call link belongs.
- Attendees — Mria CRM users, Contacts, or any email address. The assignee is added automatically, badged Organiser. Nothing is sent to anyone: attendees are recorded on the meeting, not invited.
- Notes — an agenda before, the outcome after. The same editor as a Note, @mentions included.
- If something required is still missing when you press Create, the form says so against the field rather than doing nothing.
Adding a Task #
The Tasks tab works the same way. A task needs a Title and a Due Date; Status starts at To Do and the assignee is optional, so a task can be captured first and handed to someone later.
Where they show up #
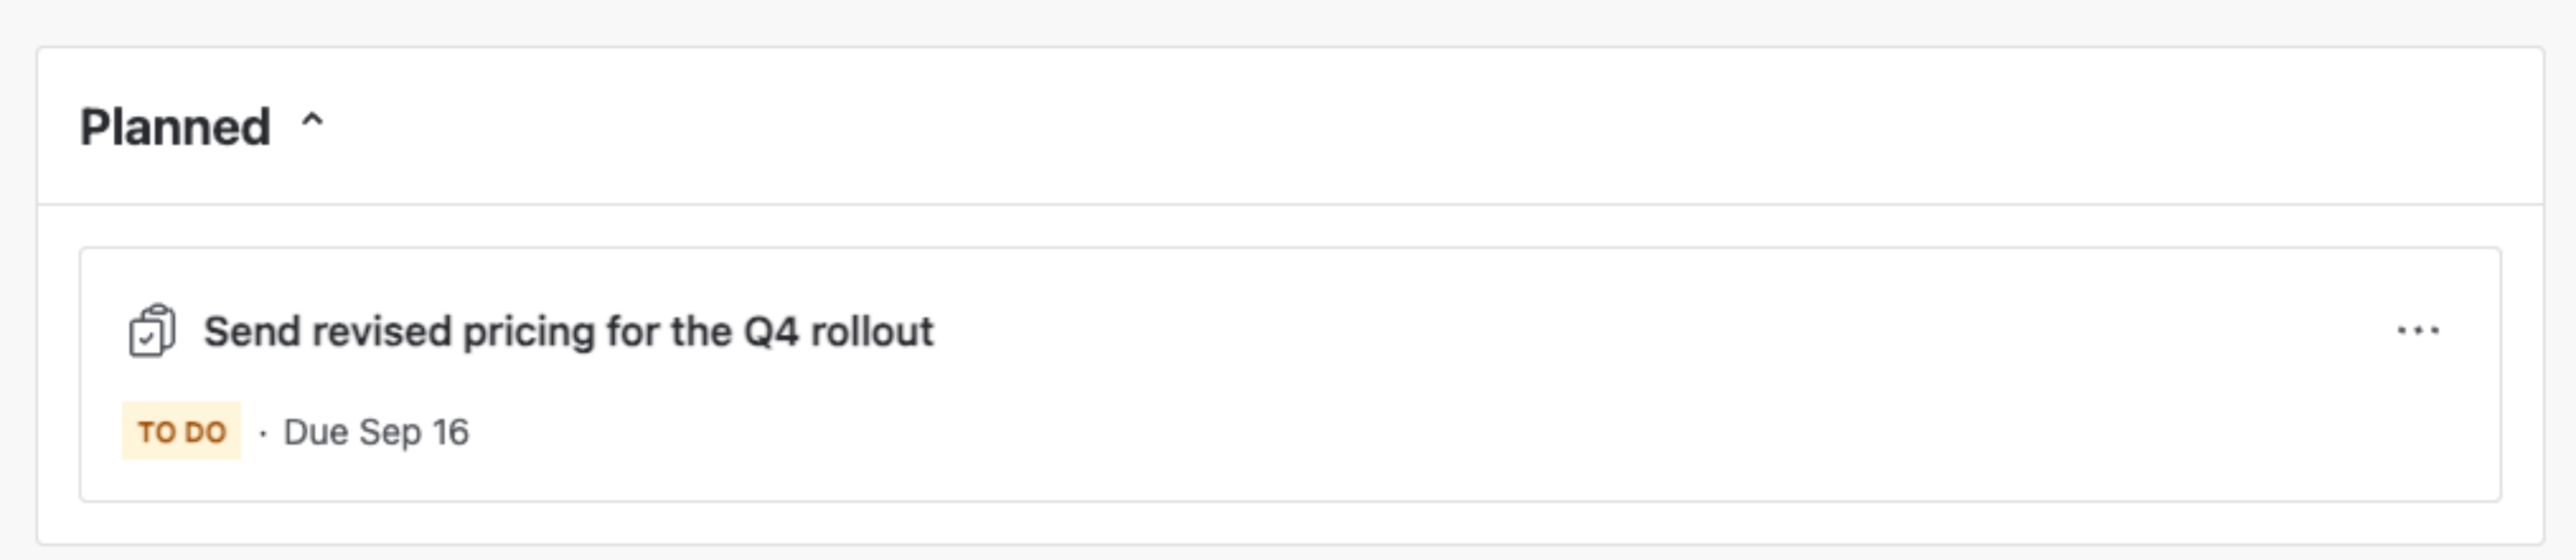
- Planned — a section on the record itself listing everything still open, with its status and due date. It only appears when there is something open, so an empty Contact stays uncluttered.
- A meeting this Contact attends, booked on another record, shows here too — for example
Meeting on Company - Brightpath Analytics. - Activities — the workspace-wide view. Meetings and Tasks booked on a Contact appear there alongside those from Leads and Deals, including under Assigned to me.
Timeline #
Below Planned, the Timeline records what has happened to this contact over time — when it was created, when links were added, and other changes to the record. Use Filters to narrow it to the kinds of activity you care about.
The Timeline records events from the point it started keeping them, so a contact that has been sitting in your CRM for a while will look empty until something next happens to it. That is expected — it is a log, not a reconstruction of the past.
Arranging this page
Administrators can move, hide or collapse the blocks of the Contact page and reorder the fields in Details — in Settings → Layouts, or from ⚙ Configure at the foot of the side panel. See Layouts.
4. Custom Fields on Contacts #
Custom fields let your team capture extra information on every Contact beyond the standard fields. For example, you can add Department and Seniority to segment by role, Preferred Channel to record how the Contact likes to be reached, or Time Zone to coordinate meetings.
Custom fields are managed by administrators under Settings → Custom Fields. See Custom Fields for the full setup guide and field type reference.
Once a custom field is created on the Contact entity, it shows up in several places:
- Contact full view — populated values appear in the More fields section on the right-hand panel. Click any field to edit inline.
- Table view — open the Customize table menu and toggle any custom field on to add it as an optional column.
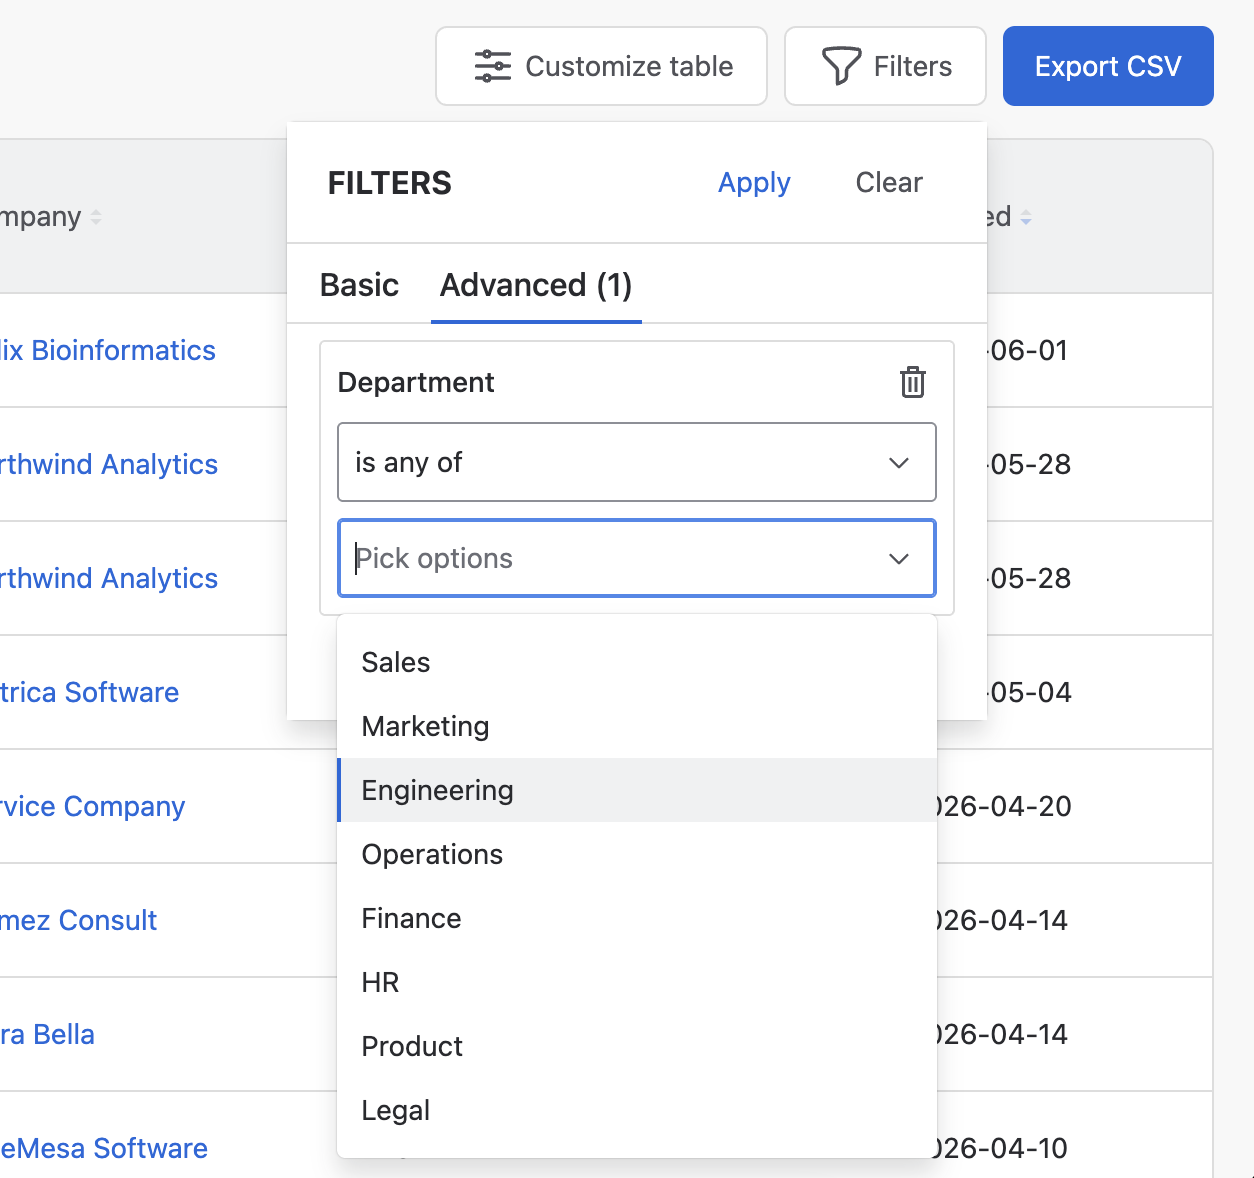
- Filters panel — every custom field appears under the Advanced tab as a filterable criterion (see Filtering Contacts below).
- CSV export — visible columns are included in the export, so custom fields show up in the CSV when they’re toggled on in the table view.
- Contacts Import — custom fields can be mapped during bulk import. See Contacts Import.
5. Filtering Contacts #
You can use the Filters panel to quickly narrow down your Contacts list. The Filters panel has two tabs:
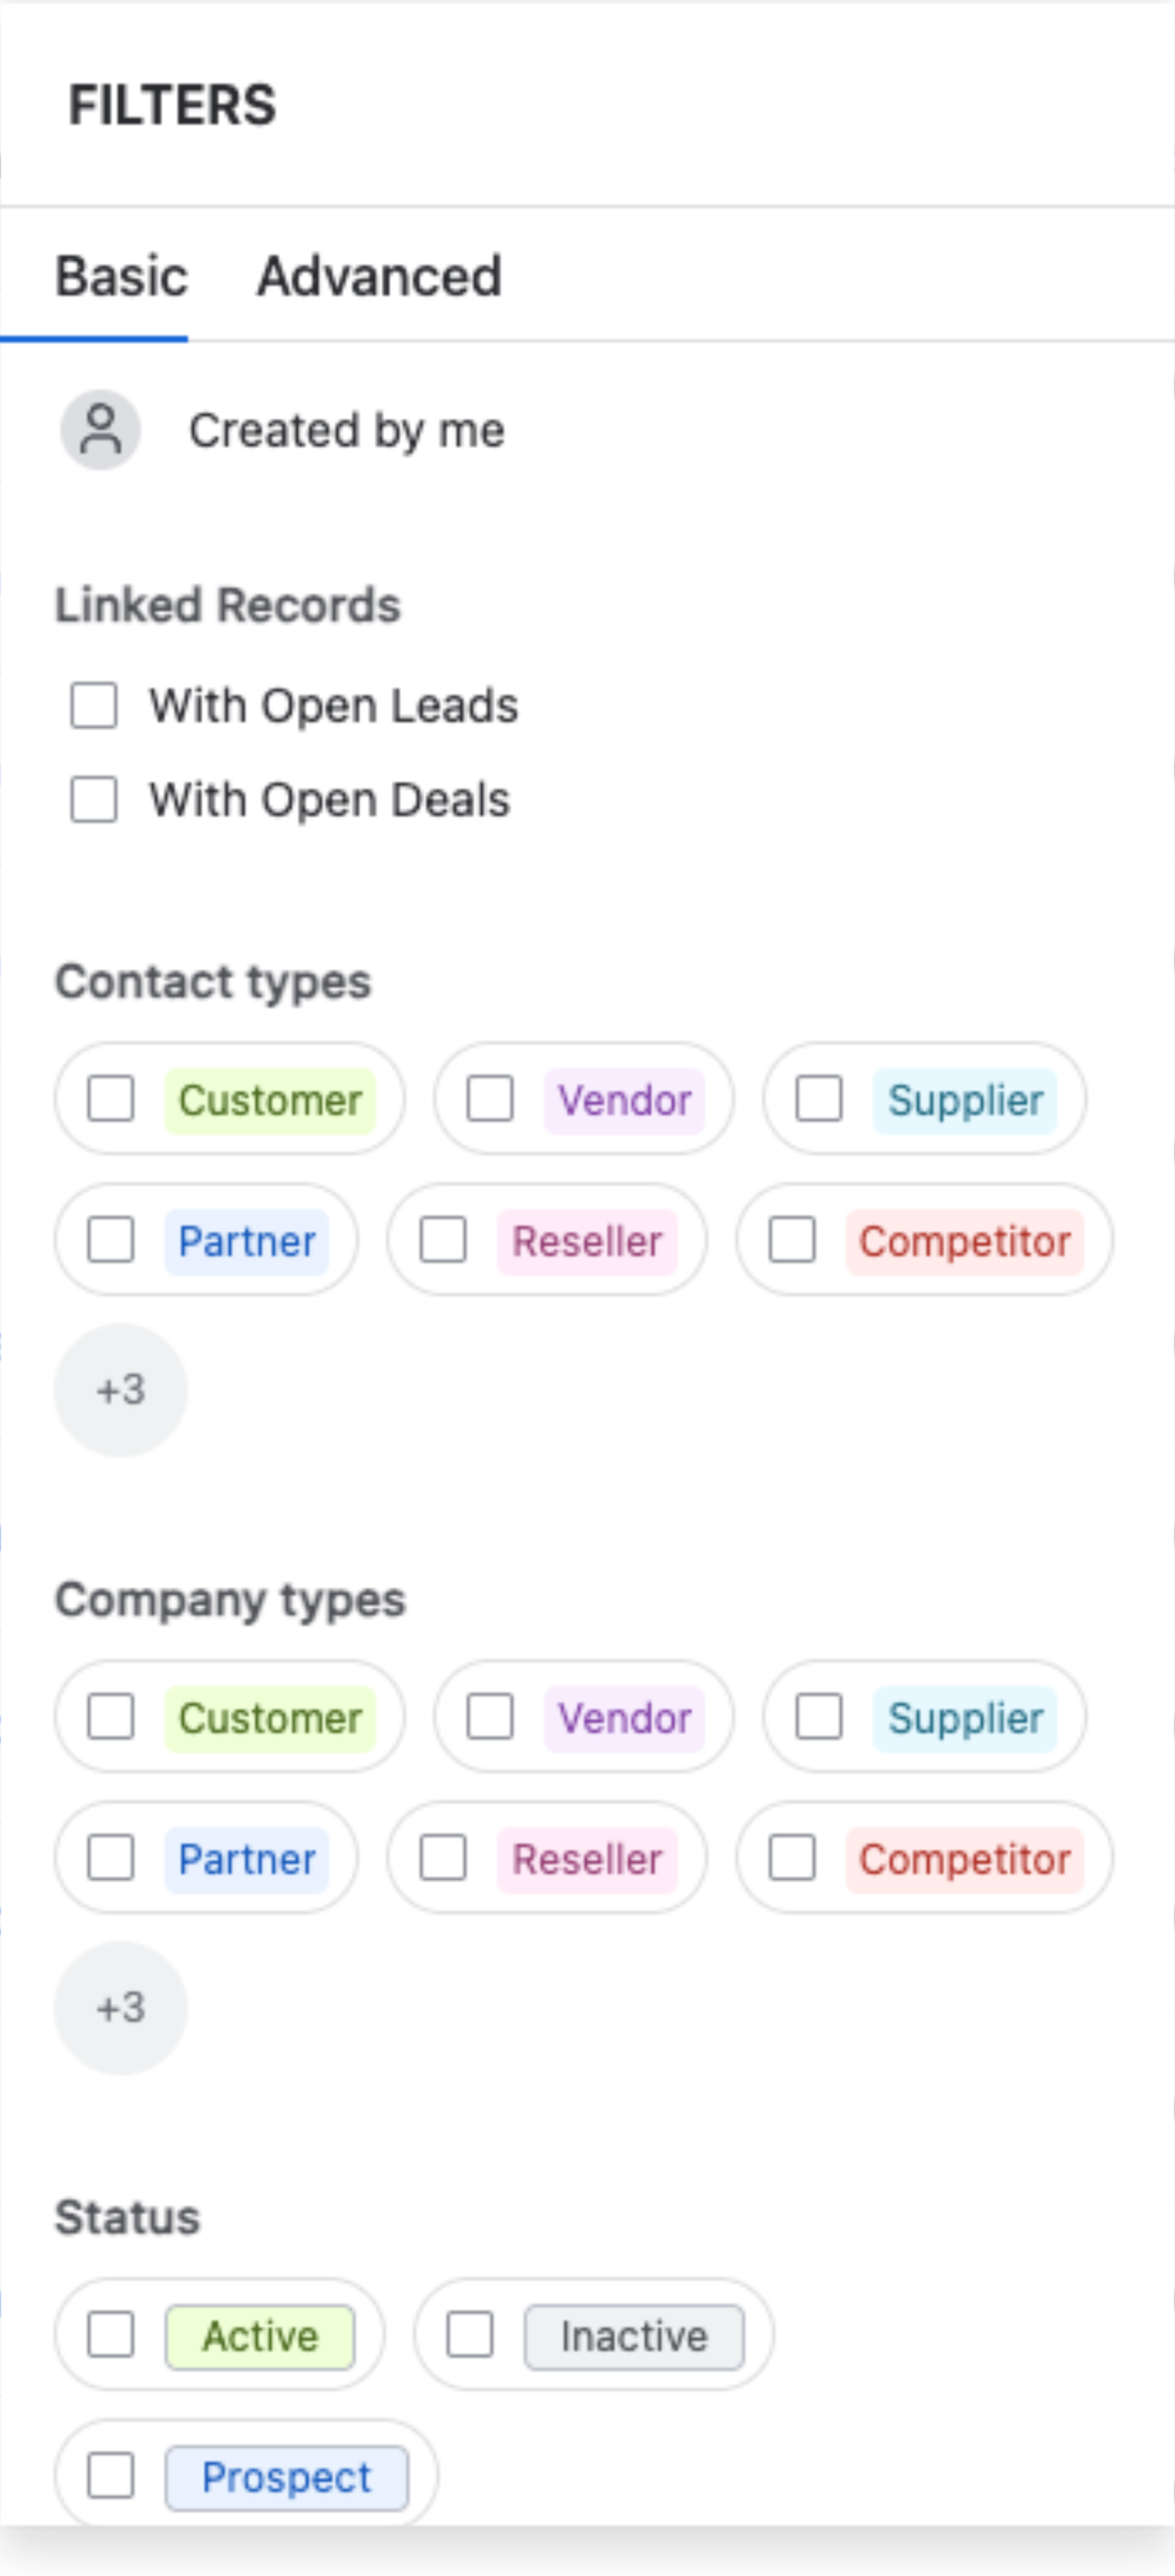
- Basic — the standard filter set, always available.
- Advanced — every custom field on the Contact is automatically available here as a filterable criterion. The available comparators depend on the field type (for example, dropdowns use is any of, numbers use is greater than, dates use is on or before).
Available Basic filters include:
- Created by me – show only Contacts you created.
- Linked Records – filter Contacts that are linked to open Leads or open Deals.
- Contact types / Company types – Contacts by their own type, or by the type of their Company.
- Status – Active, Prospect or Inactive.
- Linked Company – show only Contacts from a specific Company.
- Created – limit results by creation date range.
📌 Filters are for display purposes only — they don’t affect the underlying Contacts data.
6. Linking Jira work items #
You can connect a Contact to related Jira work items directly from the Linked work items section.
Click + Link New Item, then start typing to search by:
- Jira issue key (e.g.,
SCRUM-9), - issue summary, or
- paste a direct link to the Jira work item.
Once linked, the connection appears:
- in the Contact’s Linked work items section inside Mria CRM,
- in the Mria CRM panel on the Jira issue’s right sidebar.
➡️ Learn more about the Jira panel on the Jira Integration page.
7. CRM Statuses #
For Contacts and Companies, Mria CRM automatically calculates a status based on their activity history. It appears as the Status chip in the header, next to the Type chip; its ⓘ explains the result, for example Prospect — has 0 Leads and 1 Deal. Calculated automatically.. Status cannot be set by hand — Type is the field you choose.
| Status | Condition |
|---|---|
| Active | Has at least one Deal won. |
| Prospect | Has at least one open or lost Lead or open/lost Deal. |
| Inactive | Default state before any Leads or Deals are created. |
8. Deleting a single Contact #
To delete one Contact, open the ... menu in the top right corner of a Contact full view and select Delete.
- ❌ Primary Contacts (the main link for a Company, or the Primary Contact on a Deal) cannot be deleted. You’ll see a warning.
- ✅ Secondary Contacts can be deleted. They’ll be removed and unlinked from Deals, Leads, and Companies.
- ✅ Orphaned Contacts (not linked to any Company) stay in the system and can be linked later.
9. Bulk actions #
From the table view you can update or delete many Contacts at once — re-homing people after a company merger, tagging a segment, or clearing out an import that went wrong.
Selecting Contacts #
- Apply Filters if you want to target a specific set.
- Tick the checkbox on each row. The header checkbox selects every Contact on the current page.
- A bulk actions bar appears at the bottom showing the count, for example 2 selected. Click Select all N in that bar to extend the selection to every Contact matching your current filters.
- The × at the end of the bar clears the selection.
The count in the bar is the number you’re about to act on. Read it before you click anything, especially before Delete.
Edit fields #
Click Edit fields to open a panel that applies your changes to every selected Contact. Every field starts at Keep as is, so nothing changes unless you deliberately set it.
Fields available on Contacts:
- Company — reassign the selected Contacts to a different Company, or use Clear to unlink them.
- Type — set one type on every selected Contact, or use Clear to remove the type set on the Contacts themselves.
- Tags
- Products
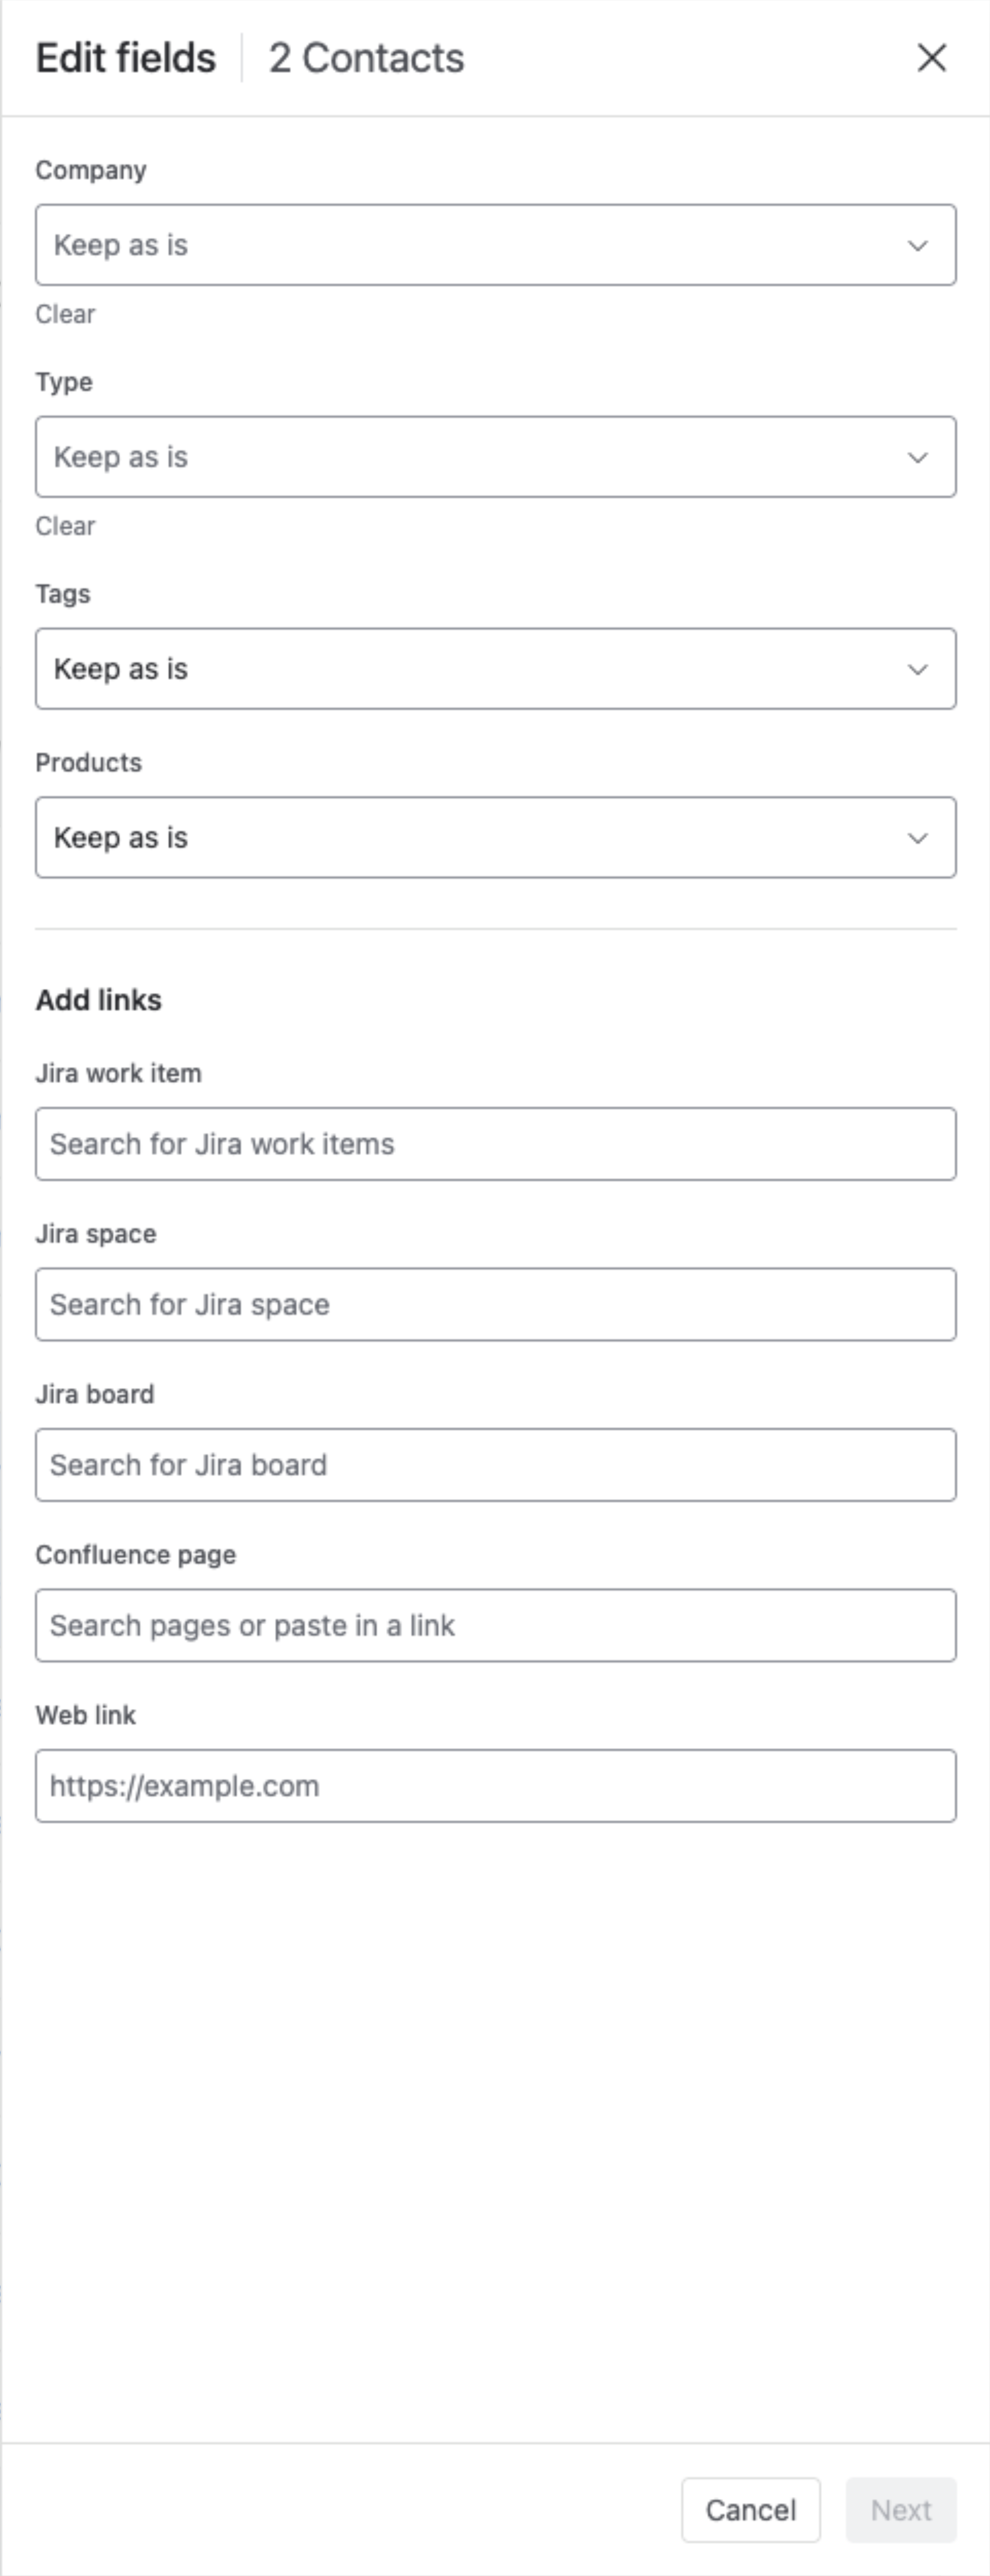
Tags and Products offer the multi-value choices — Add new, Replace all, Find and remove, and Remove all — described on the Leads page.
Below the fields, Add links attaches the same link to every selected Contact — a Jira work item, Jira space, Jira board, Confluence page, or Web link.
Click Next to review, then confirm to apply.
Name, email, and phone are not bulk-editable — they identify the individual, so setting them across a batch would never be right. Edit those on the Contact itself.
Delete #
Click Delete in the bulk actions bar and confirm.
Protected Contacts are skipped, not blocking. If a selected Contact can’t be deleted — for example, it’s still the Primary Contact on a Company or a Deal — Mria CRM leaves that record in place and carries on with the rest of the batch. One protected record never cancels the whole operation.
Bulk delete is permanent and cannot be undone. Review your filters and the selected count before confirming.
✅ This makes Contacts the core link between Leads, Deals, and Companies.


