ℹHow to Manage Leads in Mria CRM for Jira #
The Leads module in Mria CRM helps you capture, organize, and manage potential customers. Leads can be viewed in a table view (all Leads) and a detailed view (single Lead). You can also create new Leads directly from this section.
📌 See Activities for details on Notes, Meetings, Tasks, Files, and Jira links.
1. Views #
Leads can be displayed in two formats depending on your workflow:
Table view #
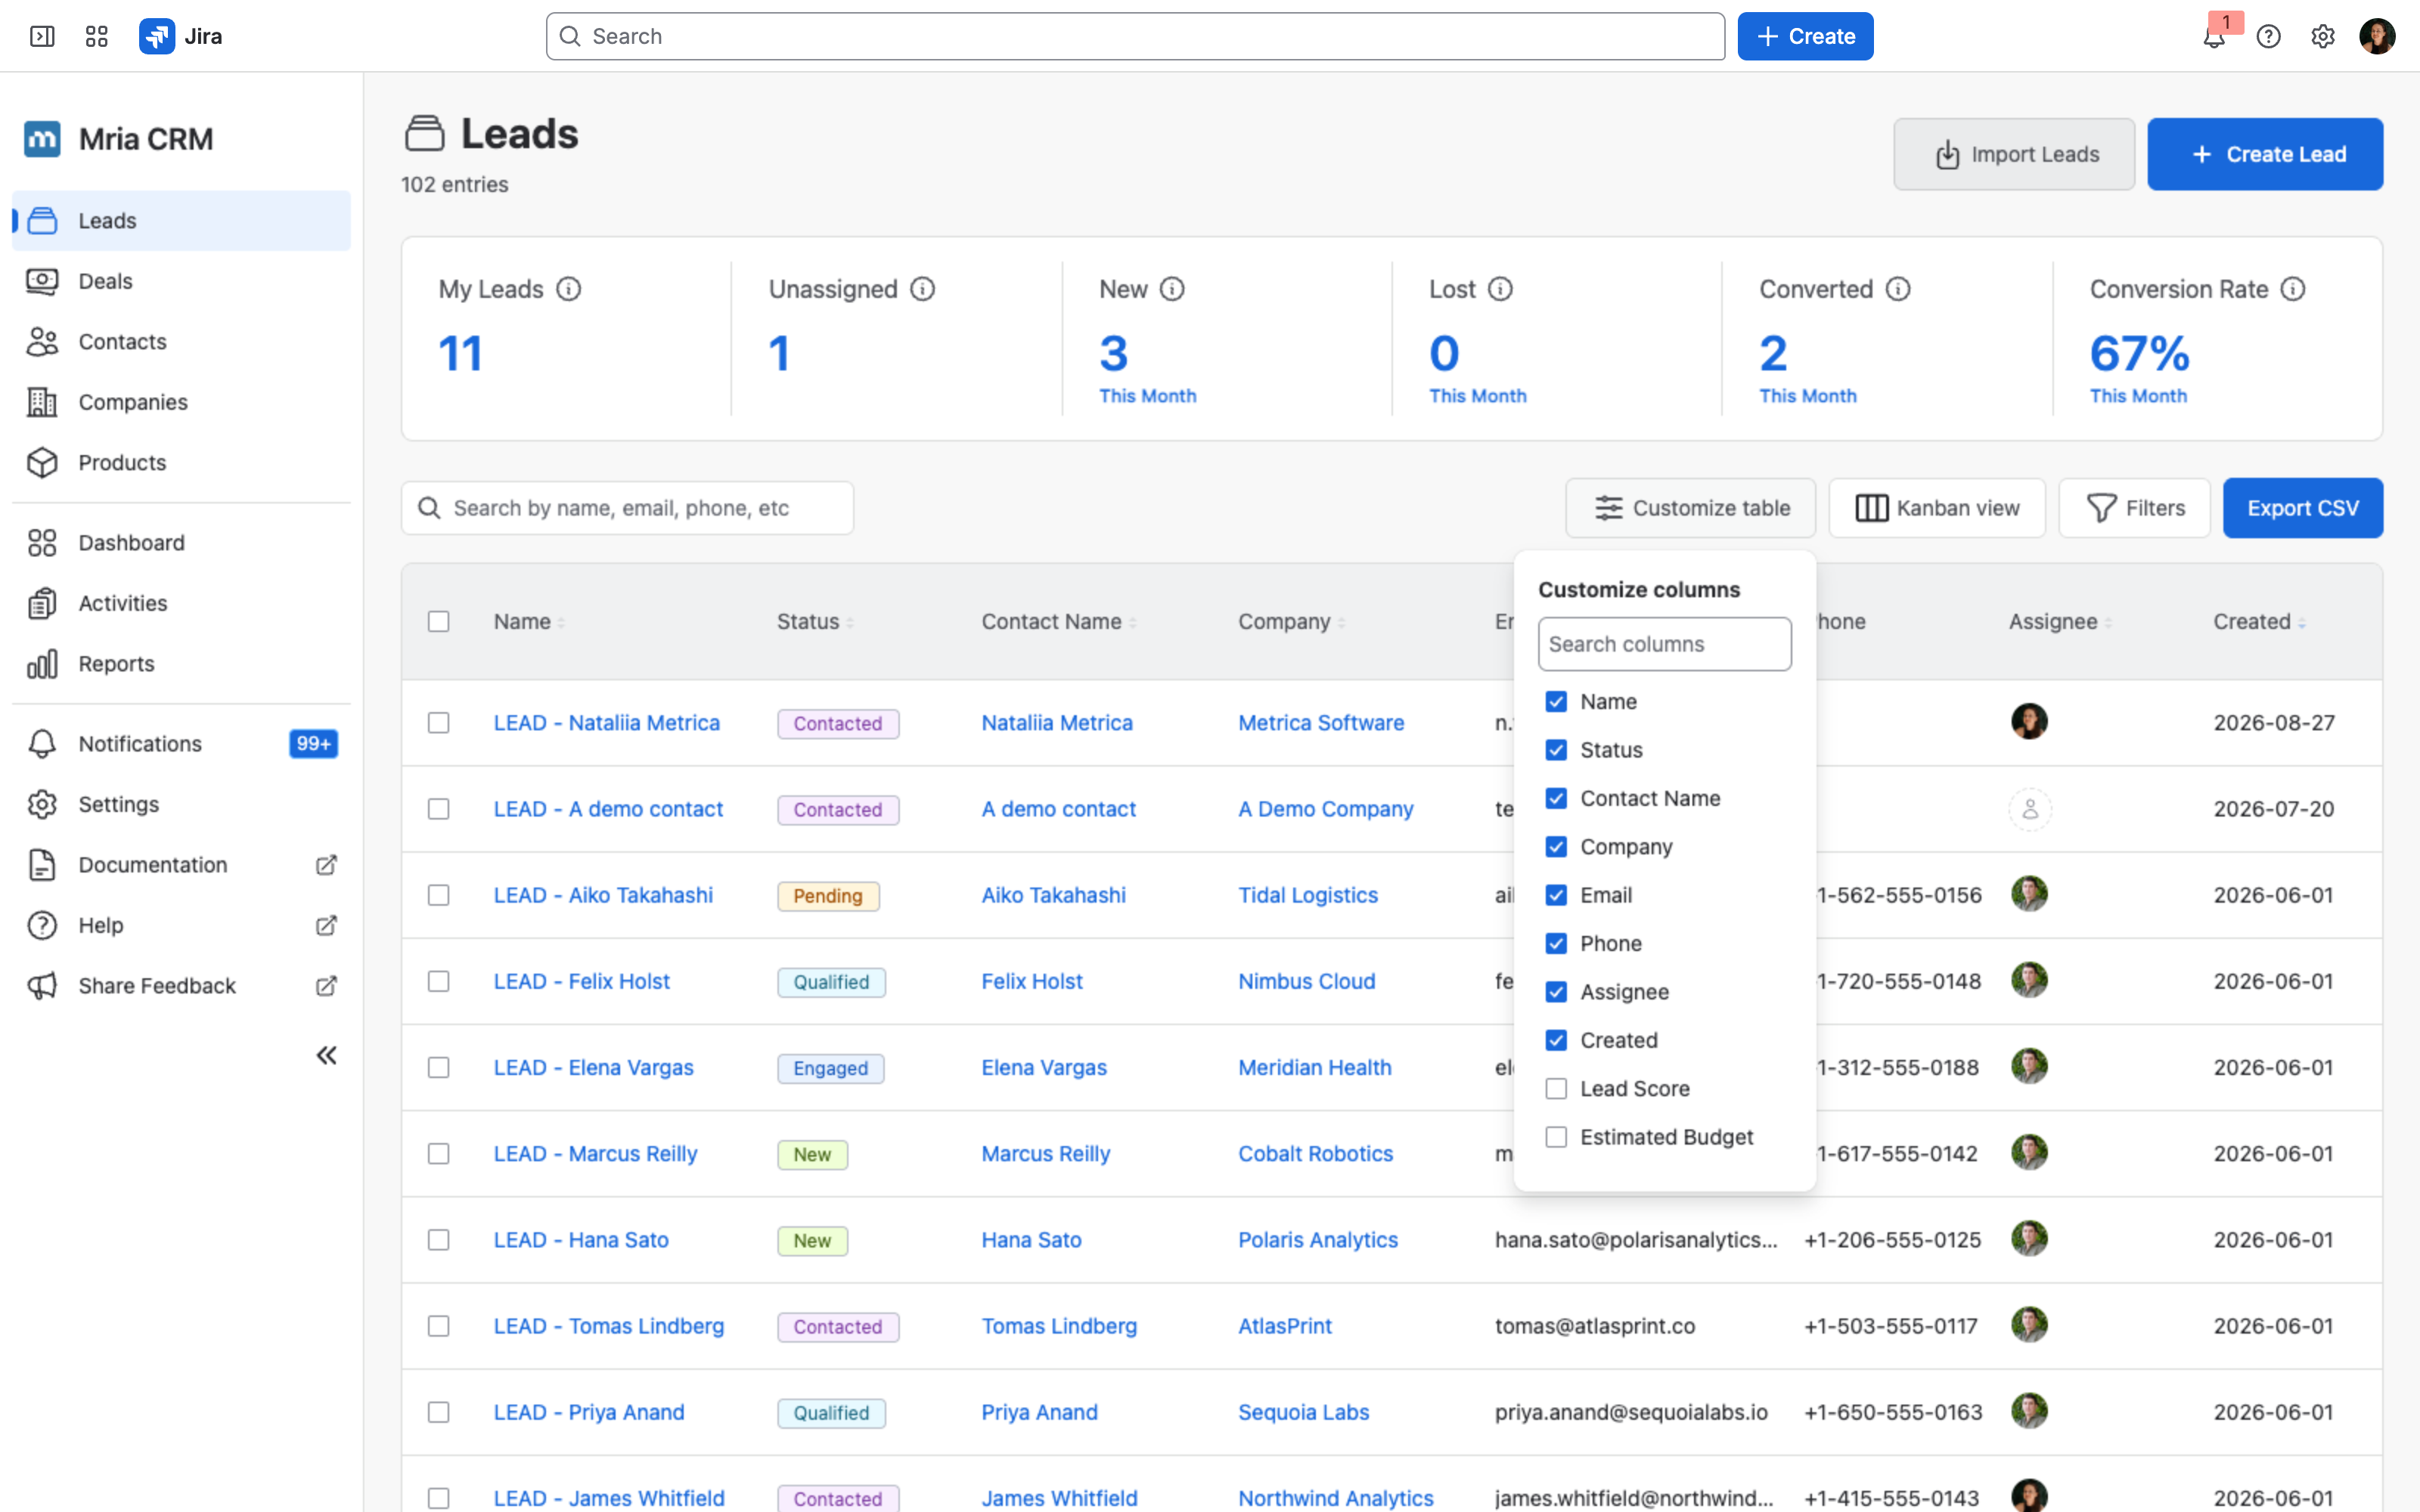
Displays Leads in a structured table format with columns such as Name, Company, Email, Status, Assignee, and Created date.
- Suitable for quick scanning, filtering, and sorting
- Supports column-based organization and detailed data visibility
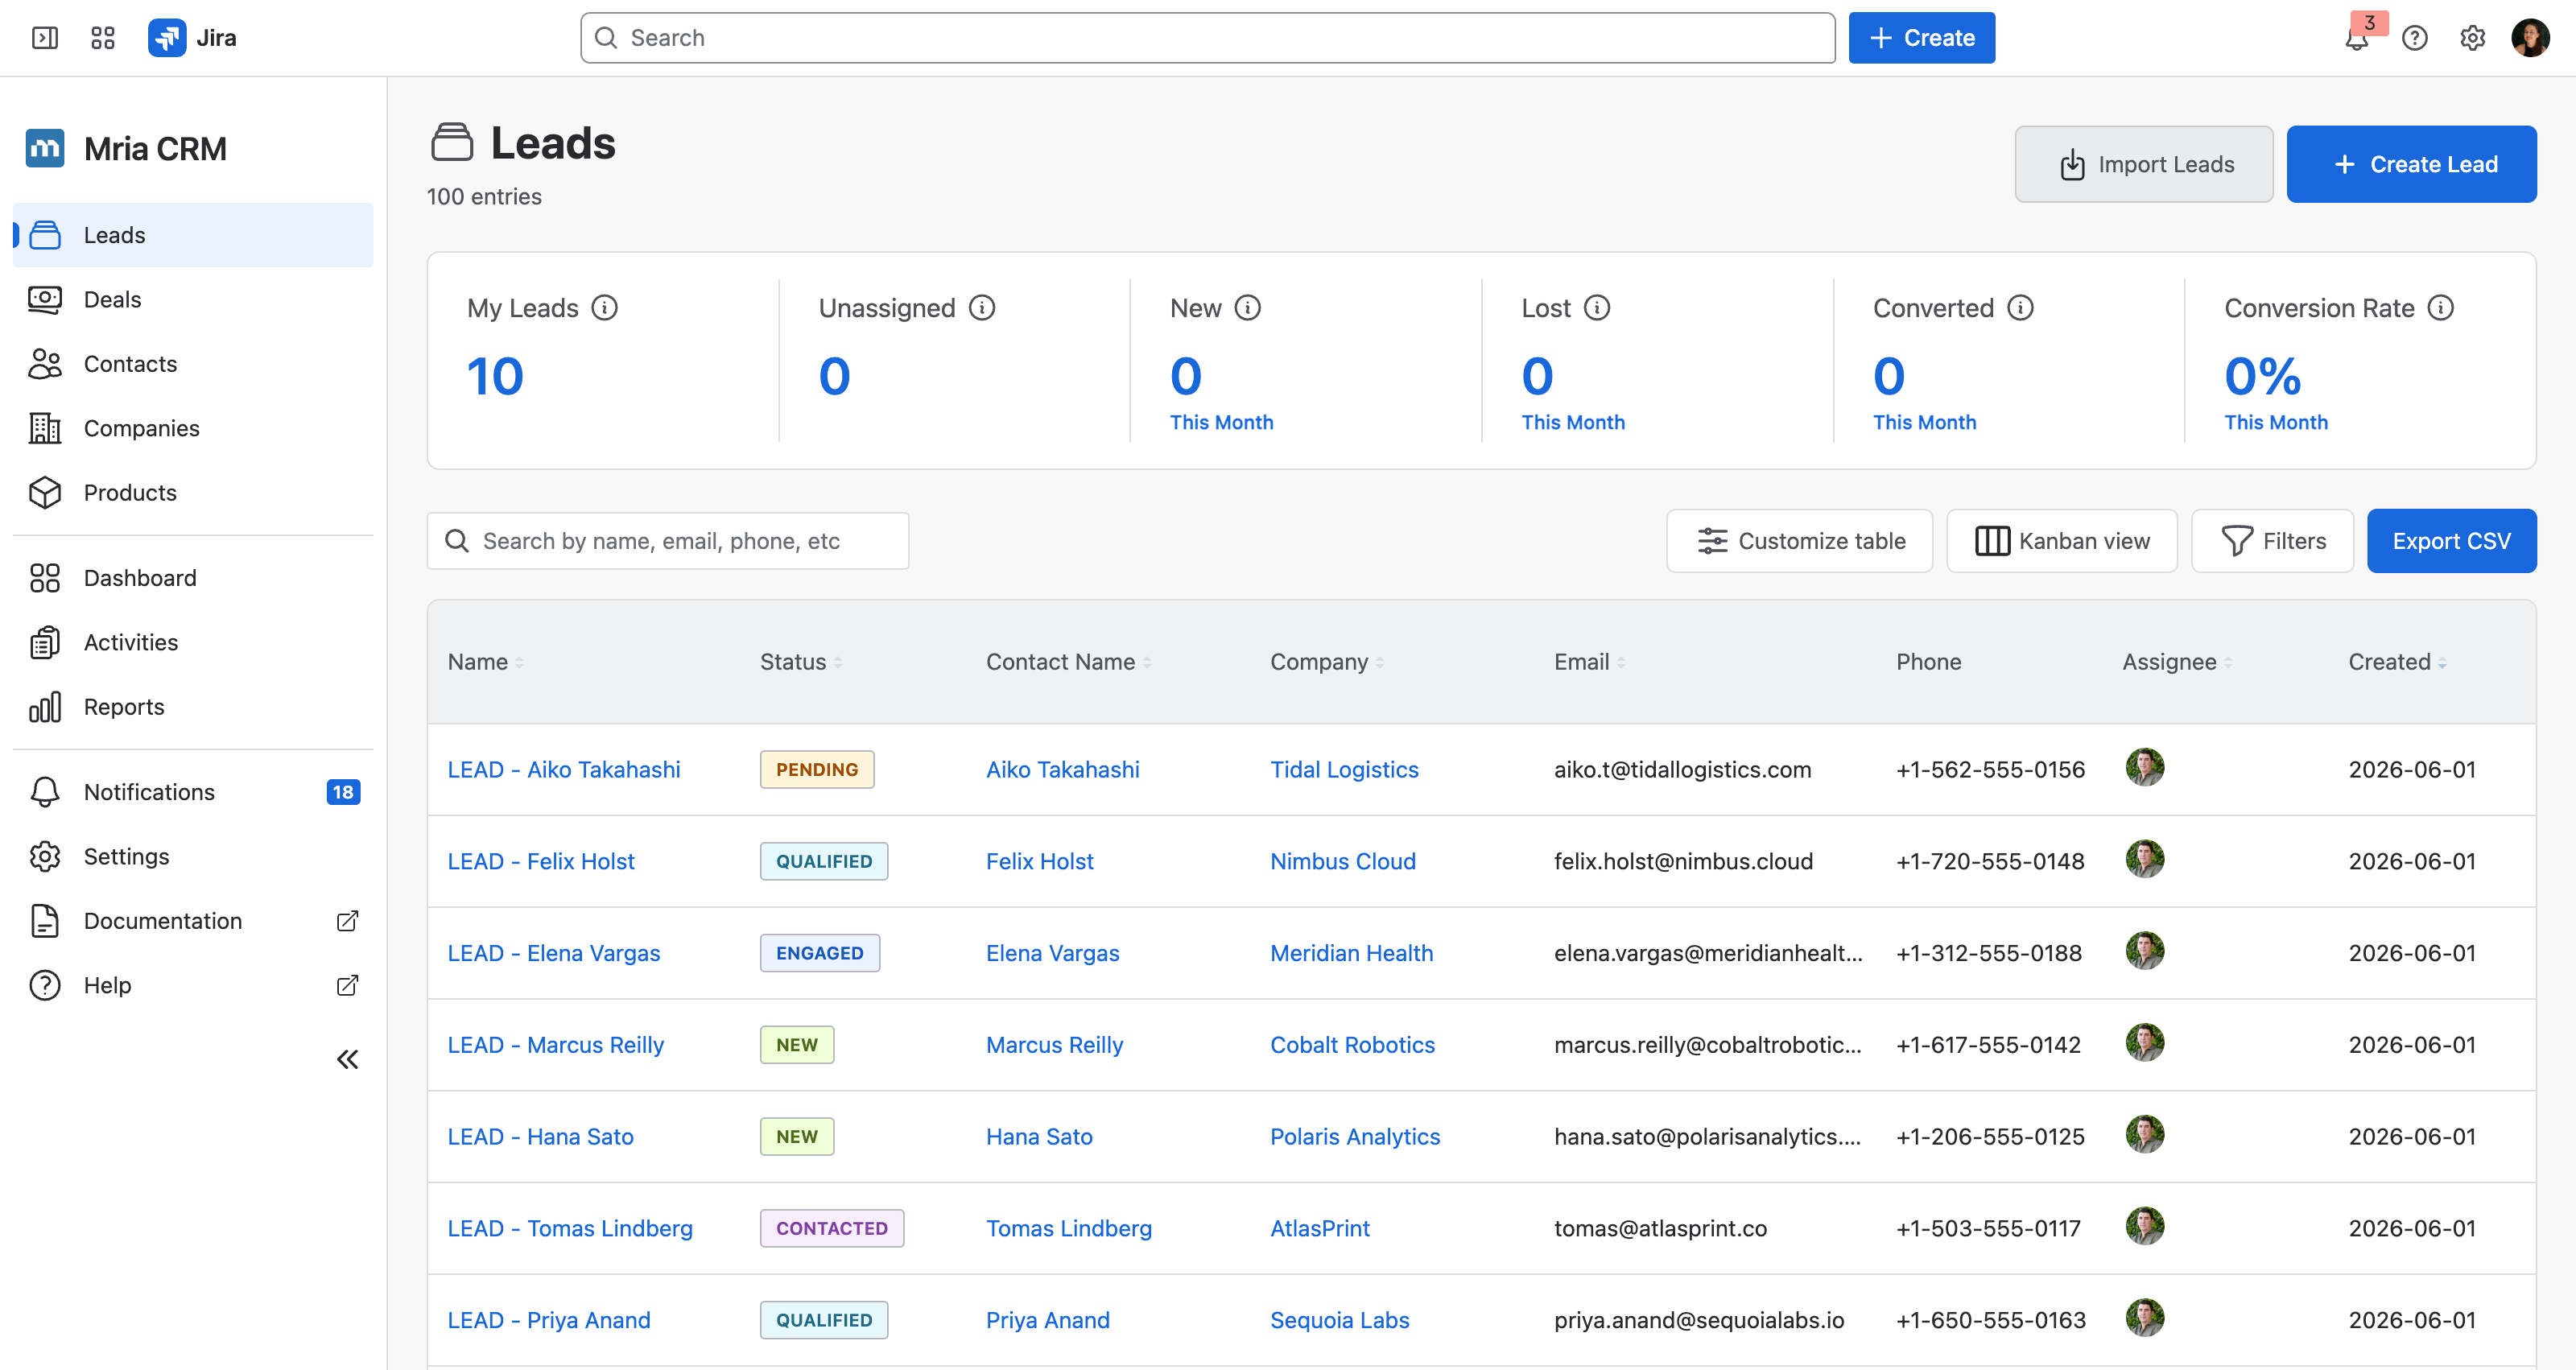
Export CSV: allows you to export the current list of Leads (based on applied filters and visible columns) as a .CSV file for external use.
Kanban view #
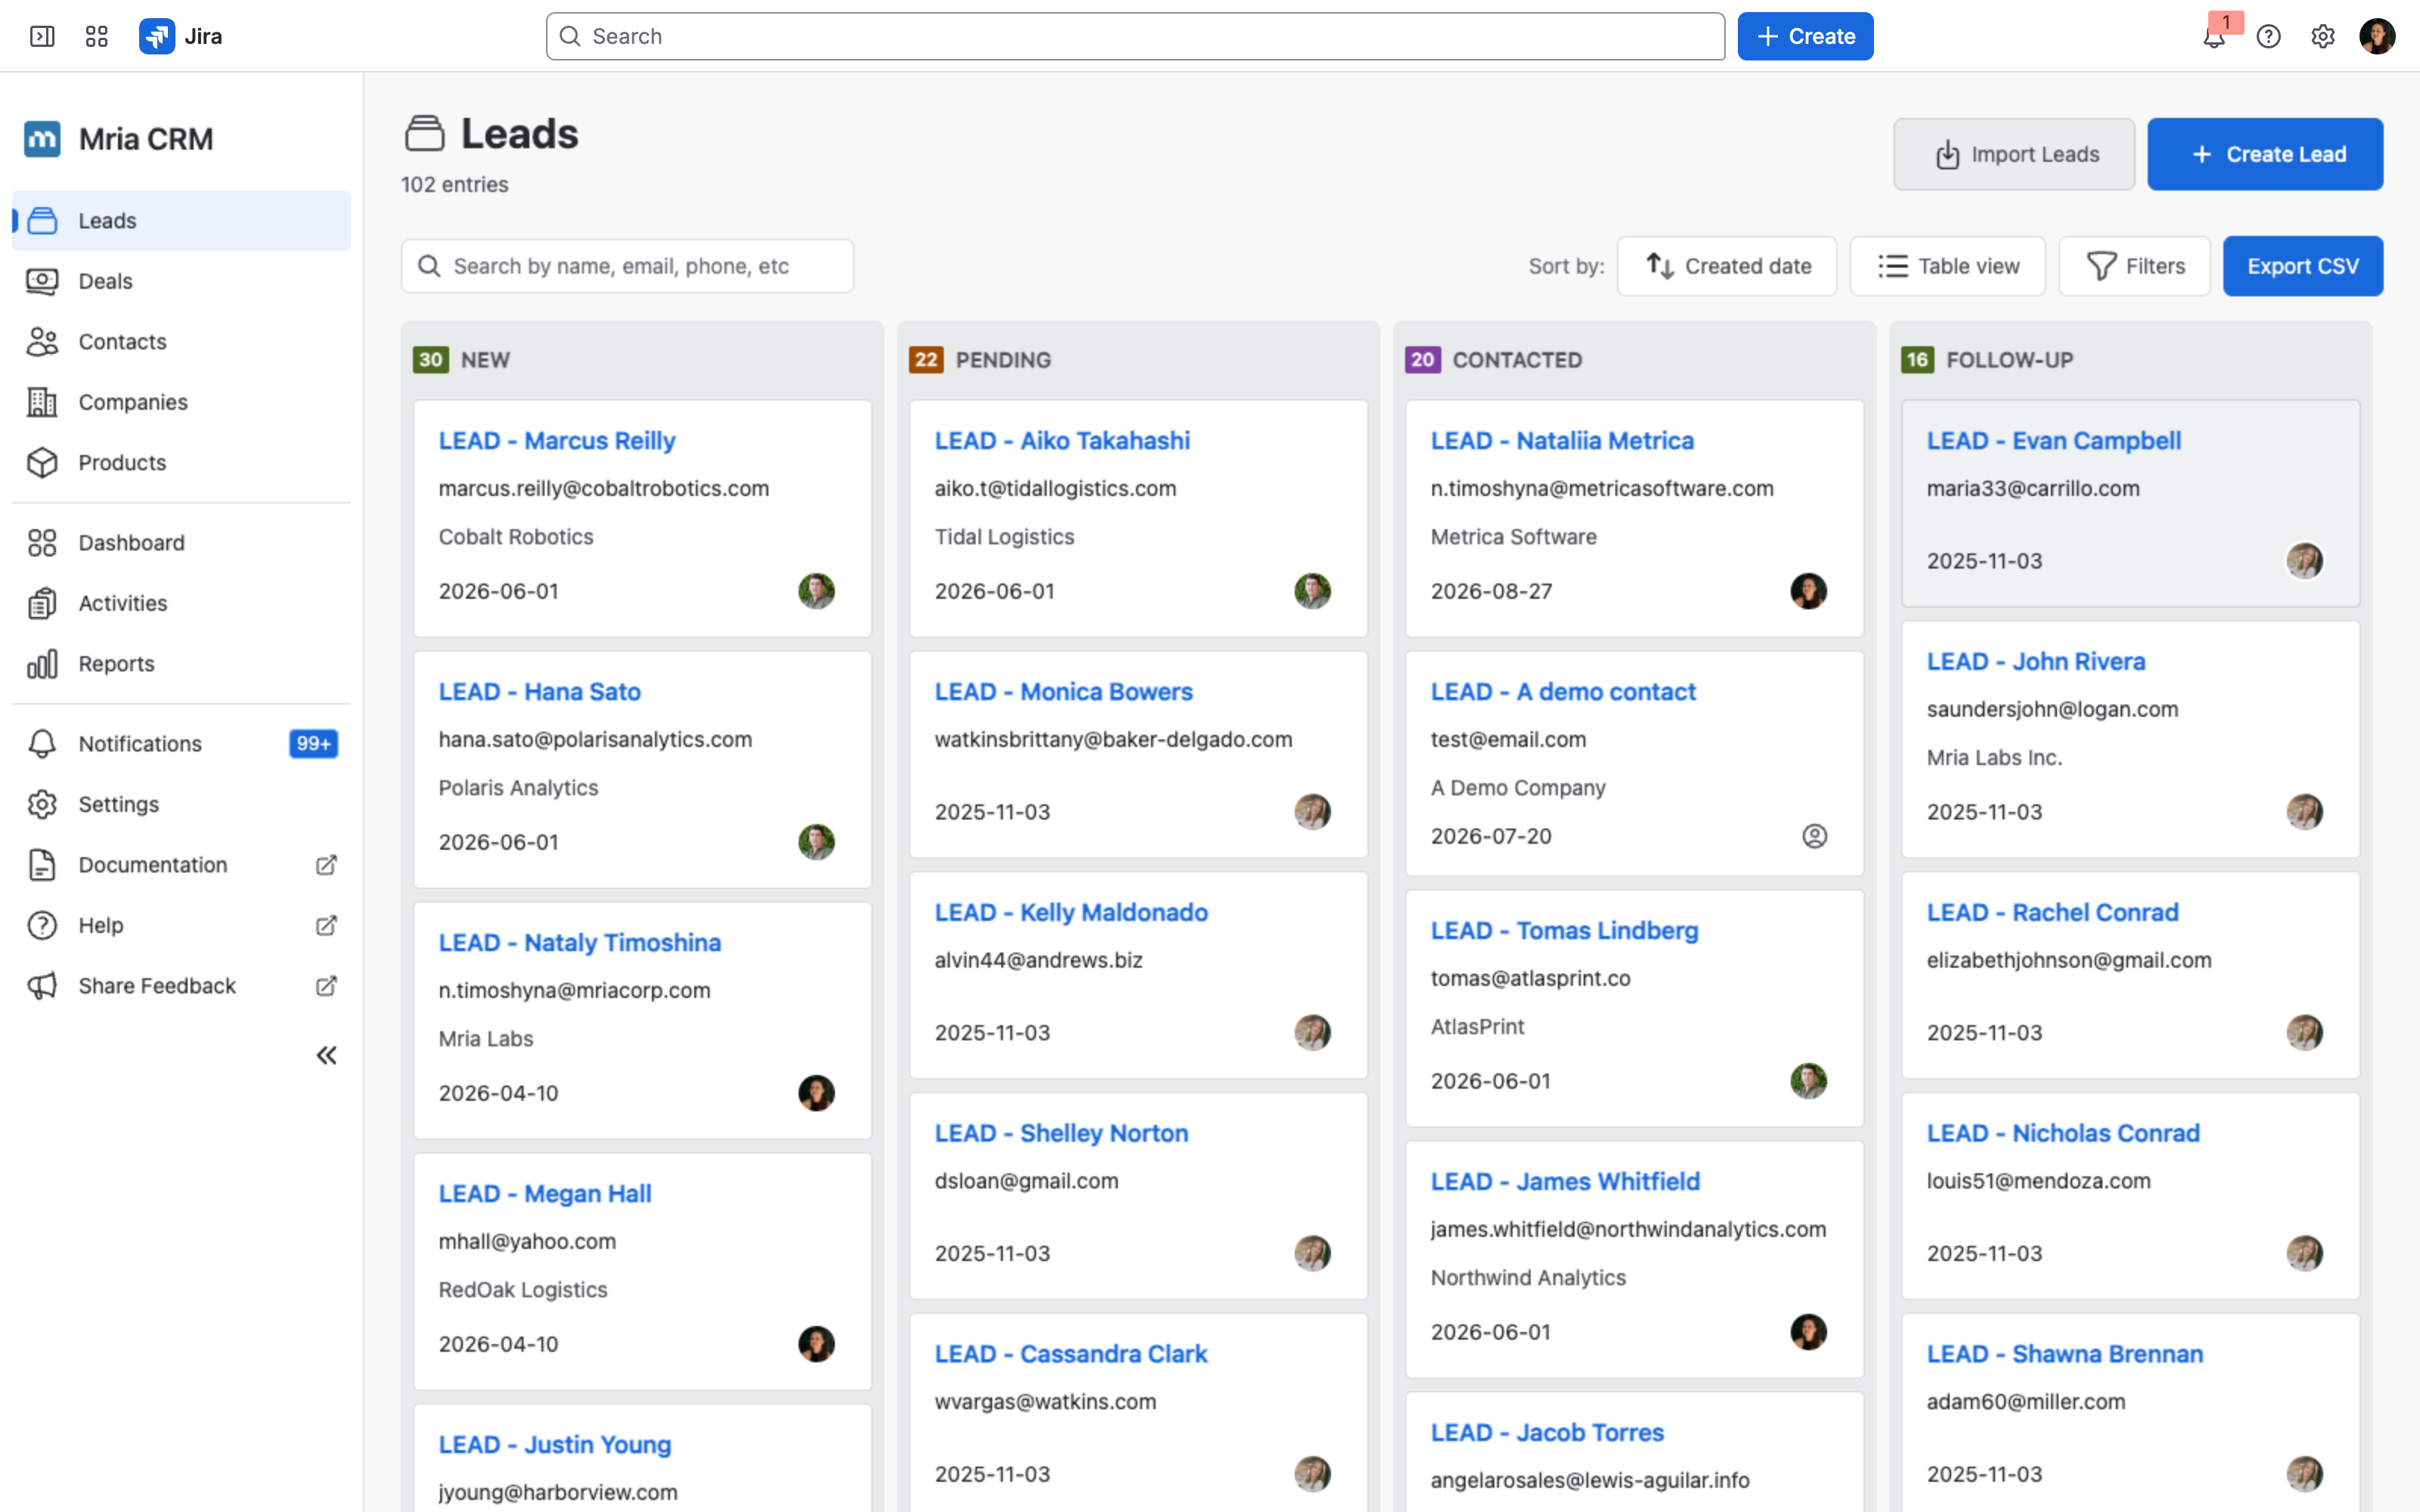
Displays Leads in columns based on their current status.
- Columns represent Lead statuses (e.g. New, Contacted, Follow-up, Lost, Junk, …)
- Each card shows key information such as Lead Name, Company, Email, Created date, and Assignee
- Cards can be moved between columns to update Lead status
Sorting #
Leads can be sorted using the sorting control:
- Created date
- Name
Clicking the arrows toggles ascending/descending order.
2. Next activity and last activity #
Every Lead carries two dates derived from the Tasks and Meetings booked against it:
| Field | Means |
|---|---|
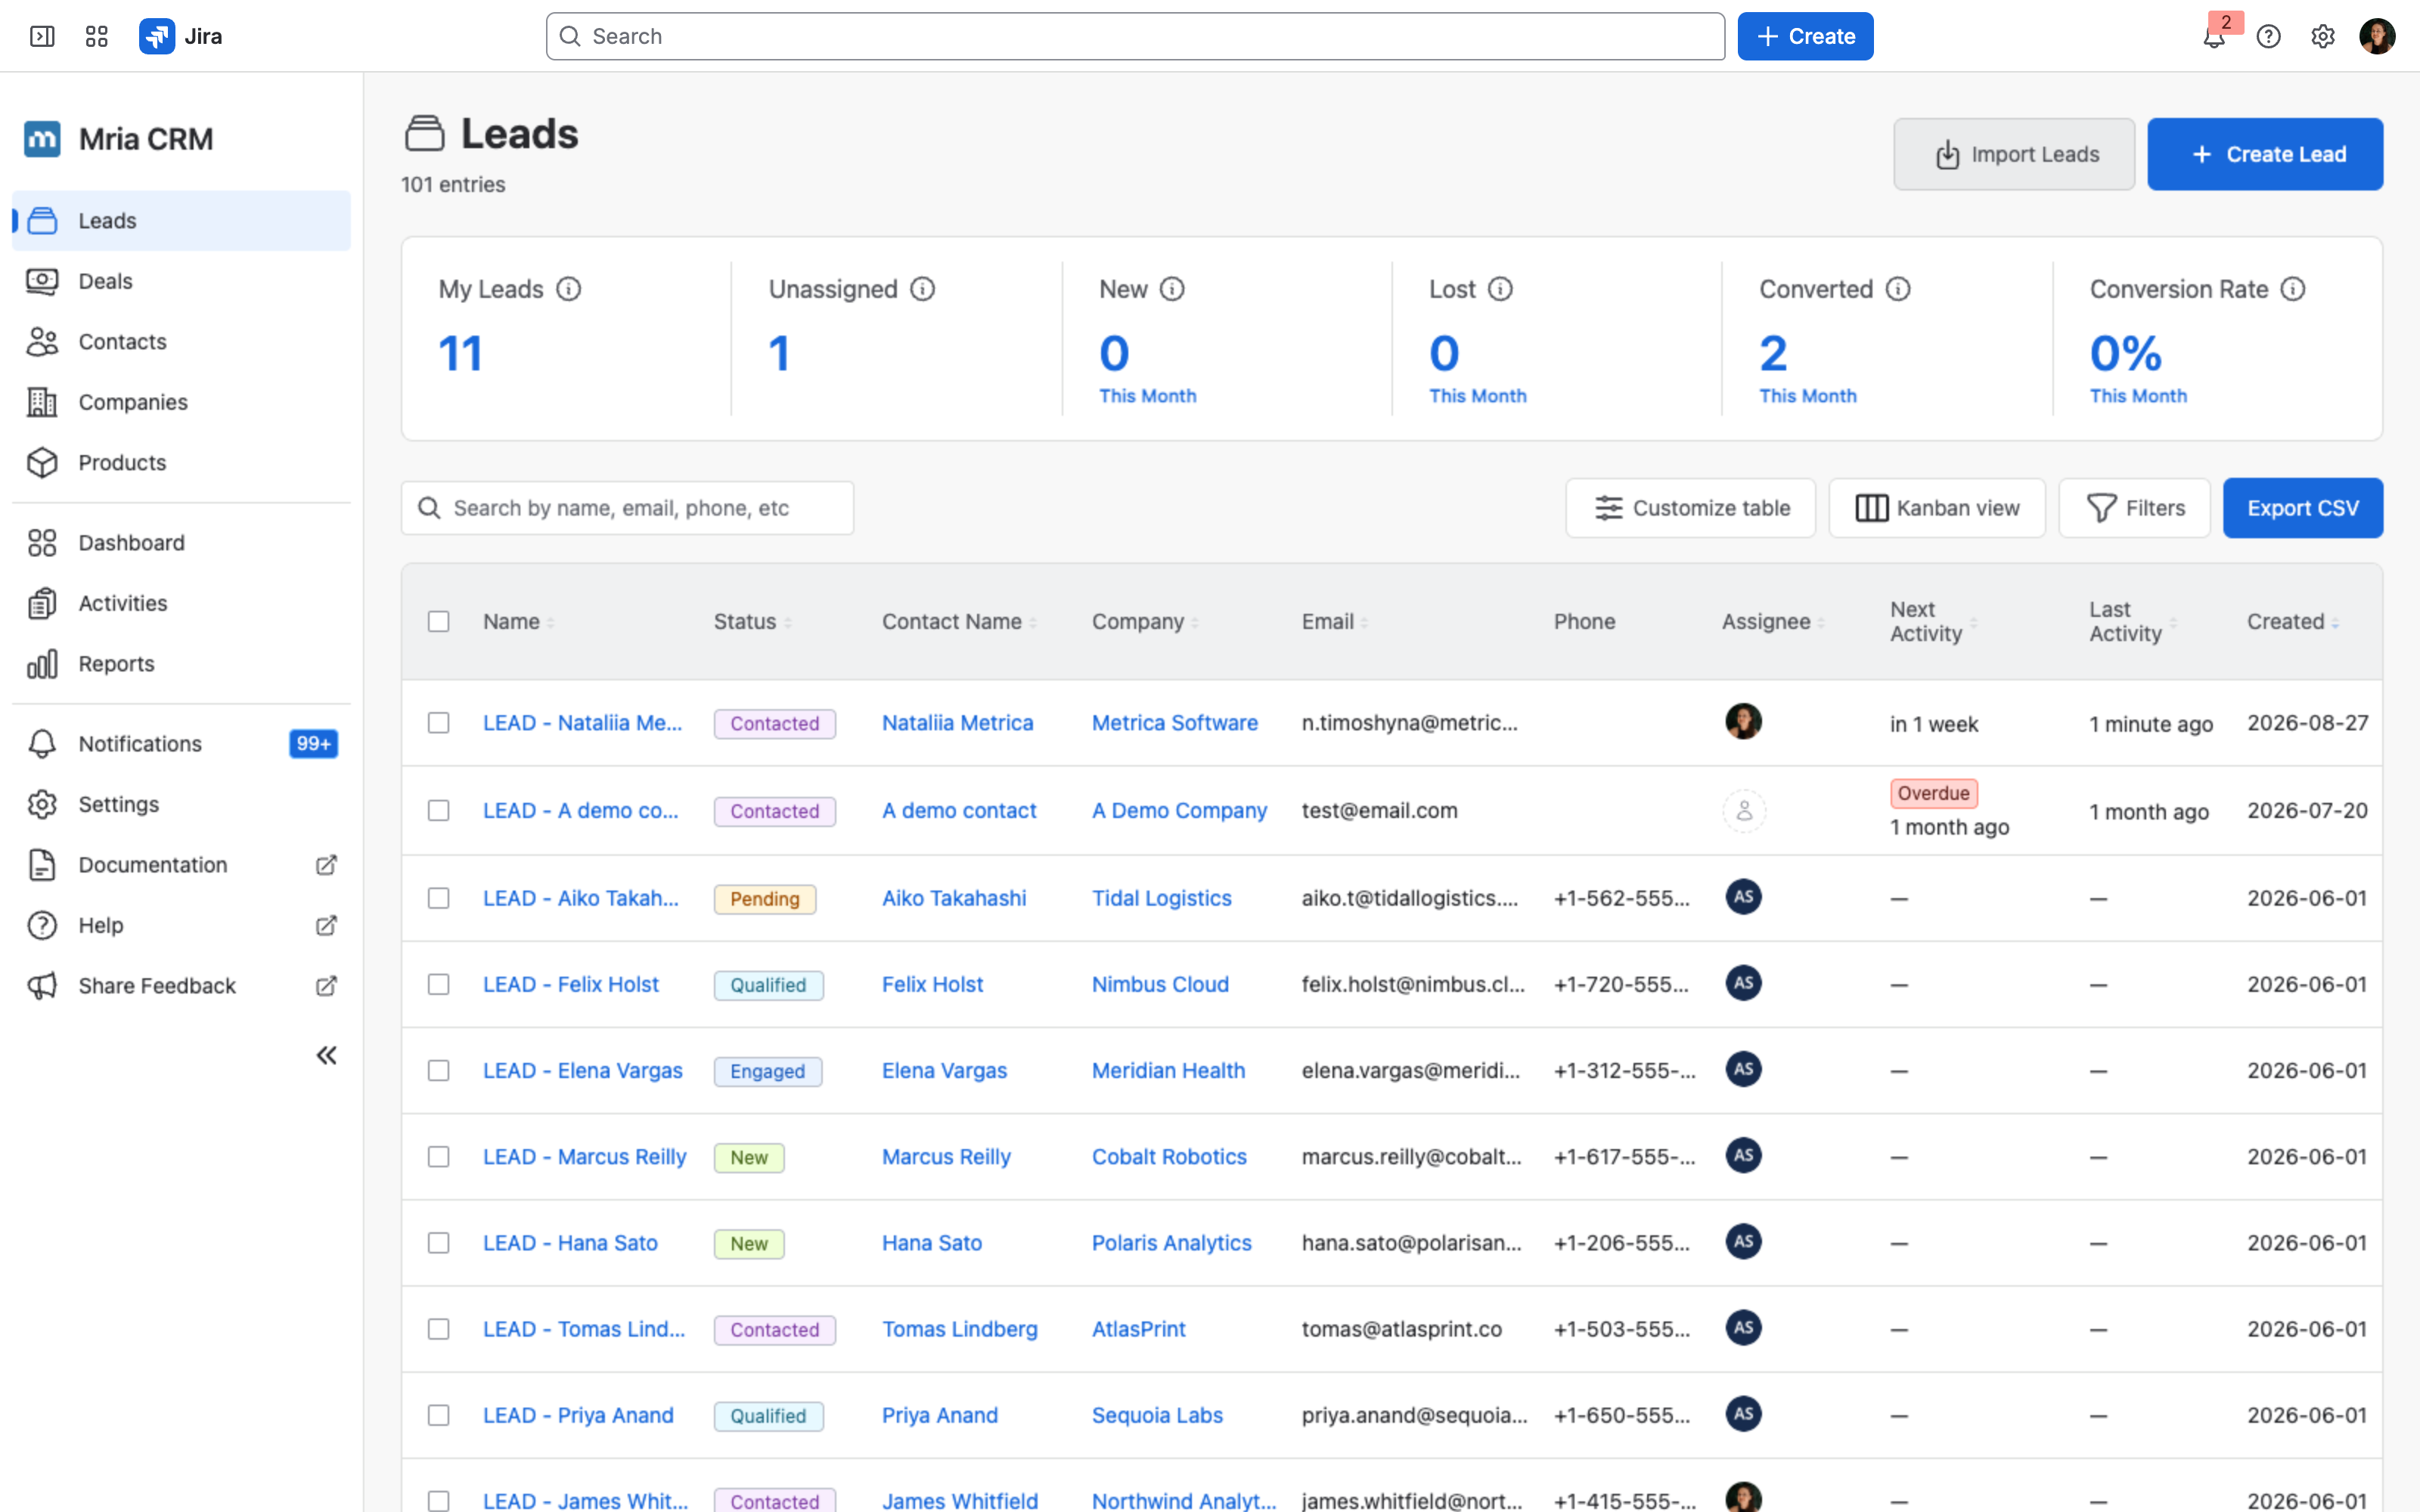
| Next activity | The earliest upcoming open Task or Meeting on the record. |
| Last activity | The most recent completed one. |
“Activity” here means Tasks and Meetings only. Notes, emails and edits to the record do not move these dates. That is deliberate: these two fields answer “when did someone last actually do something with this lead, and what is next”, not “when was the record last touched”.
Neither is typed in — both follow the Tasks and Meetings themselves, so they stay correct as work is completed or rescheduled. Activities Breakdown explains the underlying split: Next activity reads from Planned (still open), Last activity from Timeline (already done).
Showing them in the table #
Both columns are off by default. Open Customize table in the toolbar and tick Next Activity and Last Activity.
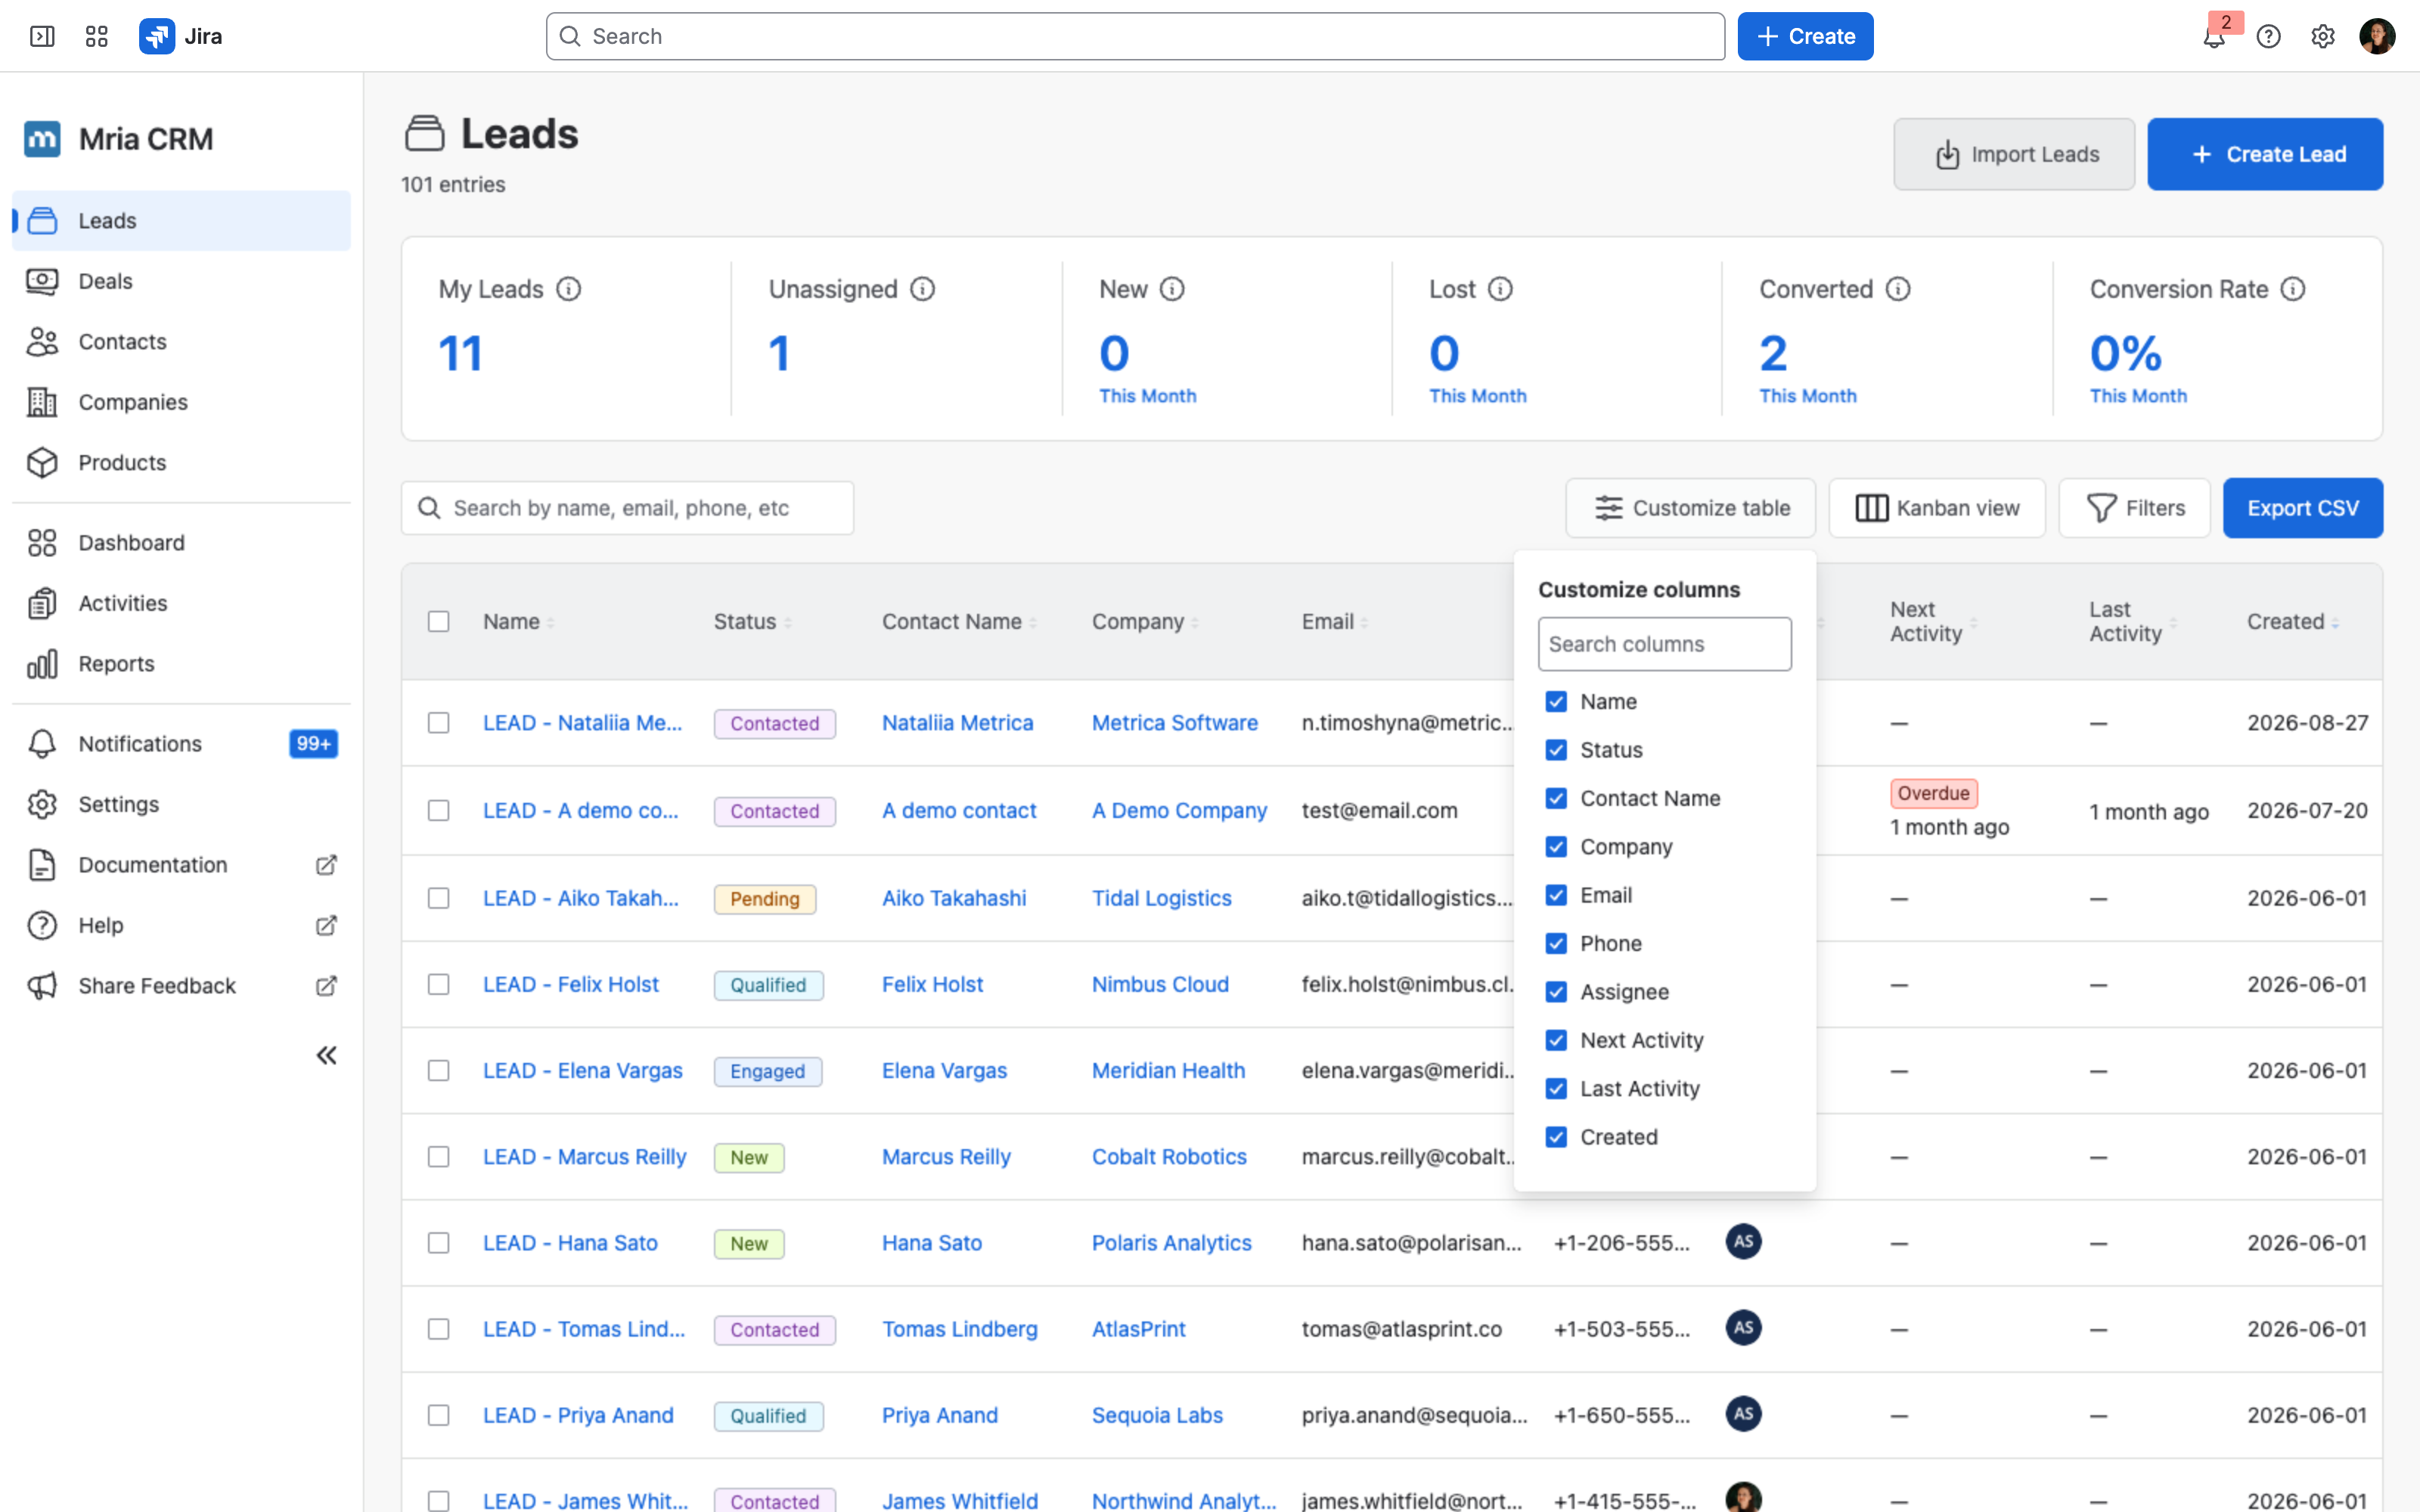
Once on, they sort like any other column, and a Next activity that has already passed is flagged Overdue.
Sorting on the board #
In Kanban view, Sort by offers Next activity date and Last activity date, and each card shows its next activity with the same Overdue flag when it has slipped.
On the record #
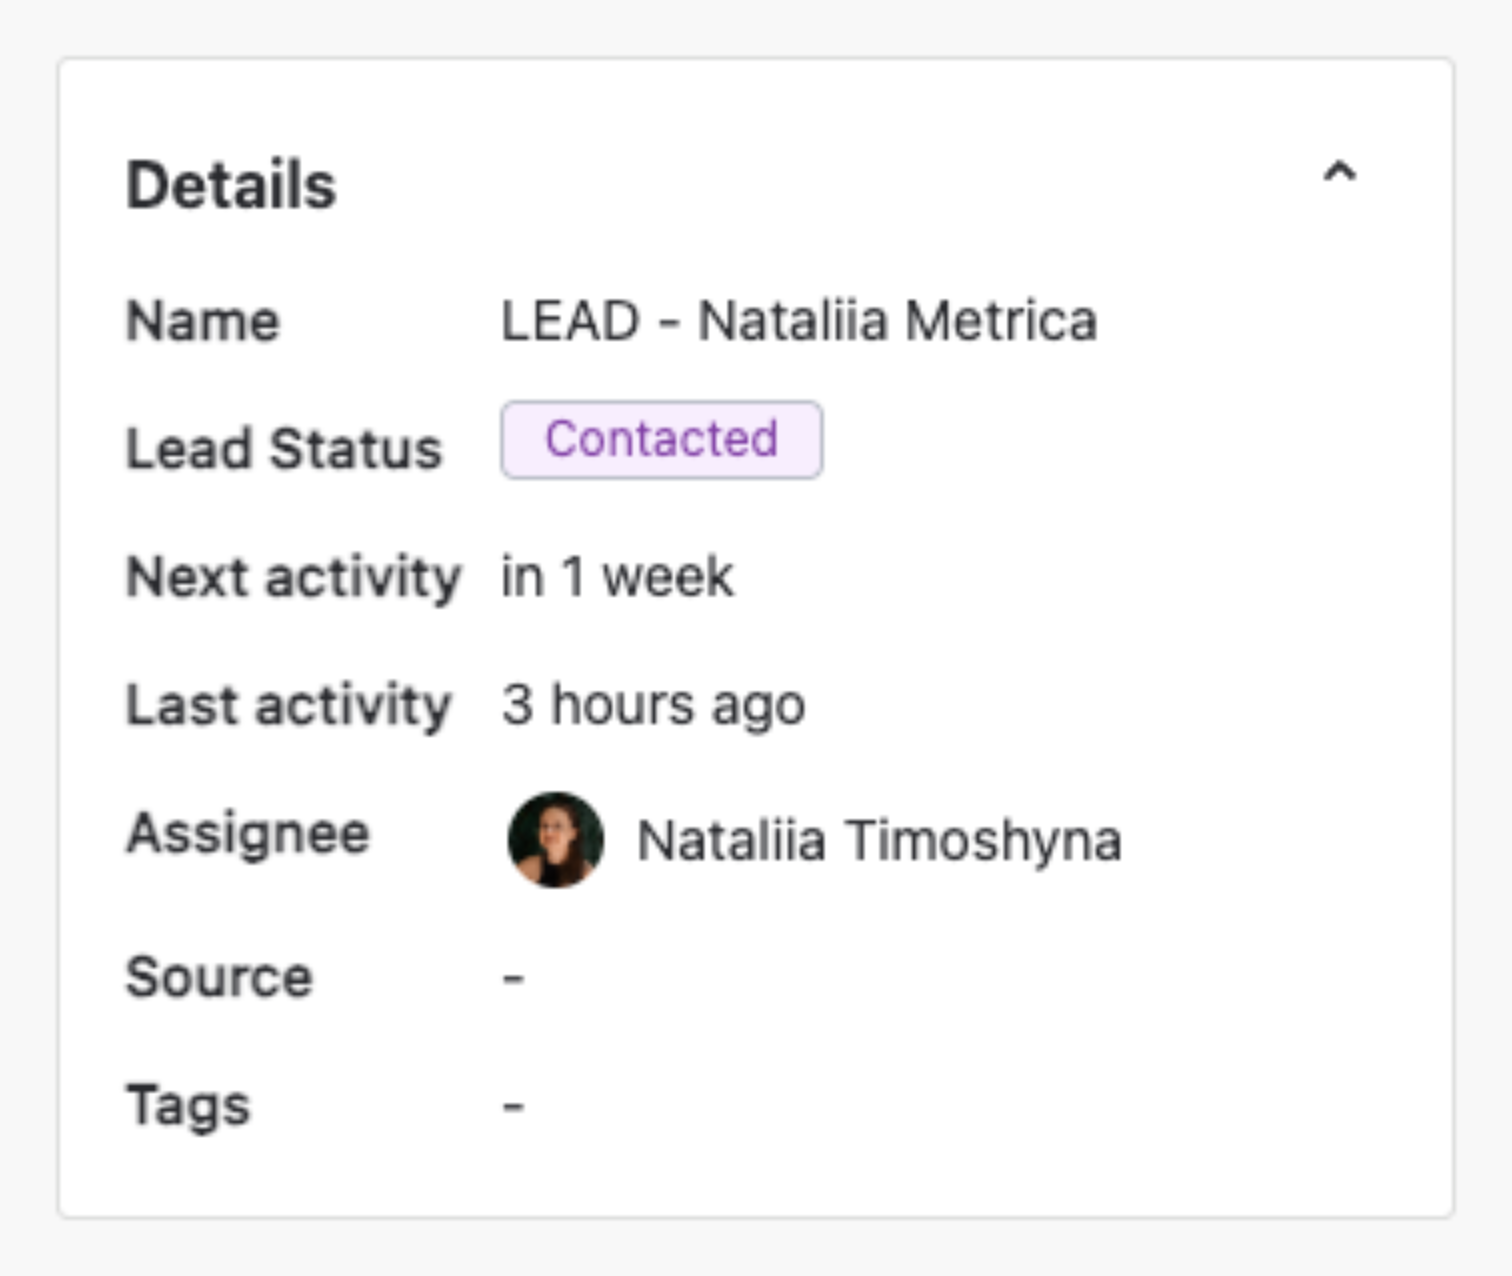
A lead’s Details panel shows both as relative values — in 1 day, 16 hours ago — so the state of the lead is readable at a glance.
Finding work that has gone quiet #
This is what the fields are really for. Open Filters → Basic and scroll to the activity blocks:
- Next activity — a preset plus a start/due date range, for “what is coming up this week”.
- Last activity — the same, plus No activity in the last (7, 14, 30 or 90 days) and a Never checkbox.
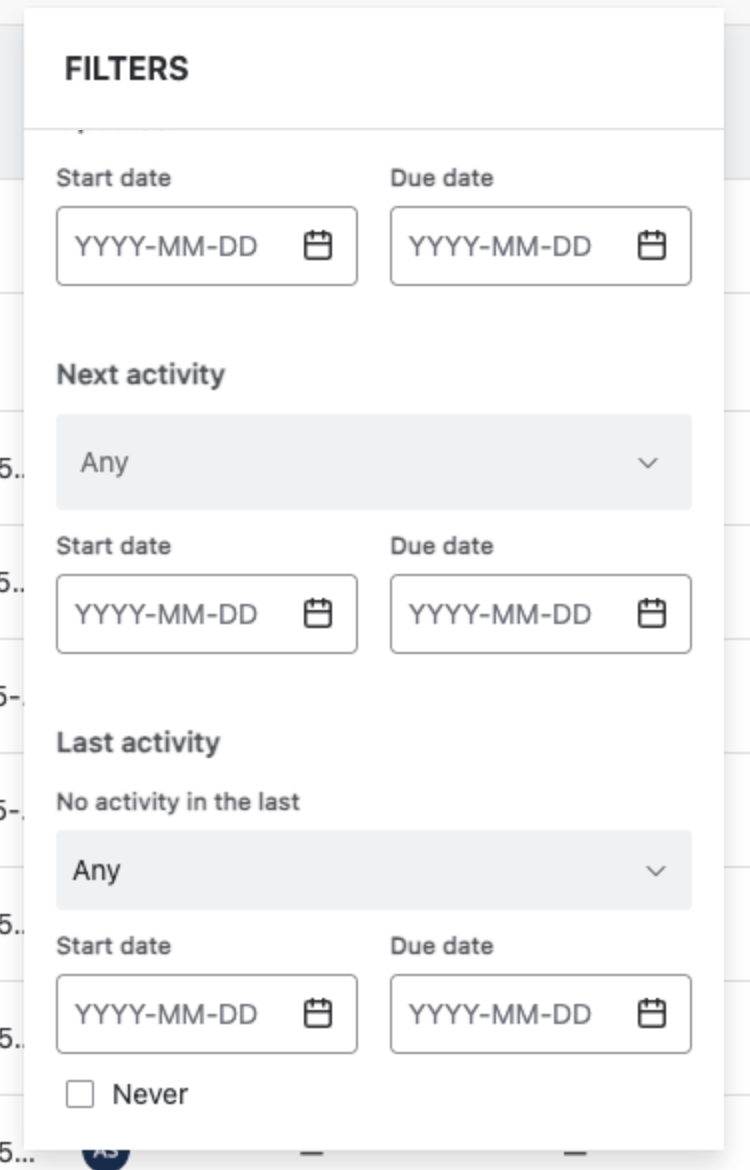
No activity in the last 30 days combined with an open status is the stale-pipeline report most sales managers want: everything nobody has touched in a month. Never finds the ones that were never worked at all.
Filters are staged until you press Apply. A selection you have made but not applied changes nothing — if the list looks wrong, check that you applied it.
3. Creating a New Lead #
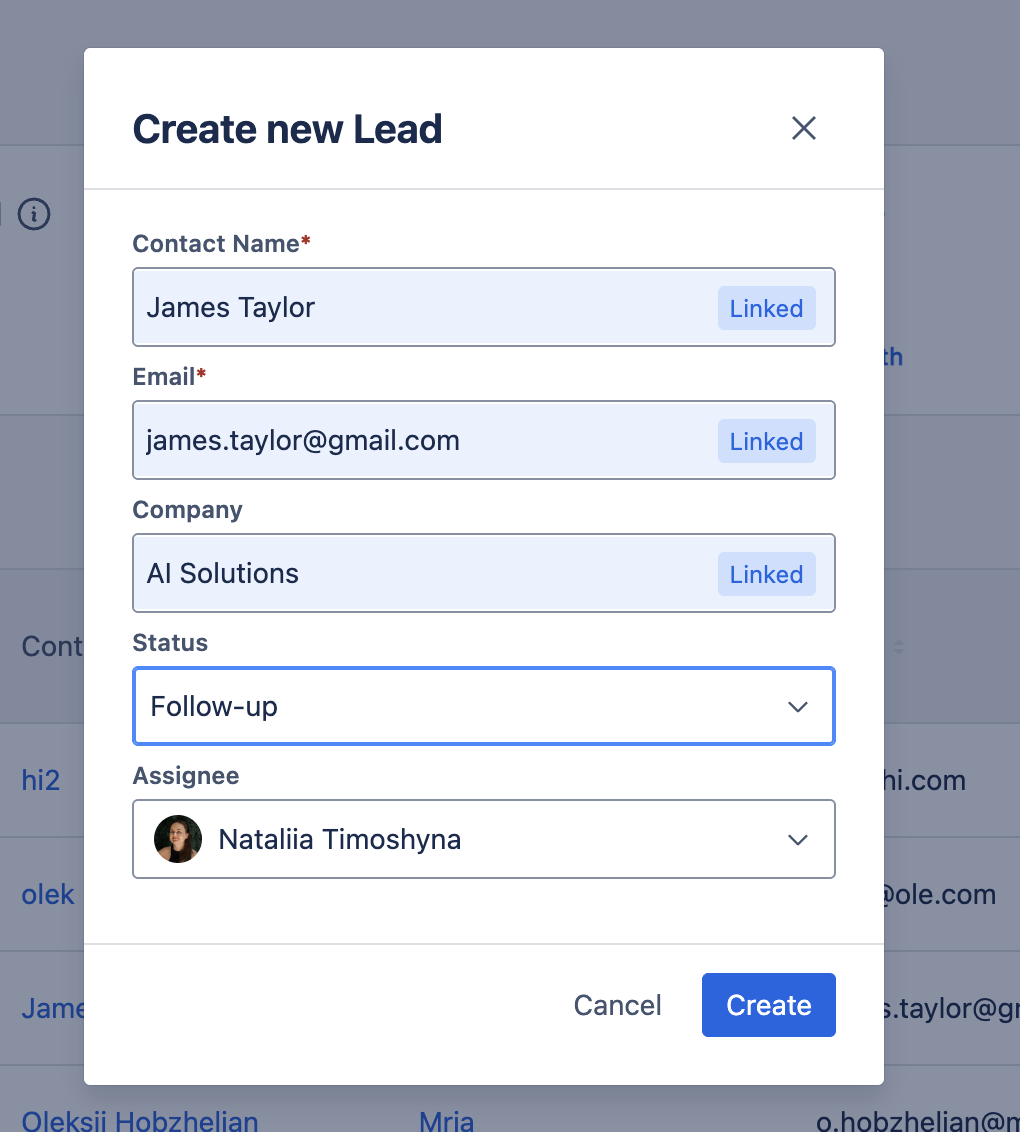
➕ To create a new Lead:
- Click Create Lead.
- Fill in the fields:
- Contact Name (required)
- Email (required, accepts duplicates)
- Company (optional)
- Status (select from dropdown: e.g., New, Follow-up, Junk, Lost)
- Assignee (select the user responsible for the Lead)
- Click Create to save.
🔗 When entering a name, Mria CRM will suggest existing contacts/companies. If selected, the Lead will be linked to that contact automatically.
4. Importing Leads in Bulk #
If you need to add multiple Leads at once, you can import them in bulk from a CSV or XLSX file.
Mria CRM will guide you through mapping your columns and values step by step, helping you review duplicates and assign Leads to the right users.
💡 You can access the import tool either from the Leads section (Import Leads button) or from Settings → Data Administration → Leads.
See full instructions here: Leads Import.
5. Lead Detail View #
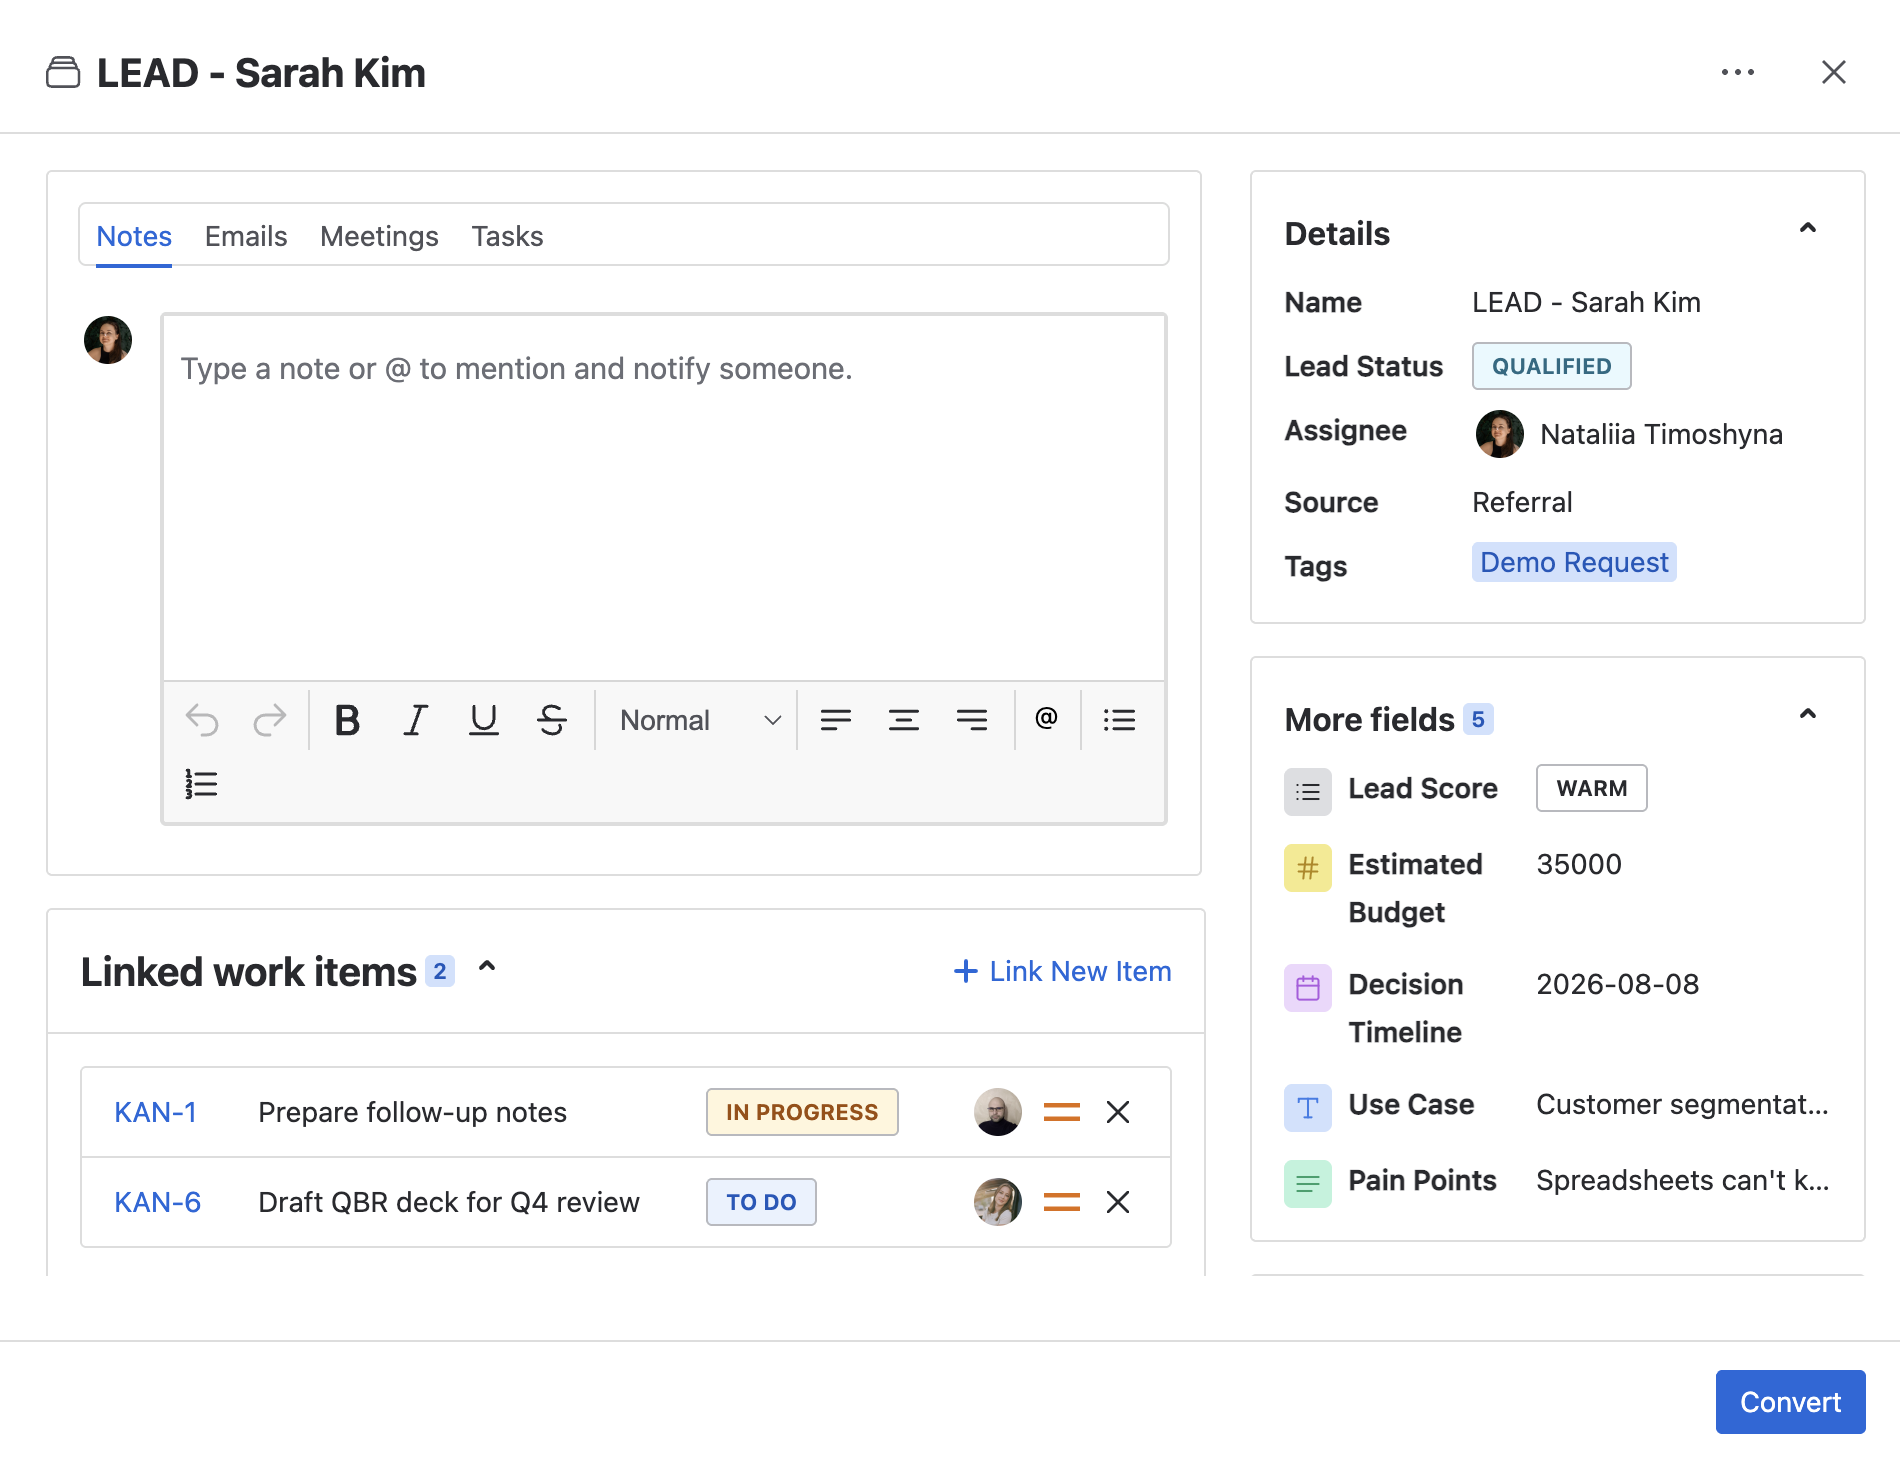
Clicking on a Lead opens the Lead detail view, where you can:
- See Details (Lead status, Assignee, Source, Tags).
- View or edit Contact information (name, email, phone, title).
Phone number can be entered in any format you prefer — for example, “+38 (097) 123 45 67 (after 5 PM)”. The field accepts numbers, symbols, and notes to keep things flexible.
- View or edit Company information (name, website).
- Add Notes and track them in the Timeline.
- Access additional tabs — Meetings, Tasks, Files, Emails, and Jira links. See Activities Breakdown for what each one does, and Gmail Integration / Outlook Integration for sending and syncing email from the Lead.
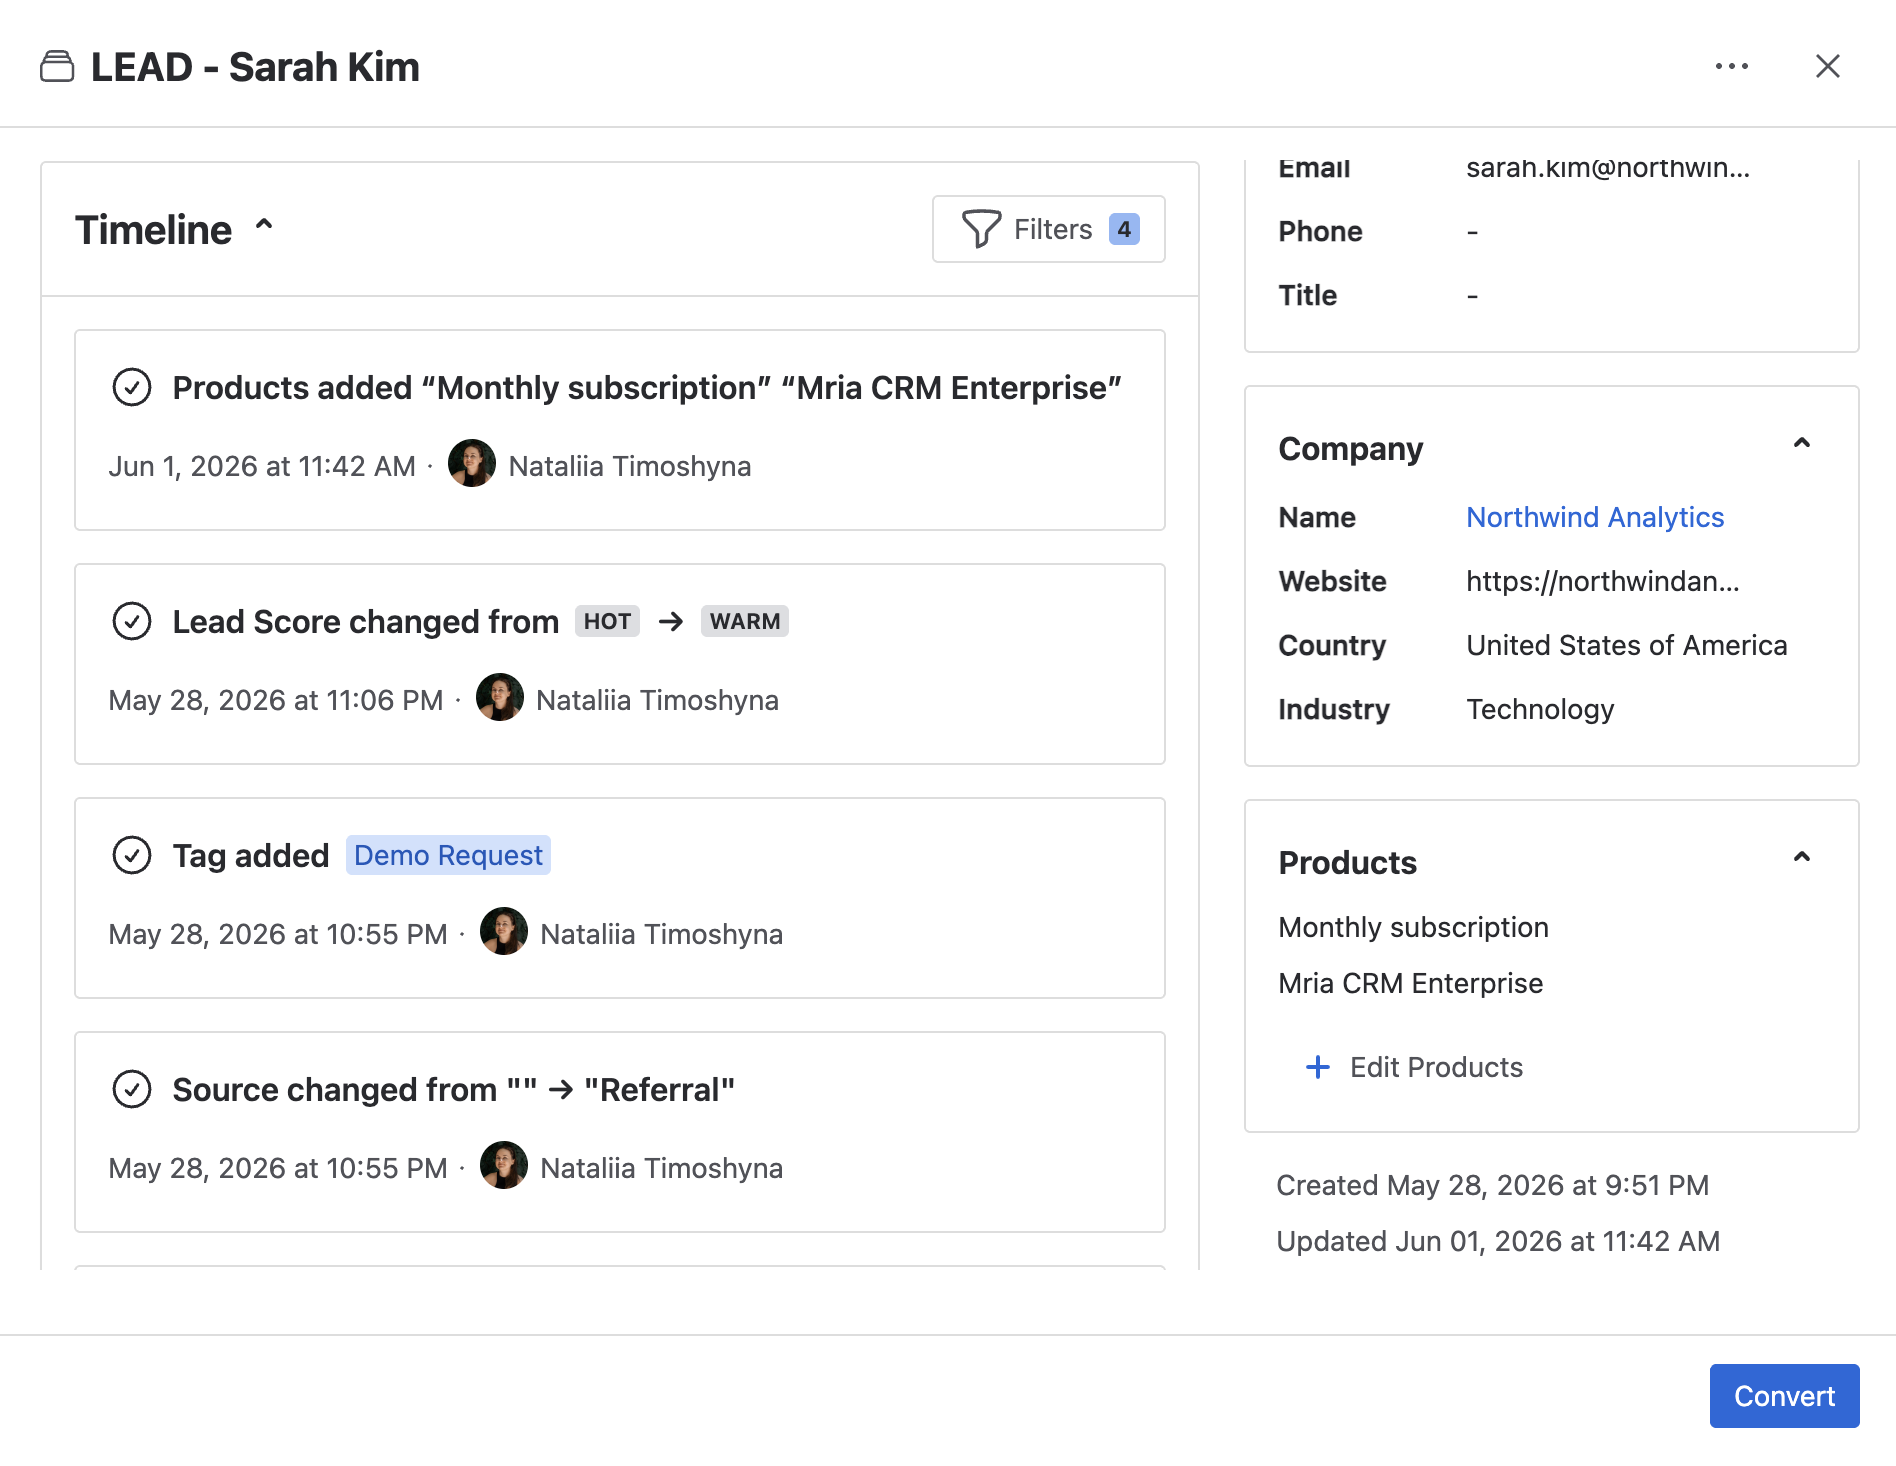
- The Timeline records important activities, such as when the Lead was created or updated.
Arranging this page
Administrators can move, hide or collapse the blocks of the Lead page and reorder the fields in Details — in Settings → Layouts, or from ⚙ Configure at the foot of the side panel. See Layouts.
6. Custom Fields on Leads #
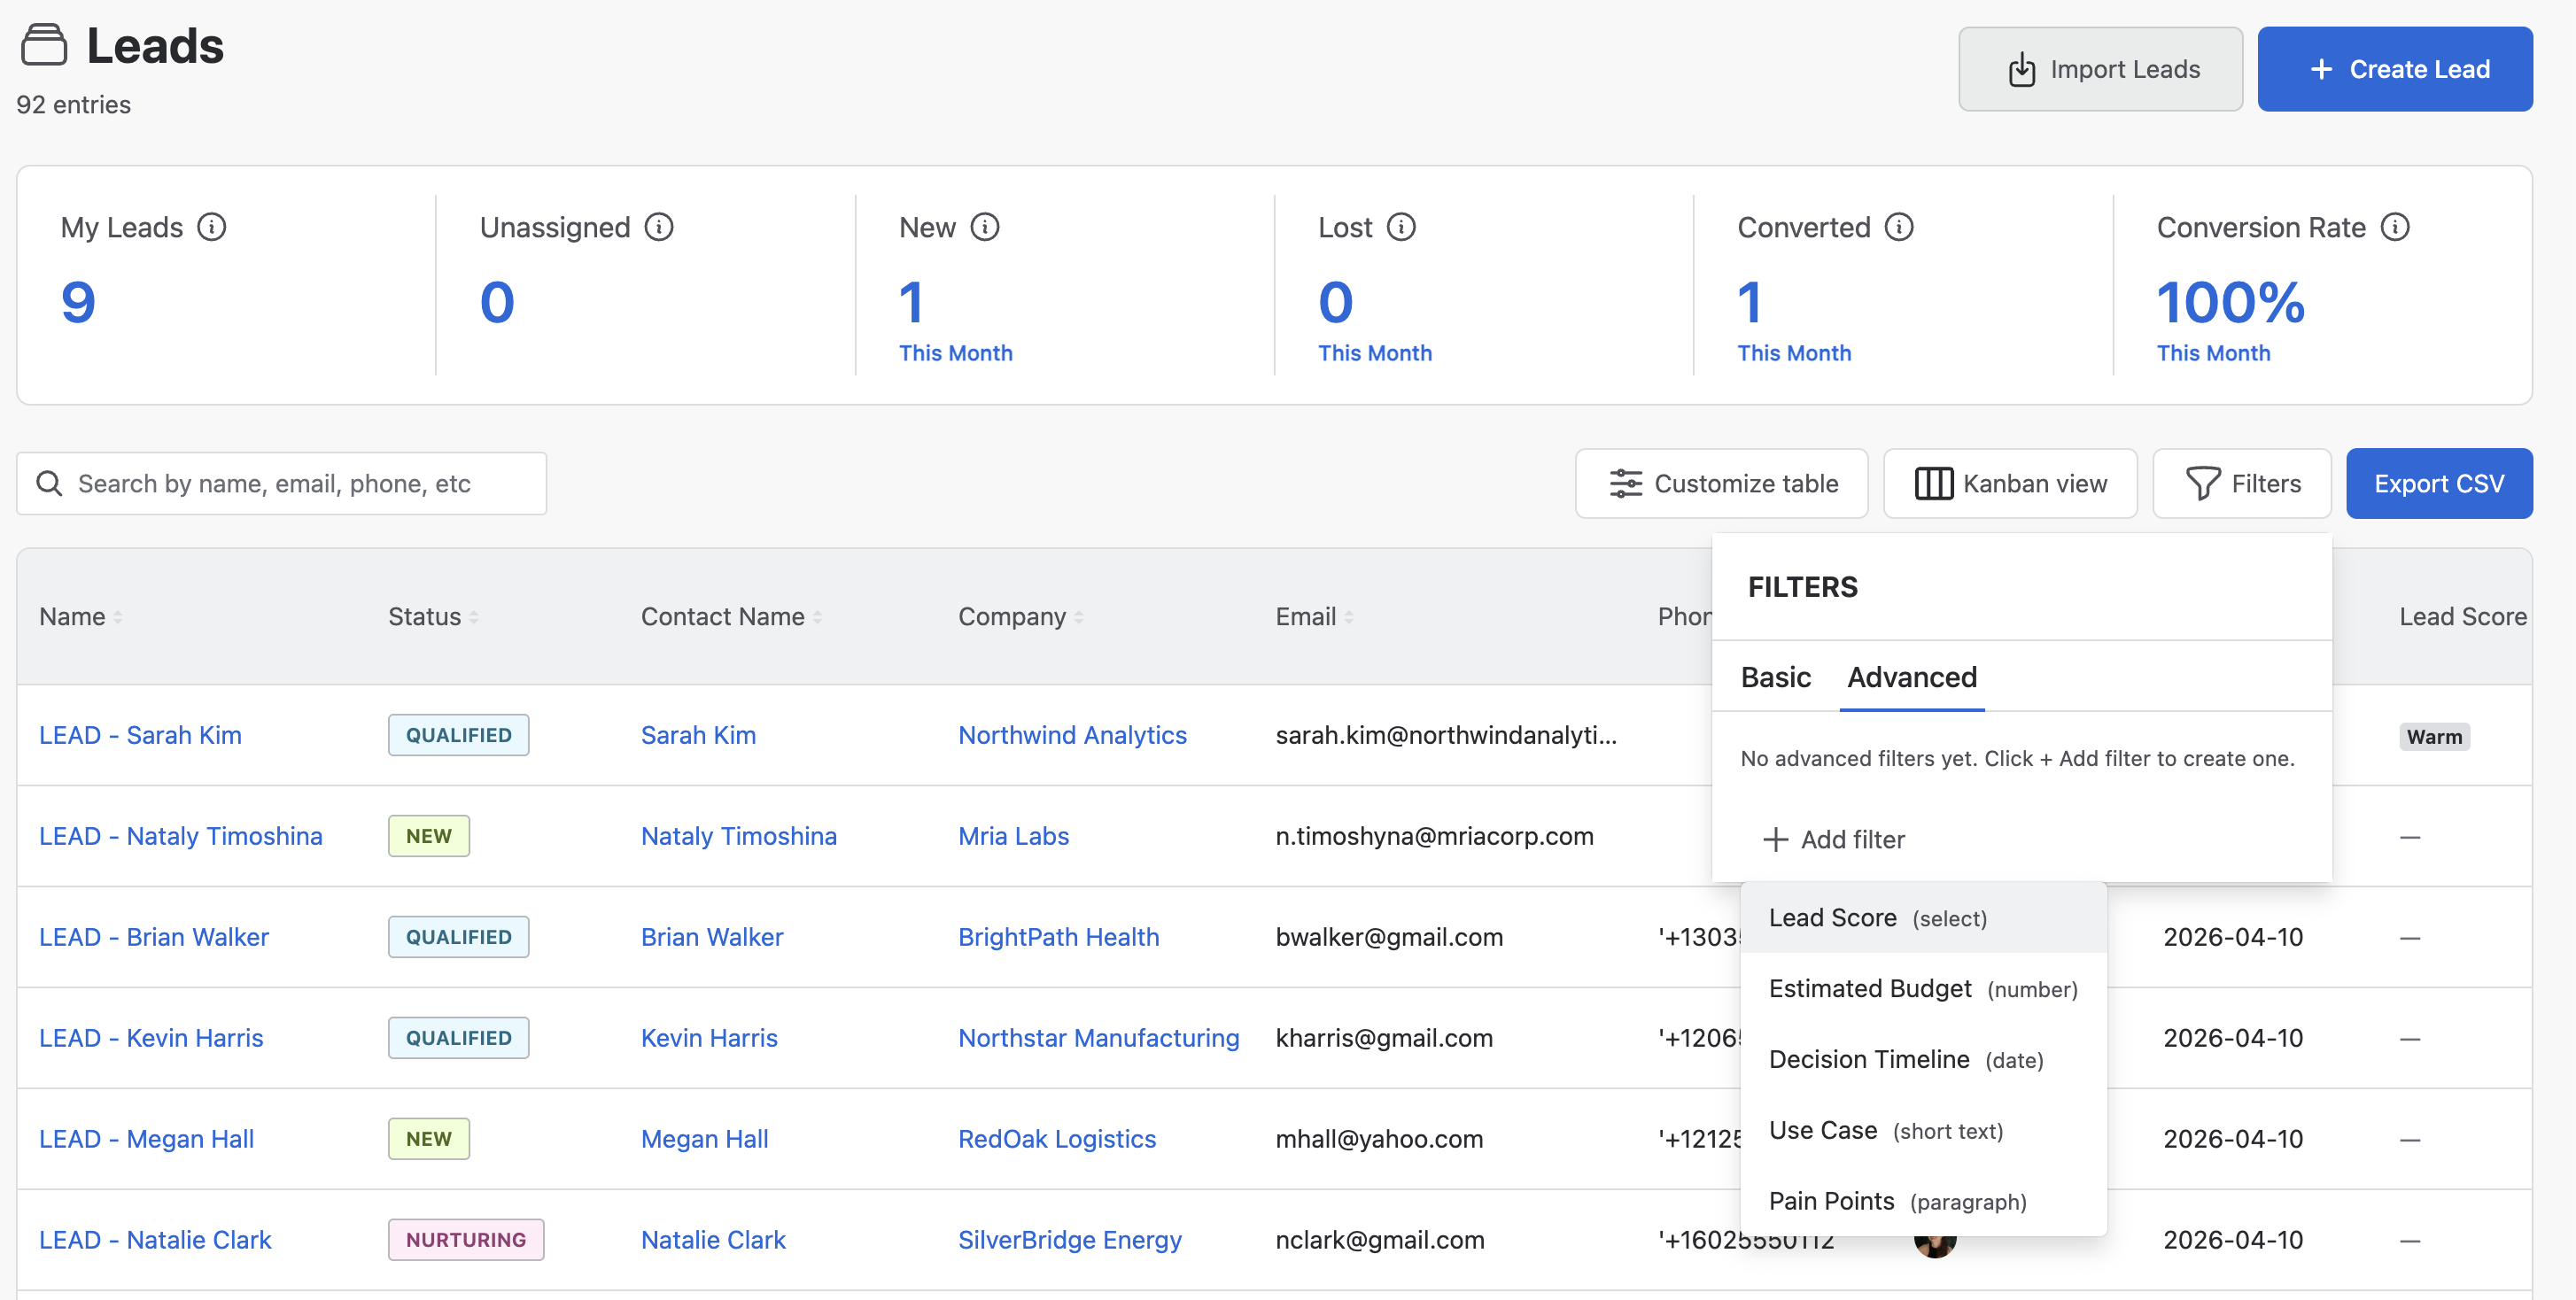
Custom fields let your team capture extra information on every Lead beyond the standard fields. For example, you can add Lead Score to track temperature, Estimated Budget to qualify opportunities earlier, or Decision Timeline to forecast when a Lead will close.
Custom fields are managed by administrators under Settings → Custom Fields. See Custom Fields for the full setup guide and field type reference.
Once a custom field is created on the Lead entity, it shows up in several places:
- Lead detail view — populated values appear in the More fields section on the right-hand panel. Click any field to edit inline.
- Table view — open the Customize table menu and toggle any custom field on to add it as an optional column.
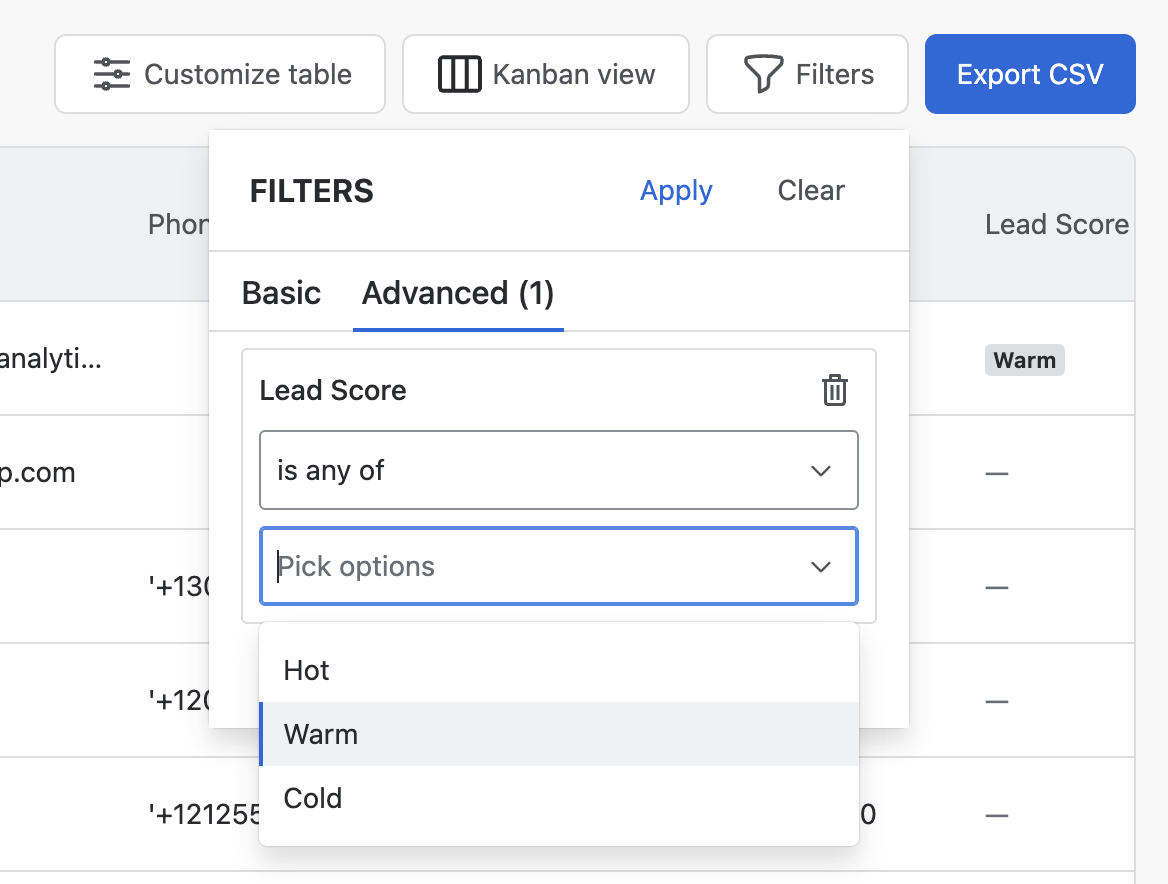
- Filters panel — every custom field appears under the Advanced tab as a filterable criterion (see Filtering Leads below).
- CSV export — visible columns are included in the export, so custom fields show up in the CSV when they’re toggled on in the table view.
- Leads Import — custom fields can be mapped during bulk import. See Leads Import.
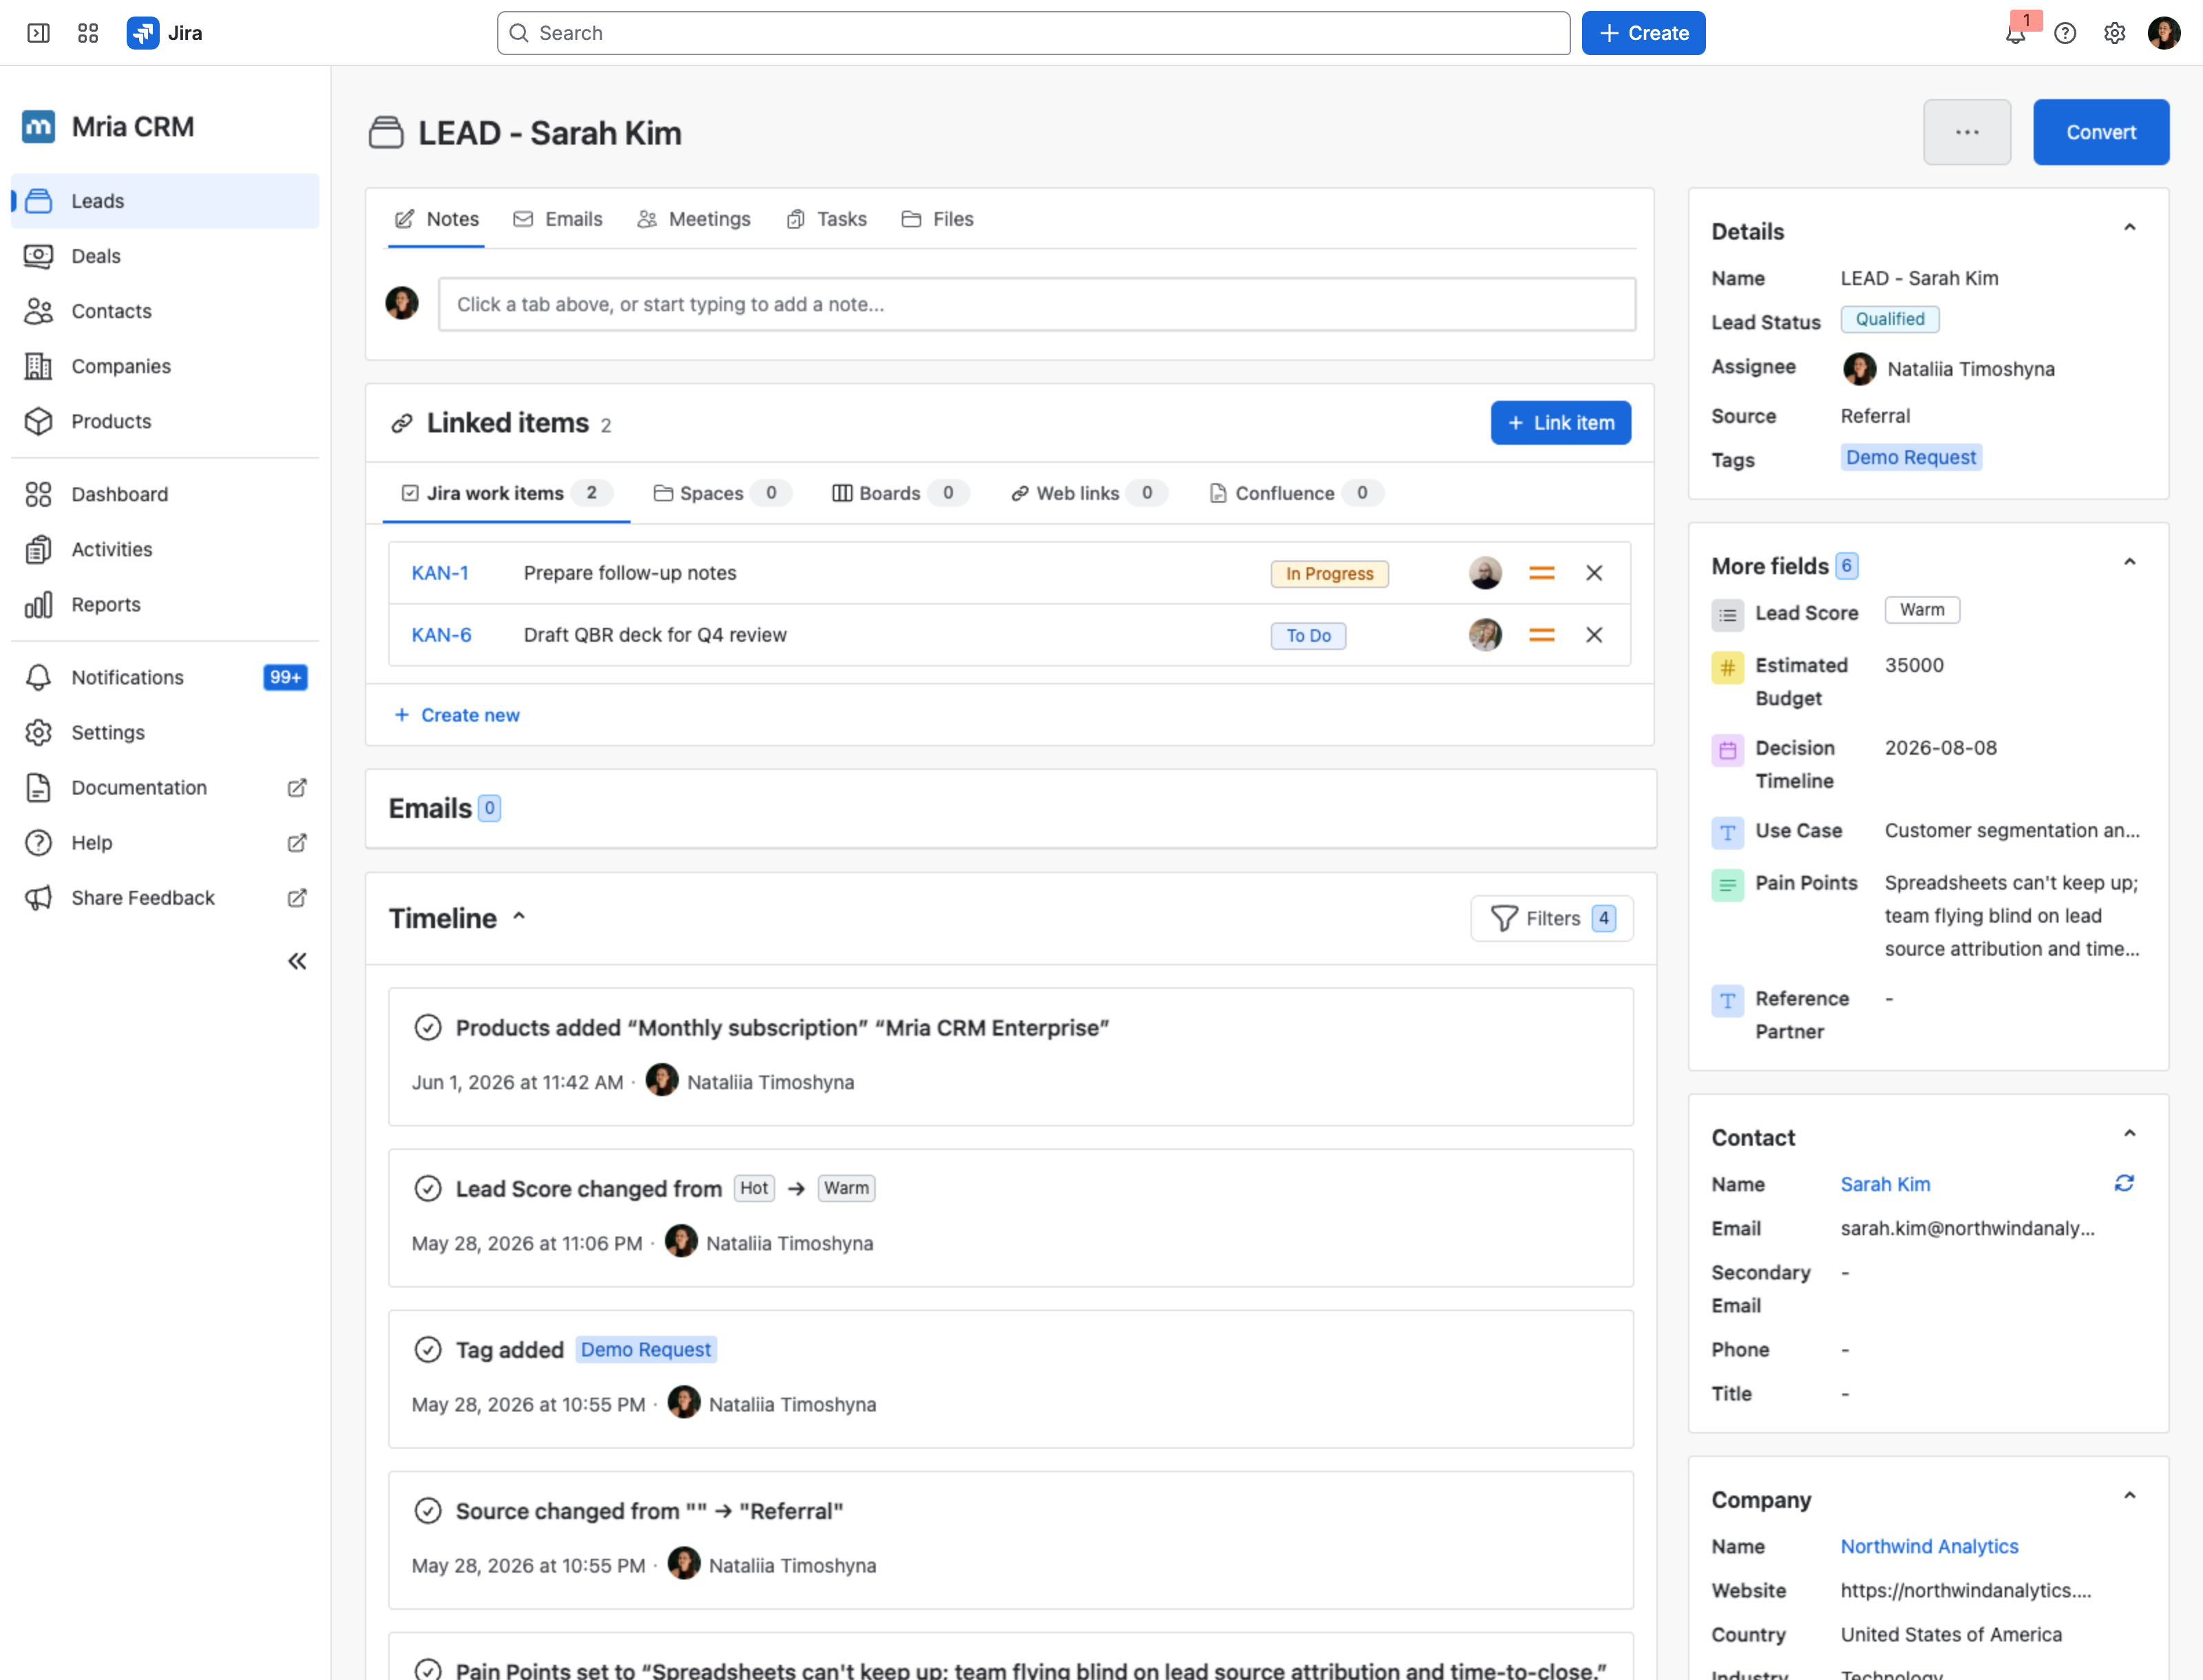
Change log: Every edit to a custom field is recorded on the Lead’s Timeline tab — who changed which field, when, and the value before and after. History is preserved even after a field is deleted, so you can always trace how a Lead evolved.
Carryover on conversion: When a Lead is converted into a Deal, custom fields with the same name and same type on both entities carry their values over automatically. See Lead to Deal Conversion for the full rule.
7. Linking Entities to a Lead #
Leads can be enriched with additional information by linking them to existing or new entities:
Contacts #
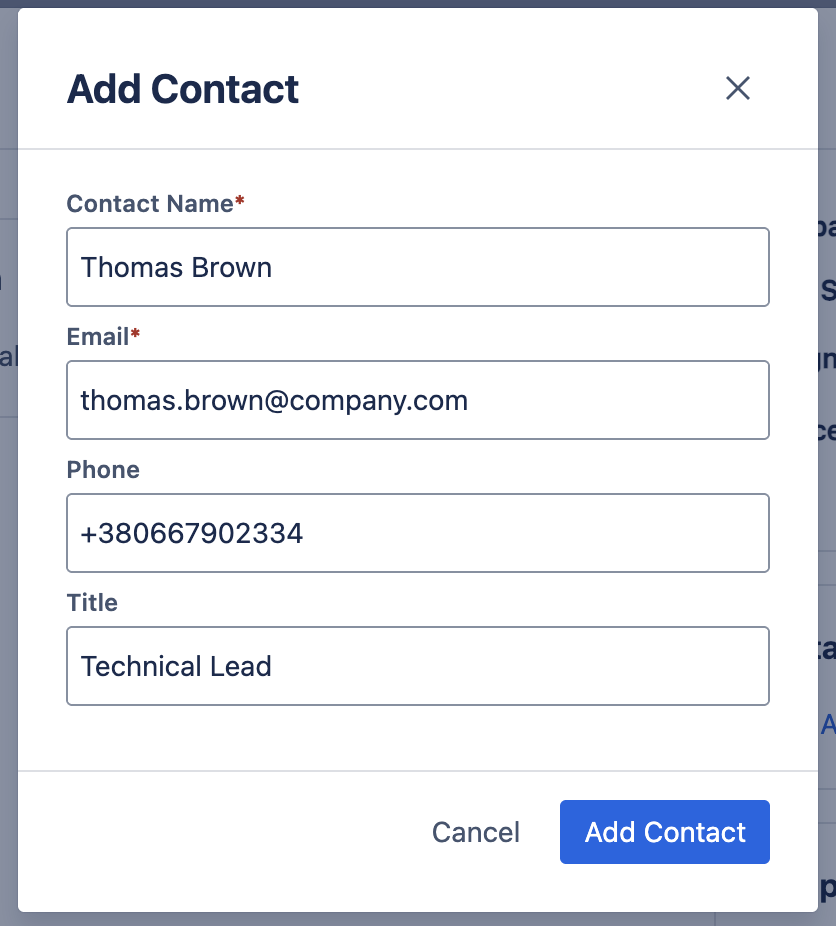
- You can add a Contact directly from the Lead detail view.
- When added, the Contact is created in the Contacts module and linked to this Lead.
- Fields include Contact Name, Email, Phone, Title.
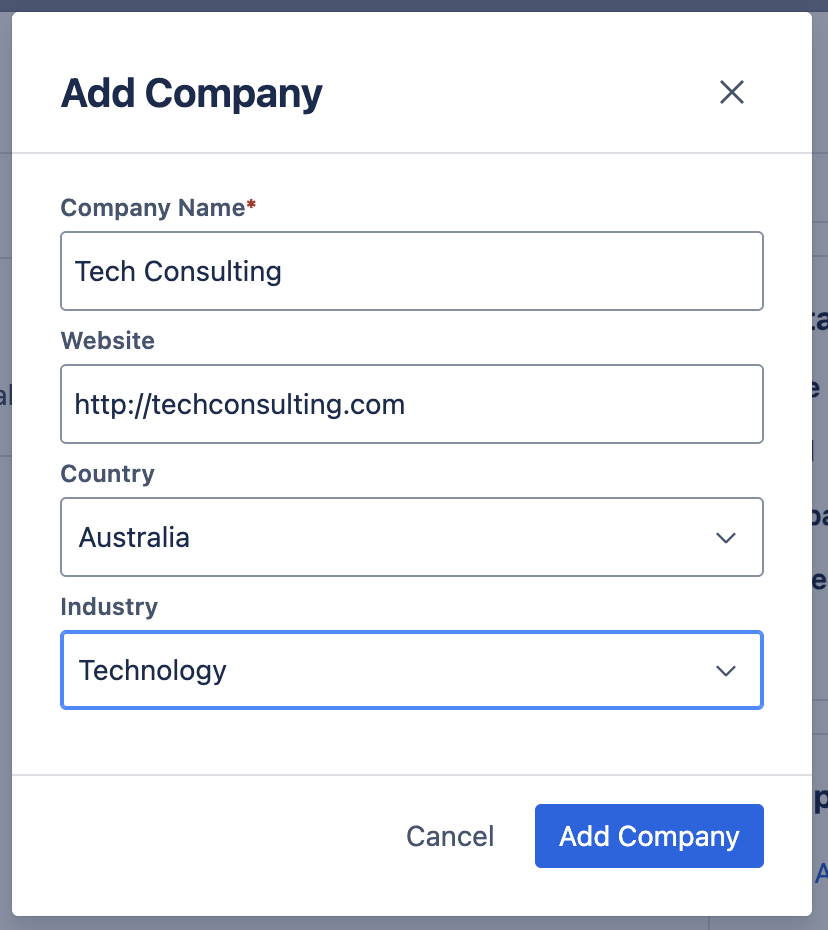
Companies #
- You can add a Company directly from the Lead detail view.
- When added, the Company is created in the Companies module and linked to this Lead.
- Fields include Company Name, Website, Country, Industry.
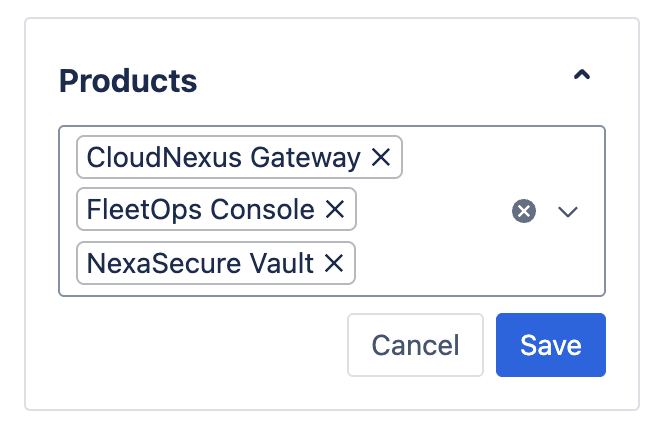
Products #
- You can link existing Products to a Lead.
- Products must already exist in the Products module.
- From the Lead view, select one or more Products from the dropdown list to associate them with the Lead.
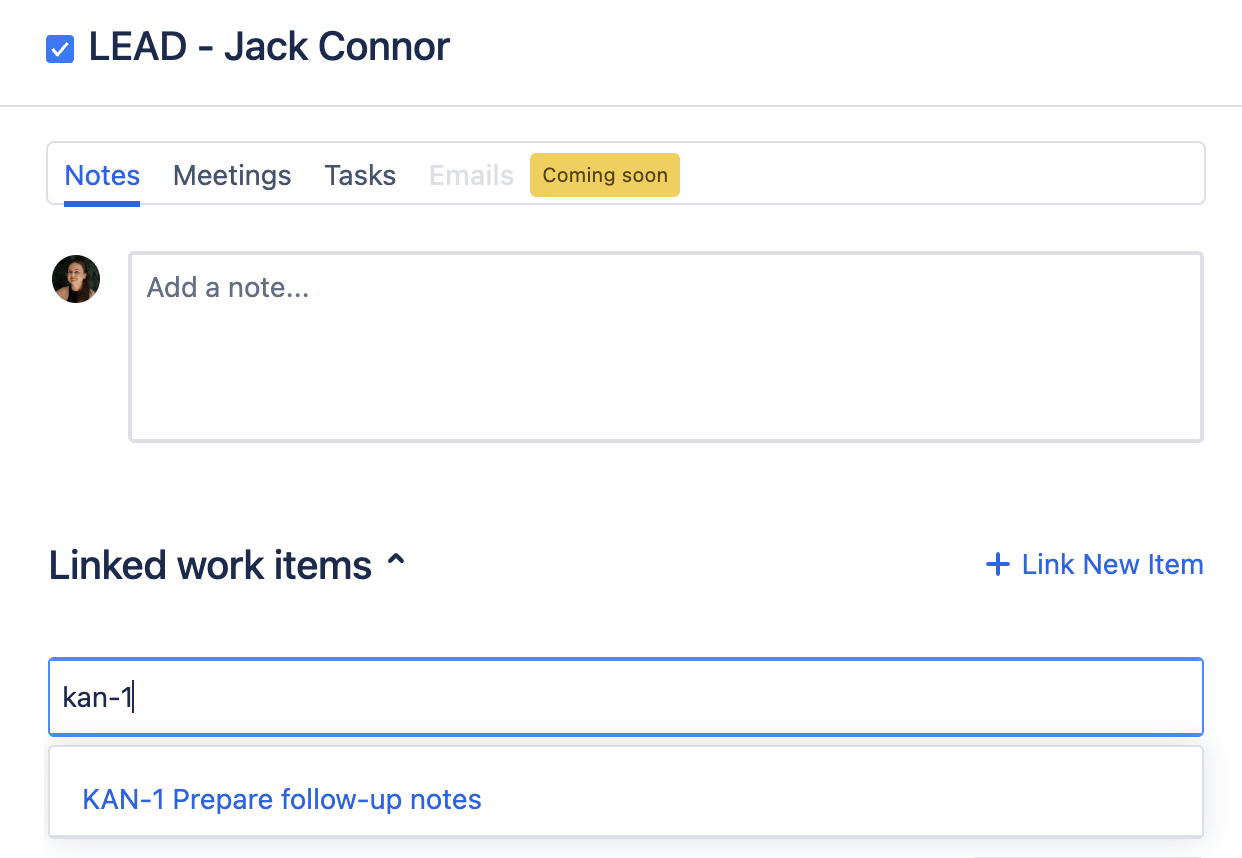
Jira work items #
- You can link existing Jira work items (issues) to a Lead.
- Work items must already exist in Jira and be accessible to the user.
- From the Lead view, type the issue key (e.g.,
KAN-1) or search by summary to select one or more work items from the dropdown list.
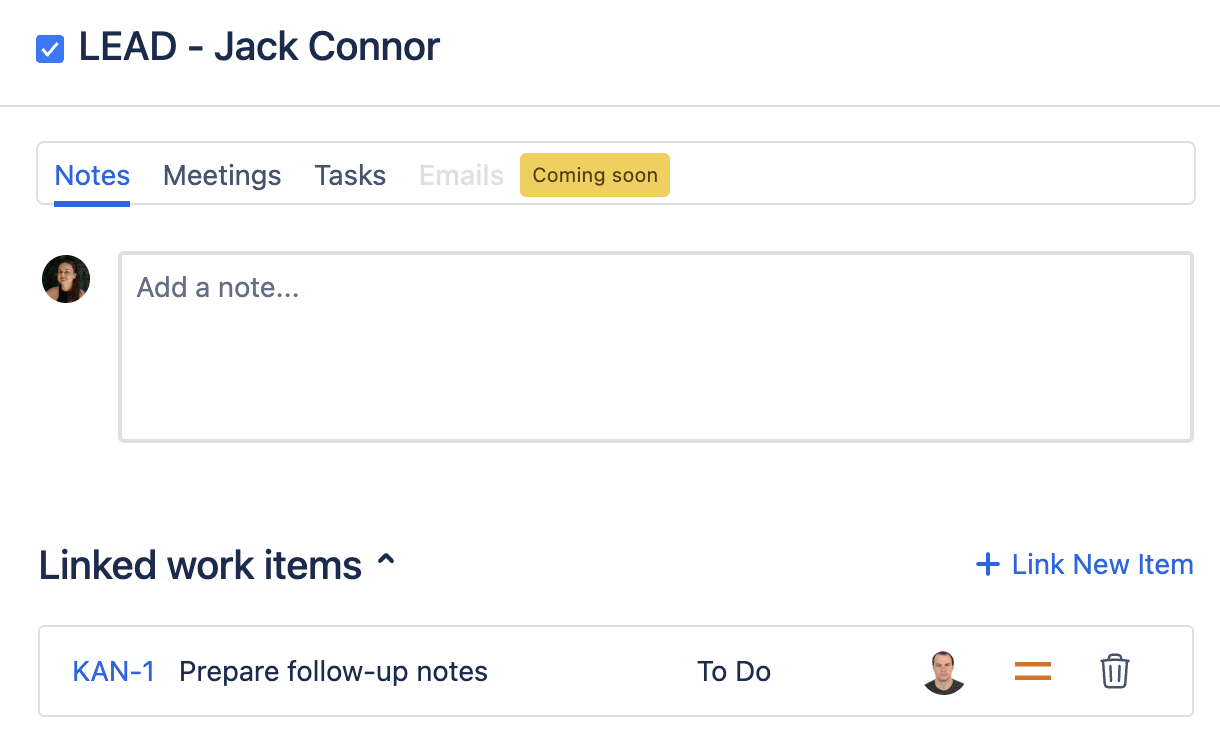
- Once linked, the work items are displayed under Linked work items, showing key details such as summary, status, priority and assignee.
- You can also create a new Jira work item and link it at the same time.
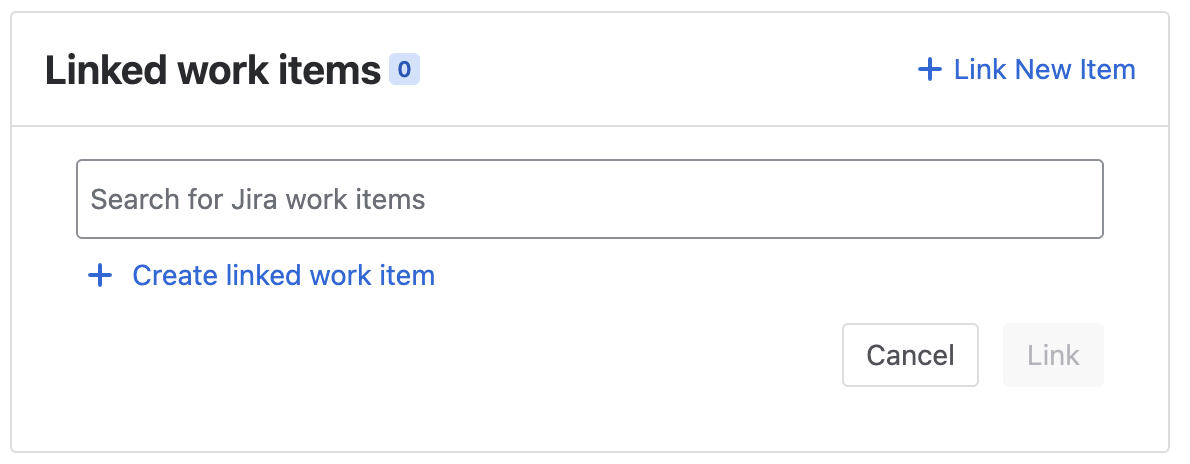
- Click Create linked work item below the search field, fill in the required details (Project, Issue Type, Summary, etc.), and click Create. The work item will be created in Jira and automatically linked to the Lead.
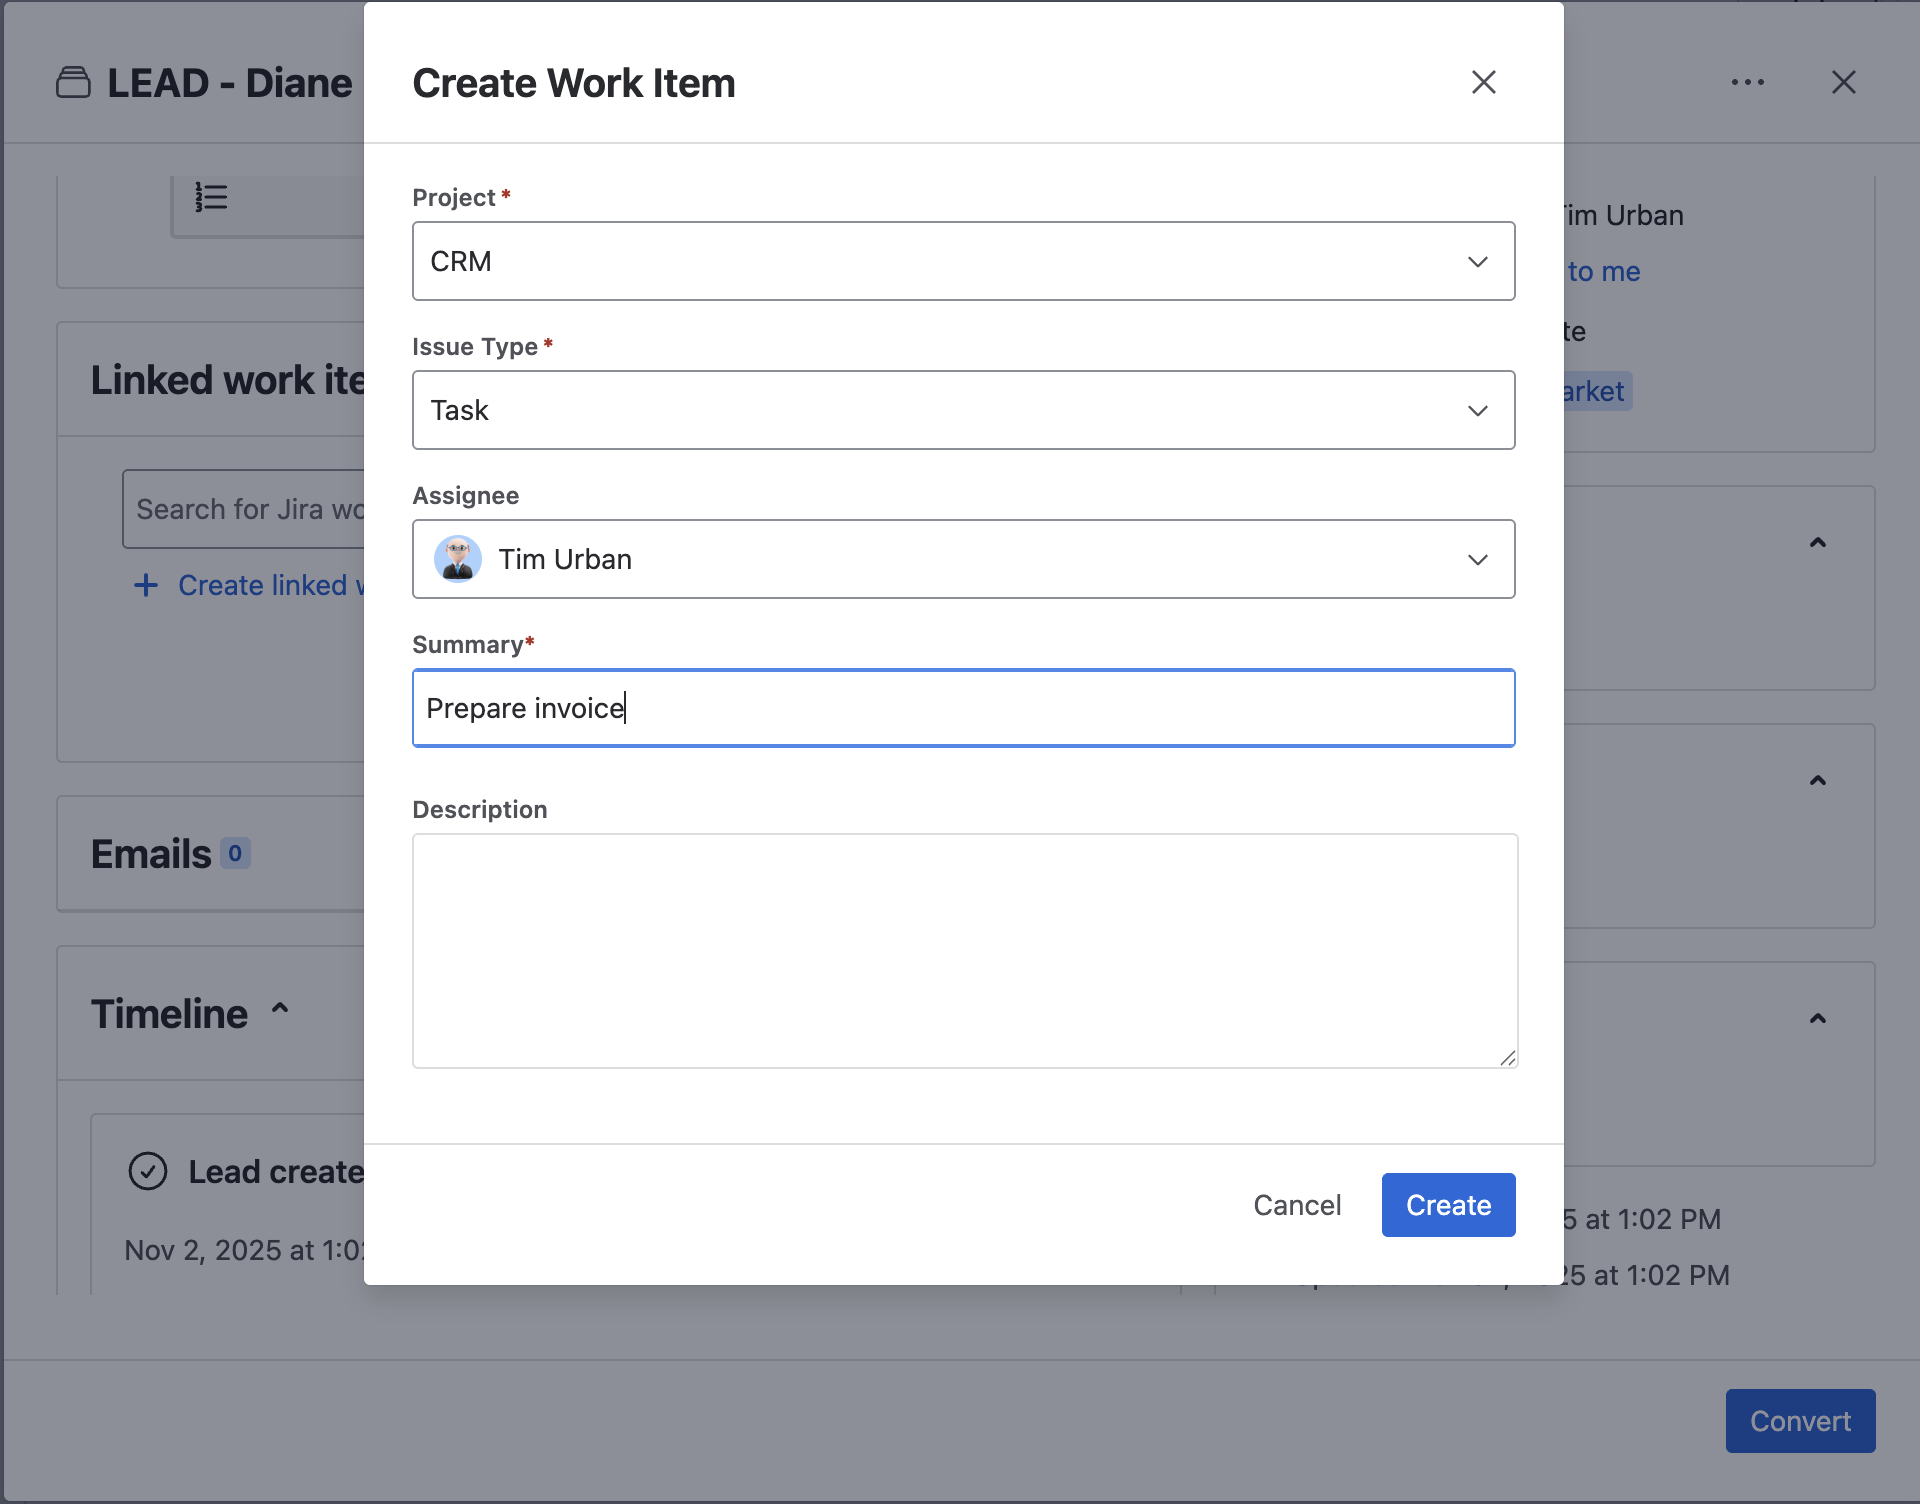
This is useful when the required work item doesn’t exist yet, allowing you to create and associate it without leaving the CRM.
8. Lead Statuses #
Leads can have different statuses to reflect their progress through the pipeline:
- New – a fresh Lead, not yet processed.
- Follow-up – requires further action or communication.
- Contacted – initial contact has been made with the Lead.
- Nurturing – the Lead is in an ongoing relationship-building phase, not ready to move forward yet.
- Pending – waiting for a response or outcome (e.g., awaiting client decision).
- Engaged – the Lead is actively responding and showing interest.
- Qualified – the Lead has been vetted and meets the criteria to move further in the pipeline.
- Junk – unqualified or irrelevant Lead.
- Lost – the Lead was pursued but the opportunity is no longer active (e.g., the Lead chose another vendor, stopped responding, or explicitly declined).
- Duplicated – the Lead is a duplicate of an existing record.
- Converted – the Lead successfully turned into a Deal (conversion flow covered in the next section).
Statuses Lost, Junk, Duplicated, and Converted are considered Closed Leads.
All other statuses are counted toward the Open Leads total. For example, in the Contacts section, users can see how many Open Leads are linked to each Contact.
9. Filtering Leads #
The Filters panel lets you quickly narrow down Leads by key criteria without affecting the underlying data. It has two tabs:
- Basic — the standard filter set, always available.
- Advanced — every custom field on the Lead is automatically available here as a filterable criterion. The available comparators depend on the field type (for example, dropdowns use is any of, numbers use is greater than, dates use is on or before).
Available Basic filters include:
- Assigned to me – show only Leads assigned to you.
- Status – filter by Lead status (e.g., Contacted, Engaged, Follow-up, Junk, Lost, etc.).
- Assignee – view Leads owned by specific team members.
- Source – filter based on Lead source.
- Product – show Leads linked to particular Products.
- Created / Updated – define date ranges to see Leads created or updated within a specific period.
📌 Filters are optional and purely for convenience. They do not change the data itself, only how it’s displayed.
10. Deleting a single Lead #
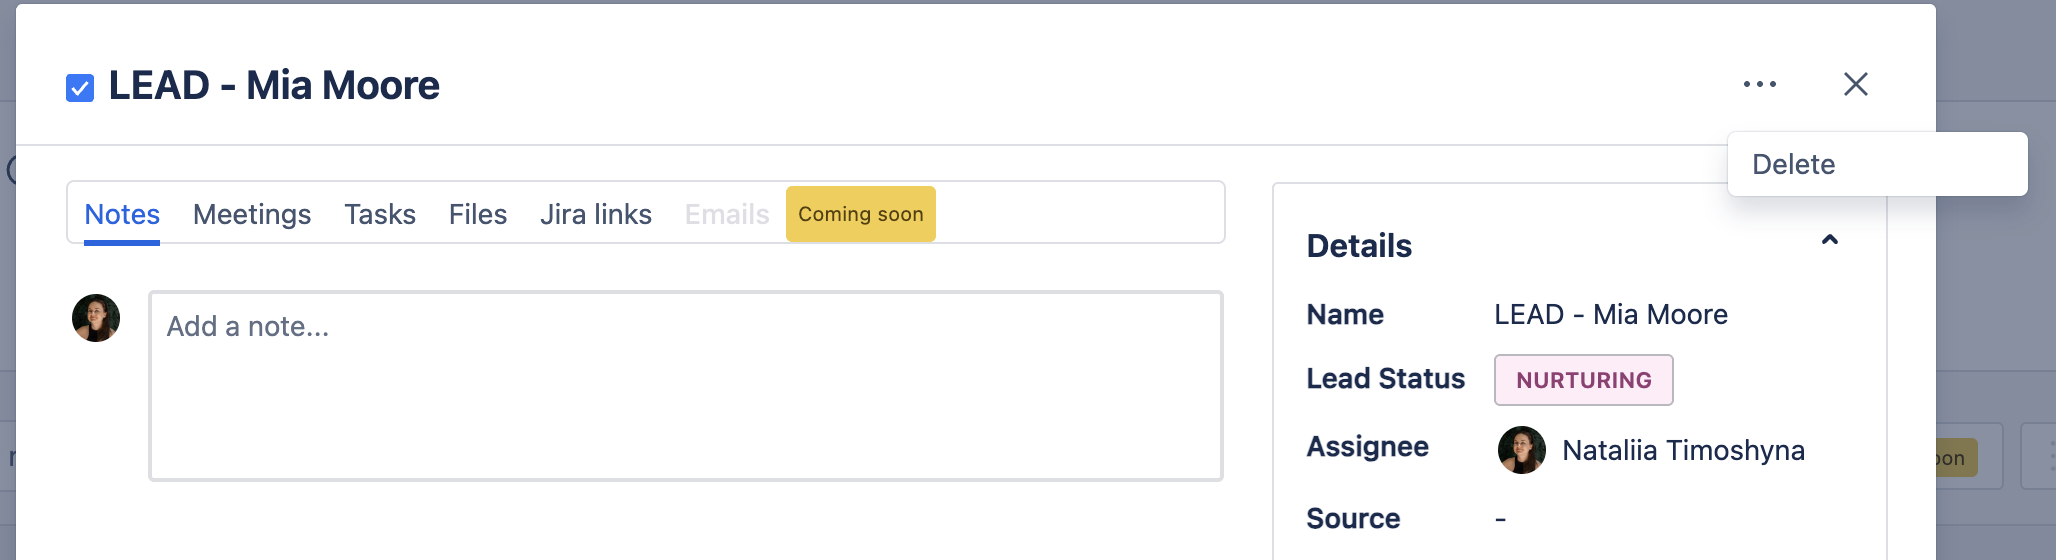
To delete one Lead, open the ... menu in the top right corner of a Lead full view and select Delete.
- No business rule blocks it. A Lead has no linked-record guard the way a Contact used on a Deal does, so deletion is never refused because of what the Lead is attached to.
- You still need the permission. Deleting requires the Delete grant on Leads, which only Administrator holds by default — User and Viewer both have Delete off on all five core entities. See Roles & Permissions.
- Once deleted, the Lead is gone from the system.
Delete is granted per area, not per role in the abstract: User has no Delete on Leads, Deals, Contacts, Companies or Products, but does have it on Emails and Email templates.
11. Bulk actions #
From the table view you can update or delete many Leads in one go — useful for re-assigning a departed colleague’s pipeline, tagging a campaign, or clearing out sample data.
Selecting Leads #
- Narrow the list with Filters if you want to target a specific set.
- Tick the checkbox on each row you want. The header checkbox selects every Lead on the current page.
- A bulk actions bar appears at the bottom of the list, showing the count — for example 2 selected. To go wider than the current page, click Select all N in that bar: it extends the selection to every Lead matching your current filters.
- The × at the end of the bar clears the selection.
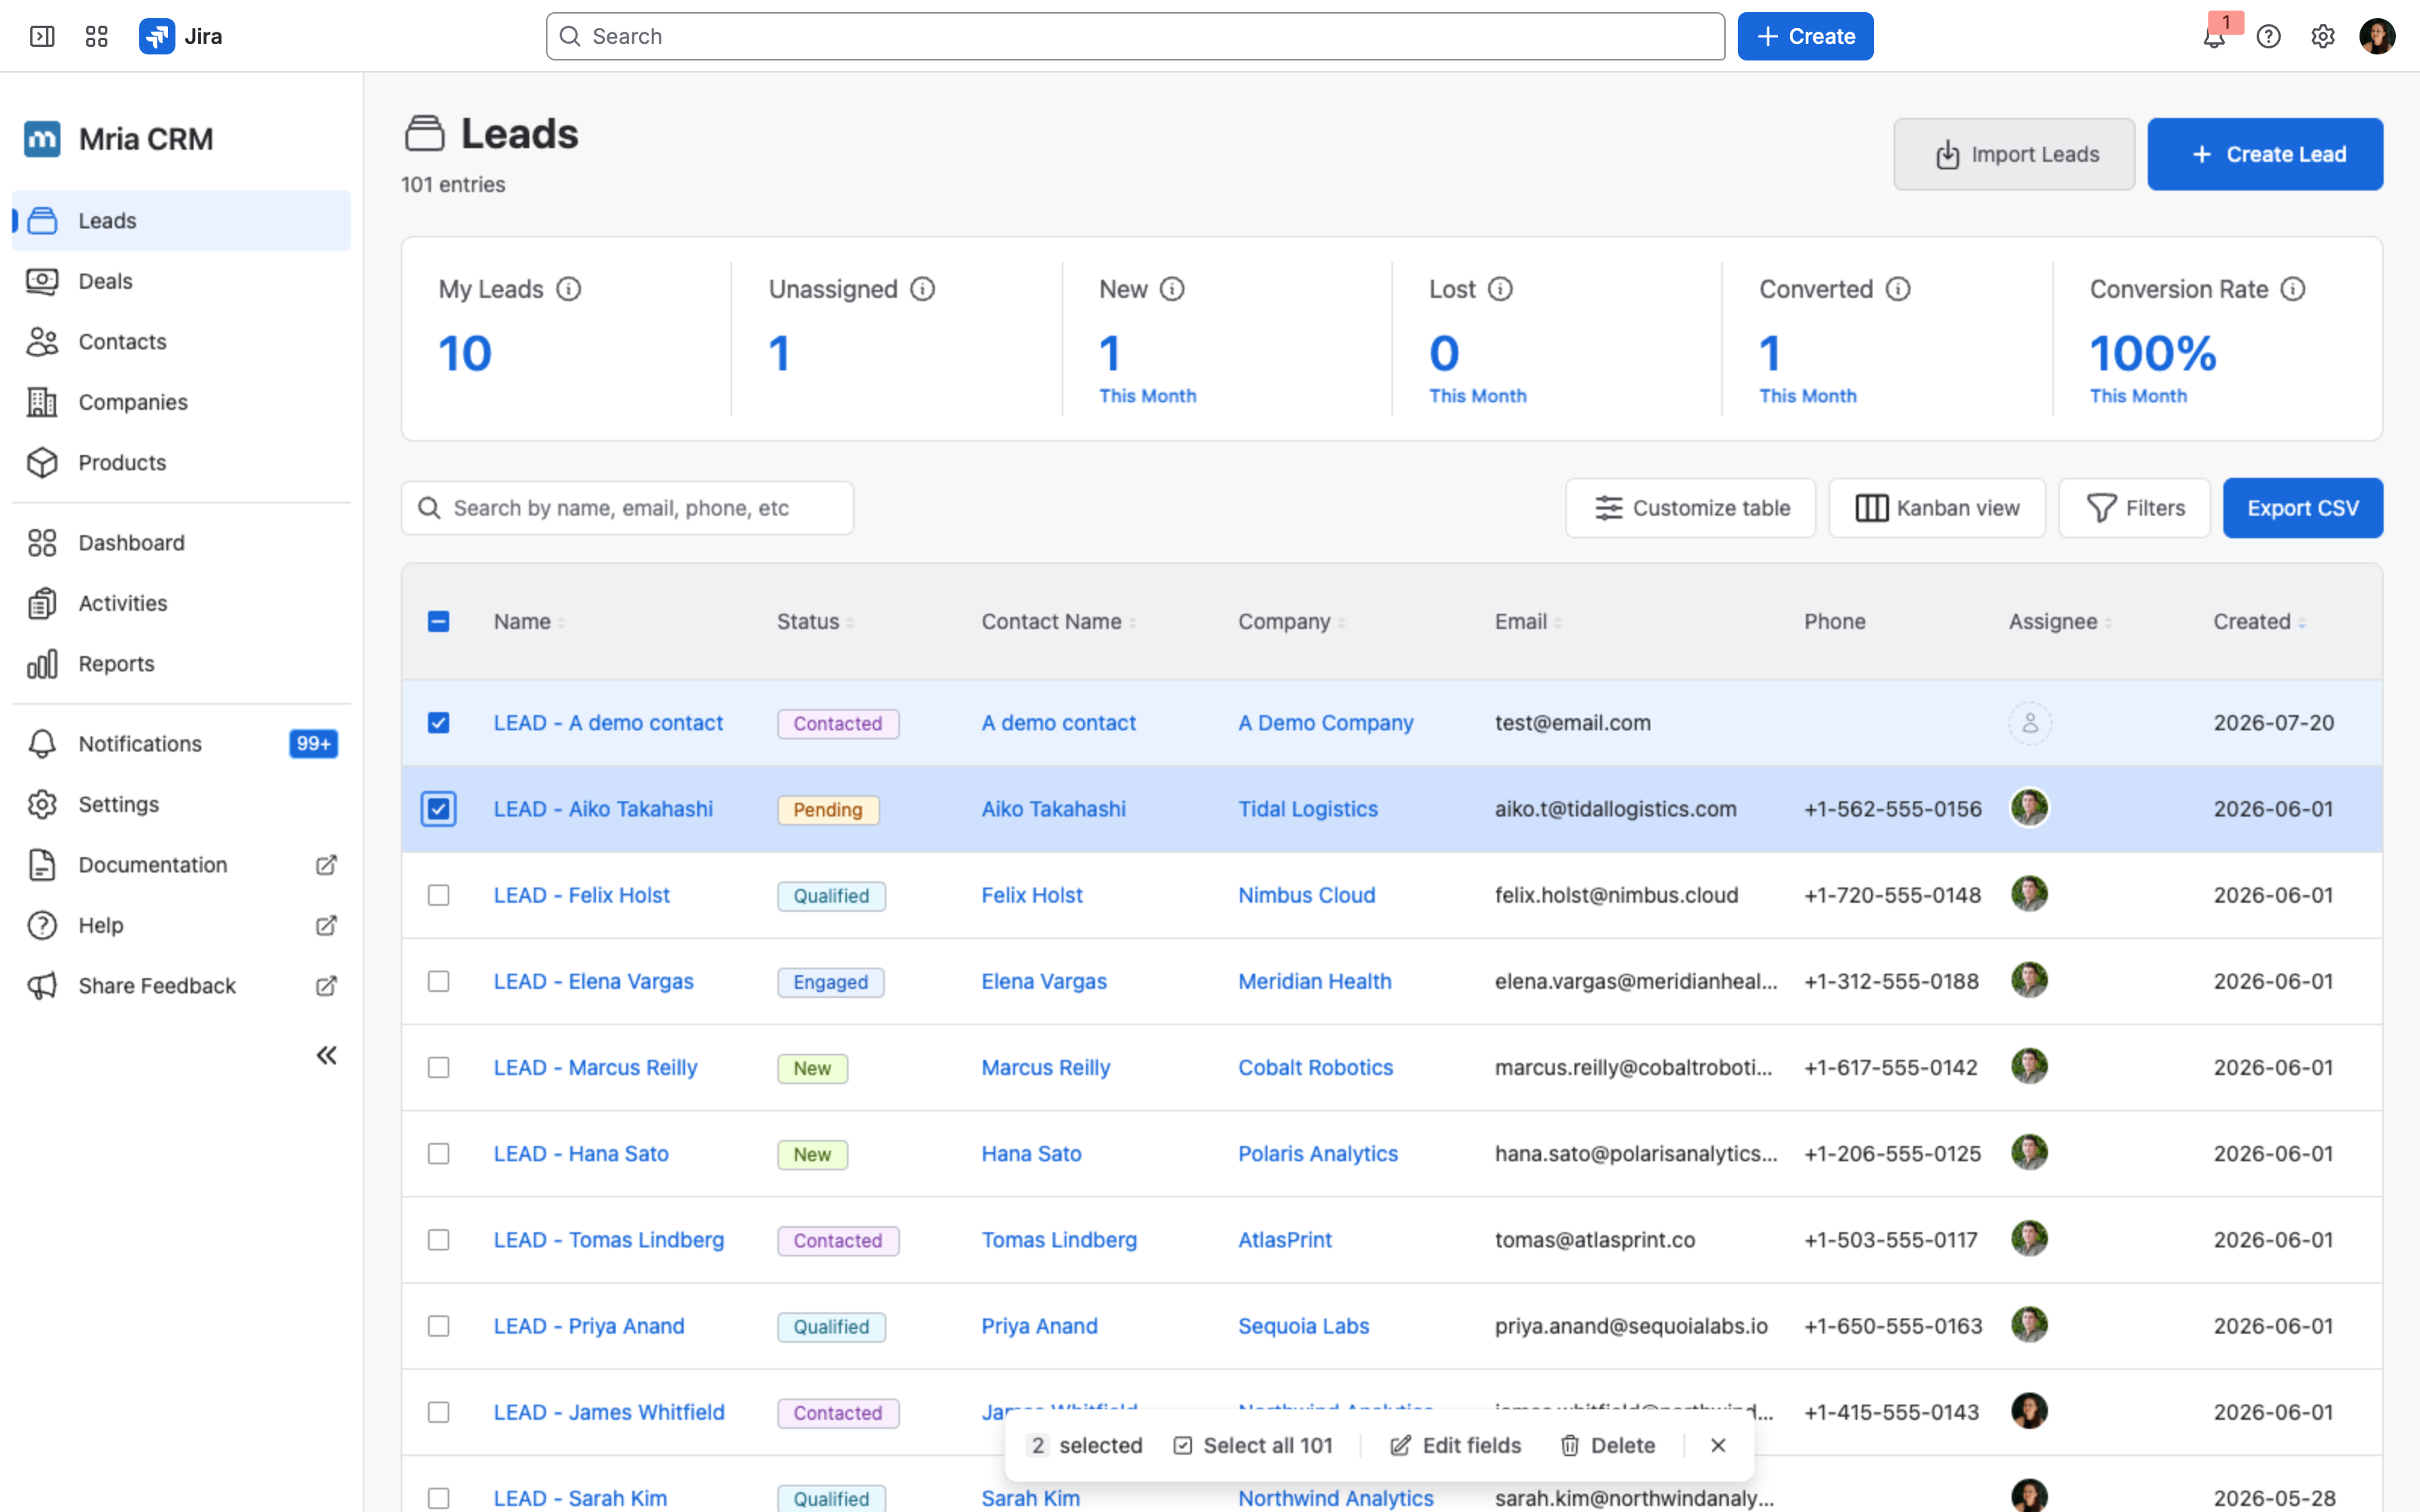
The count in the bar is the number you’re about to act on. “2 selected” and “101 selected” sit in the same place and look almost identical — read it before you click anything, especially before Delete.
Edit fields #
Click Edit fields to open a panel that applies your changes to every selected Lead.
Every field starts at Keep as is, so nothing is touched unless you deliberately change it. You can open the panel, set the one field you care about, and leave the rest alone.
Fields available on Leads:
- Status
- Source
- Assignee
- Tags
- Products
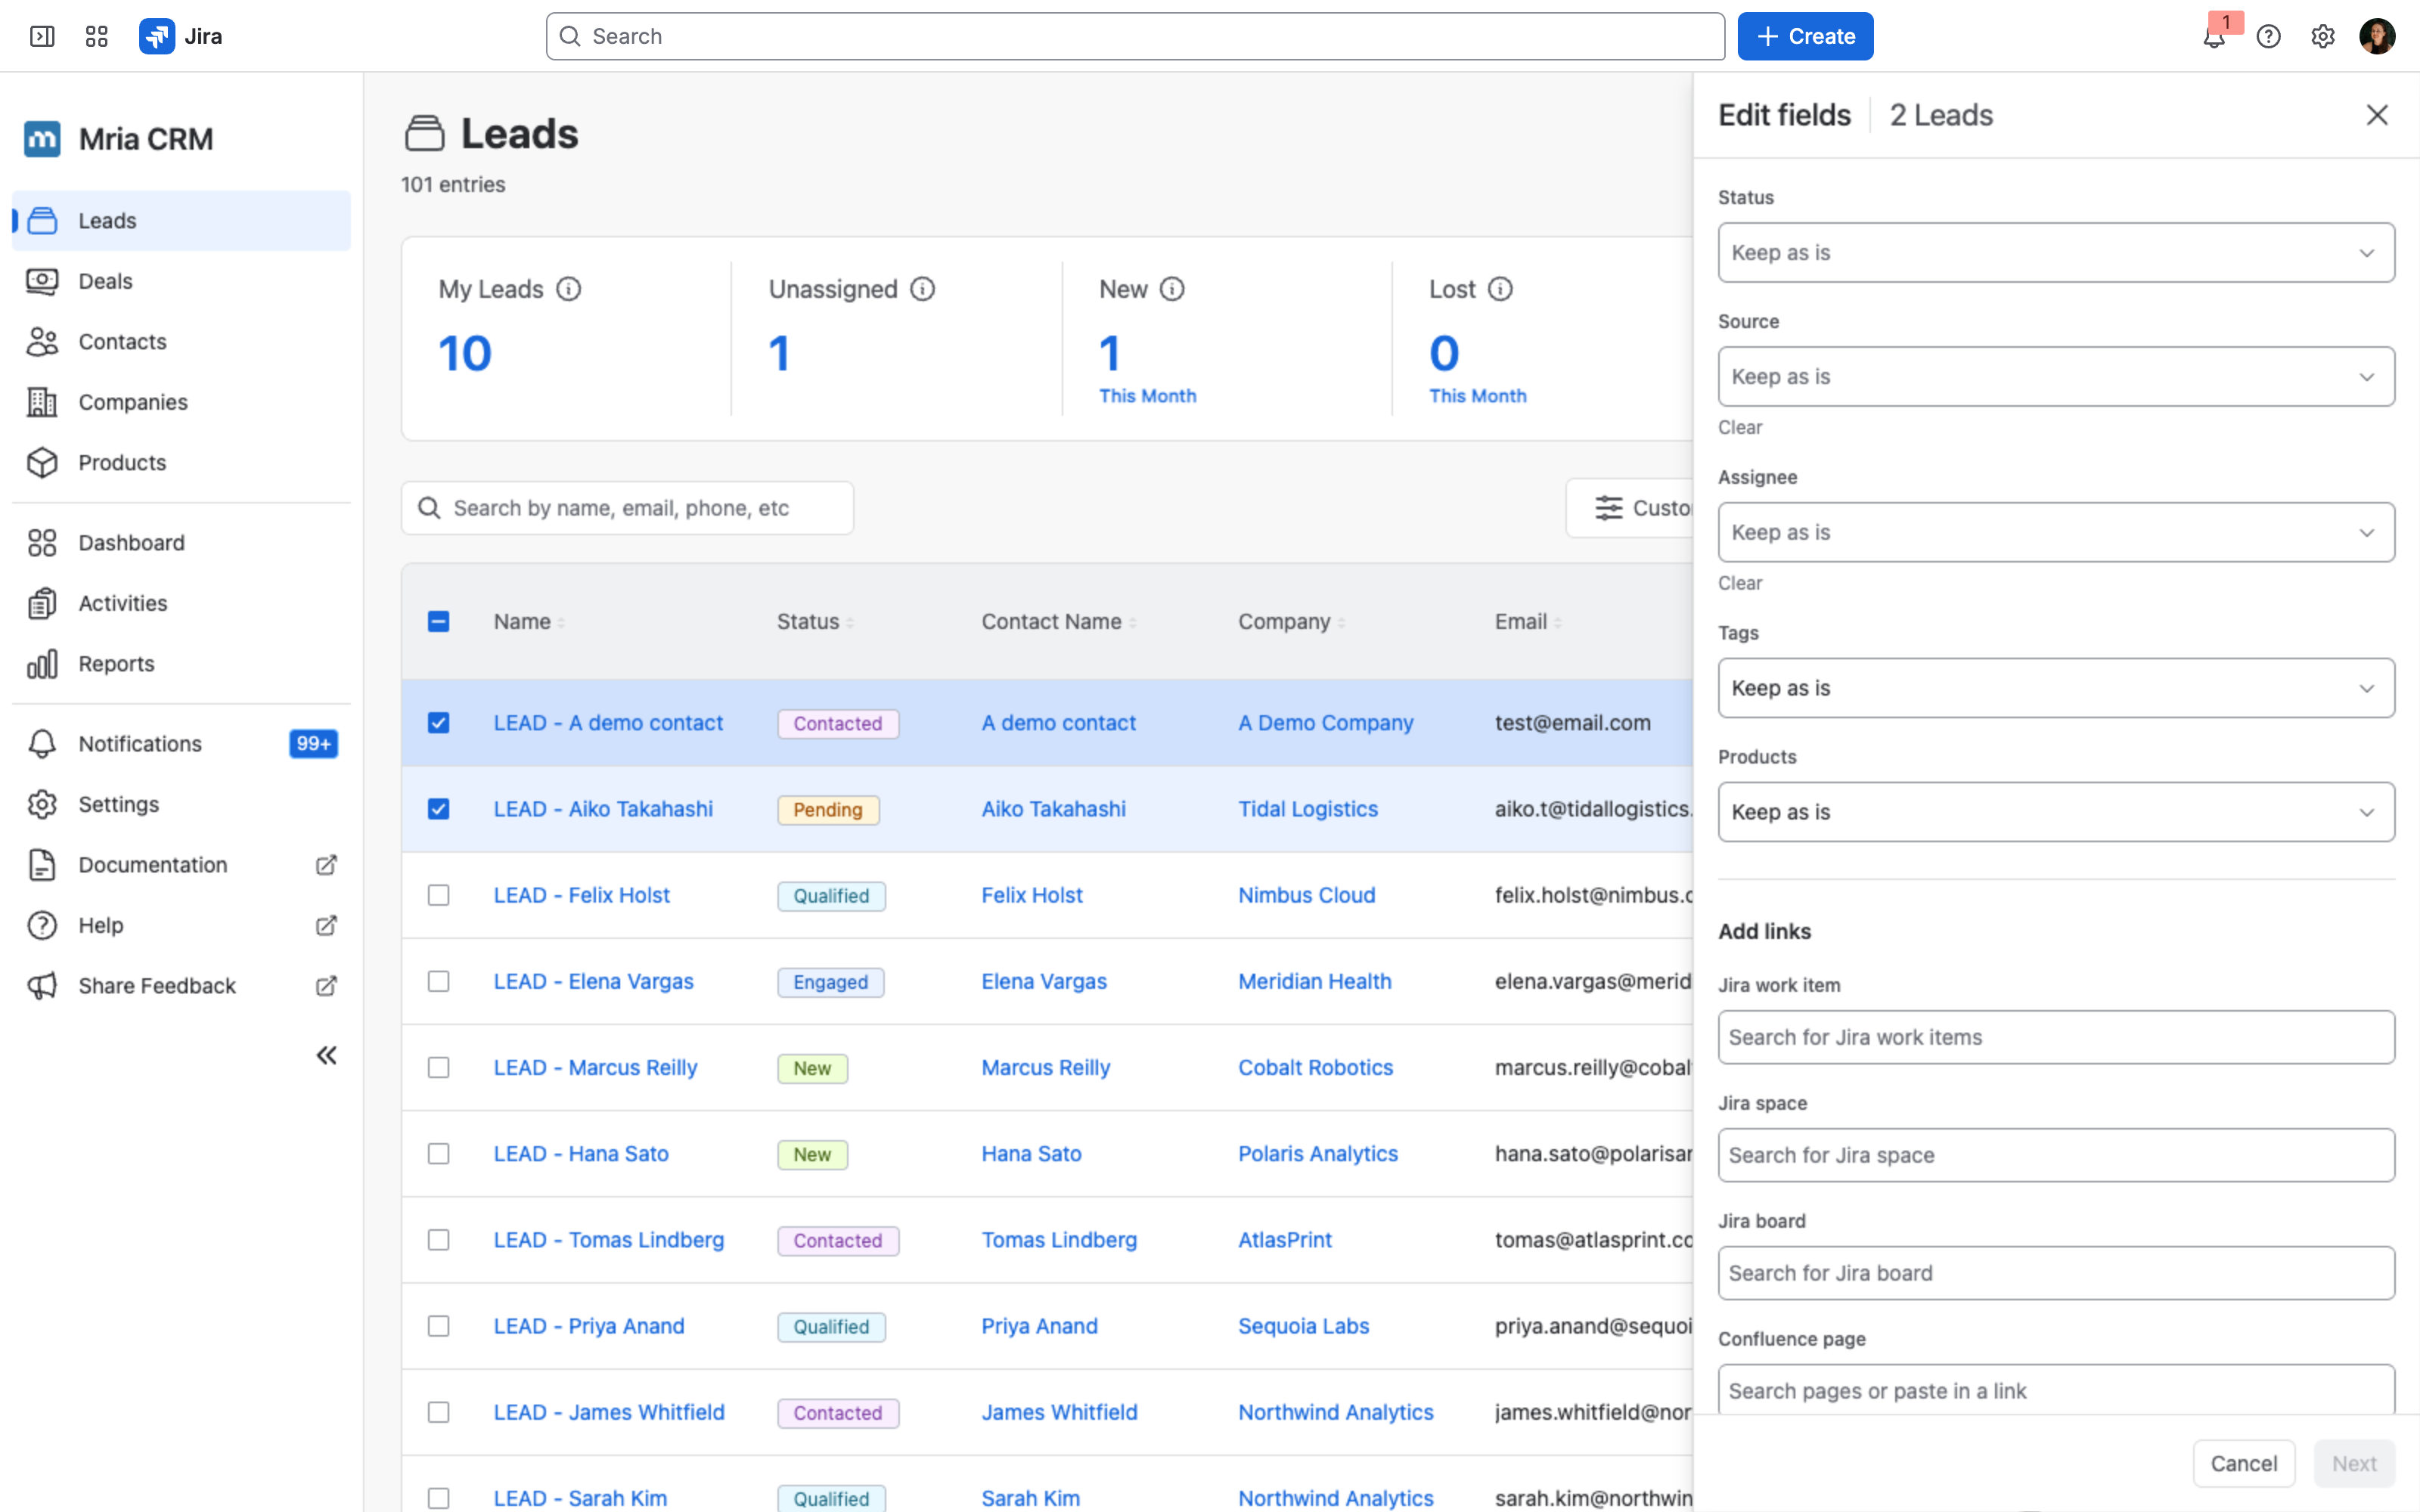
Source and Assignee offer a Clear link, which empties that field across the selection. Status does not — every Lead has to sit at some status, so there is nothing to clear it to; move the selection to another status instead.
Multi-value fields (Tags, Products) give you a choice of how to apply the change:
| Option | What it does |
|---|---|
| Keep as is | Leaves the field untouched. |
| Add new | Adds the values you pick, keeping whatever is already there. |
| Replace all | Discards the existing values and sets only the ones you pick. |
| Find and remove | Removes the specific values you name, leaving the rest. |
| Remove all | Empties the field. |
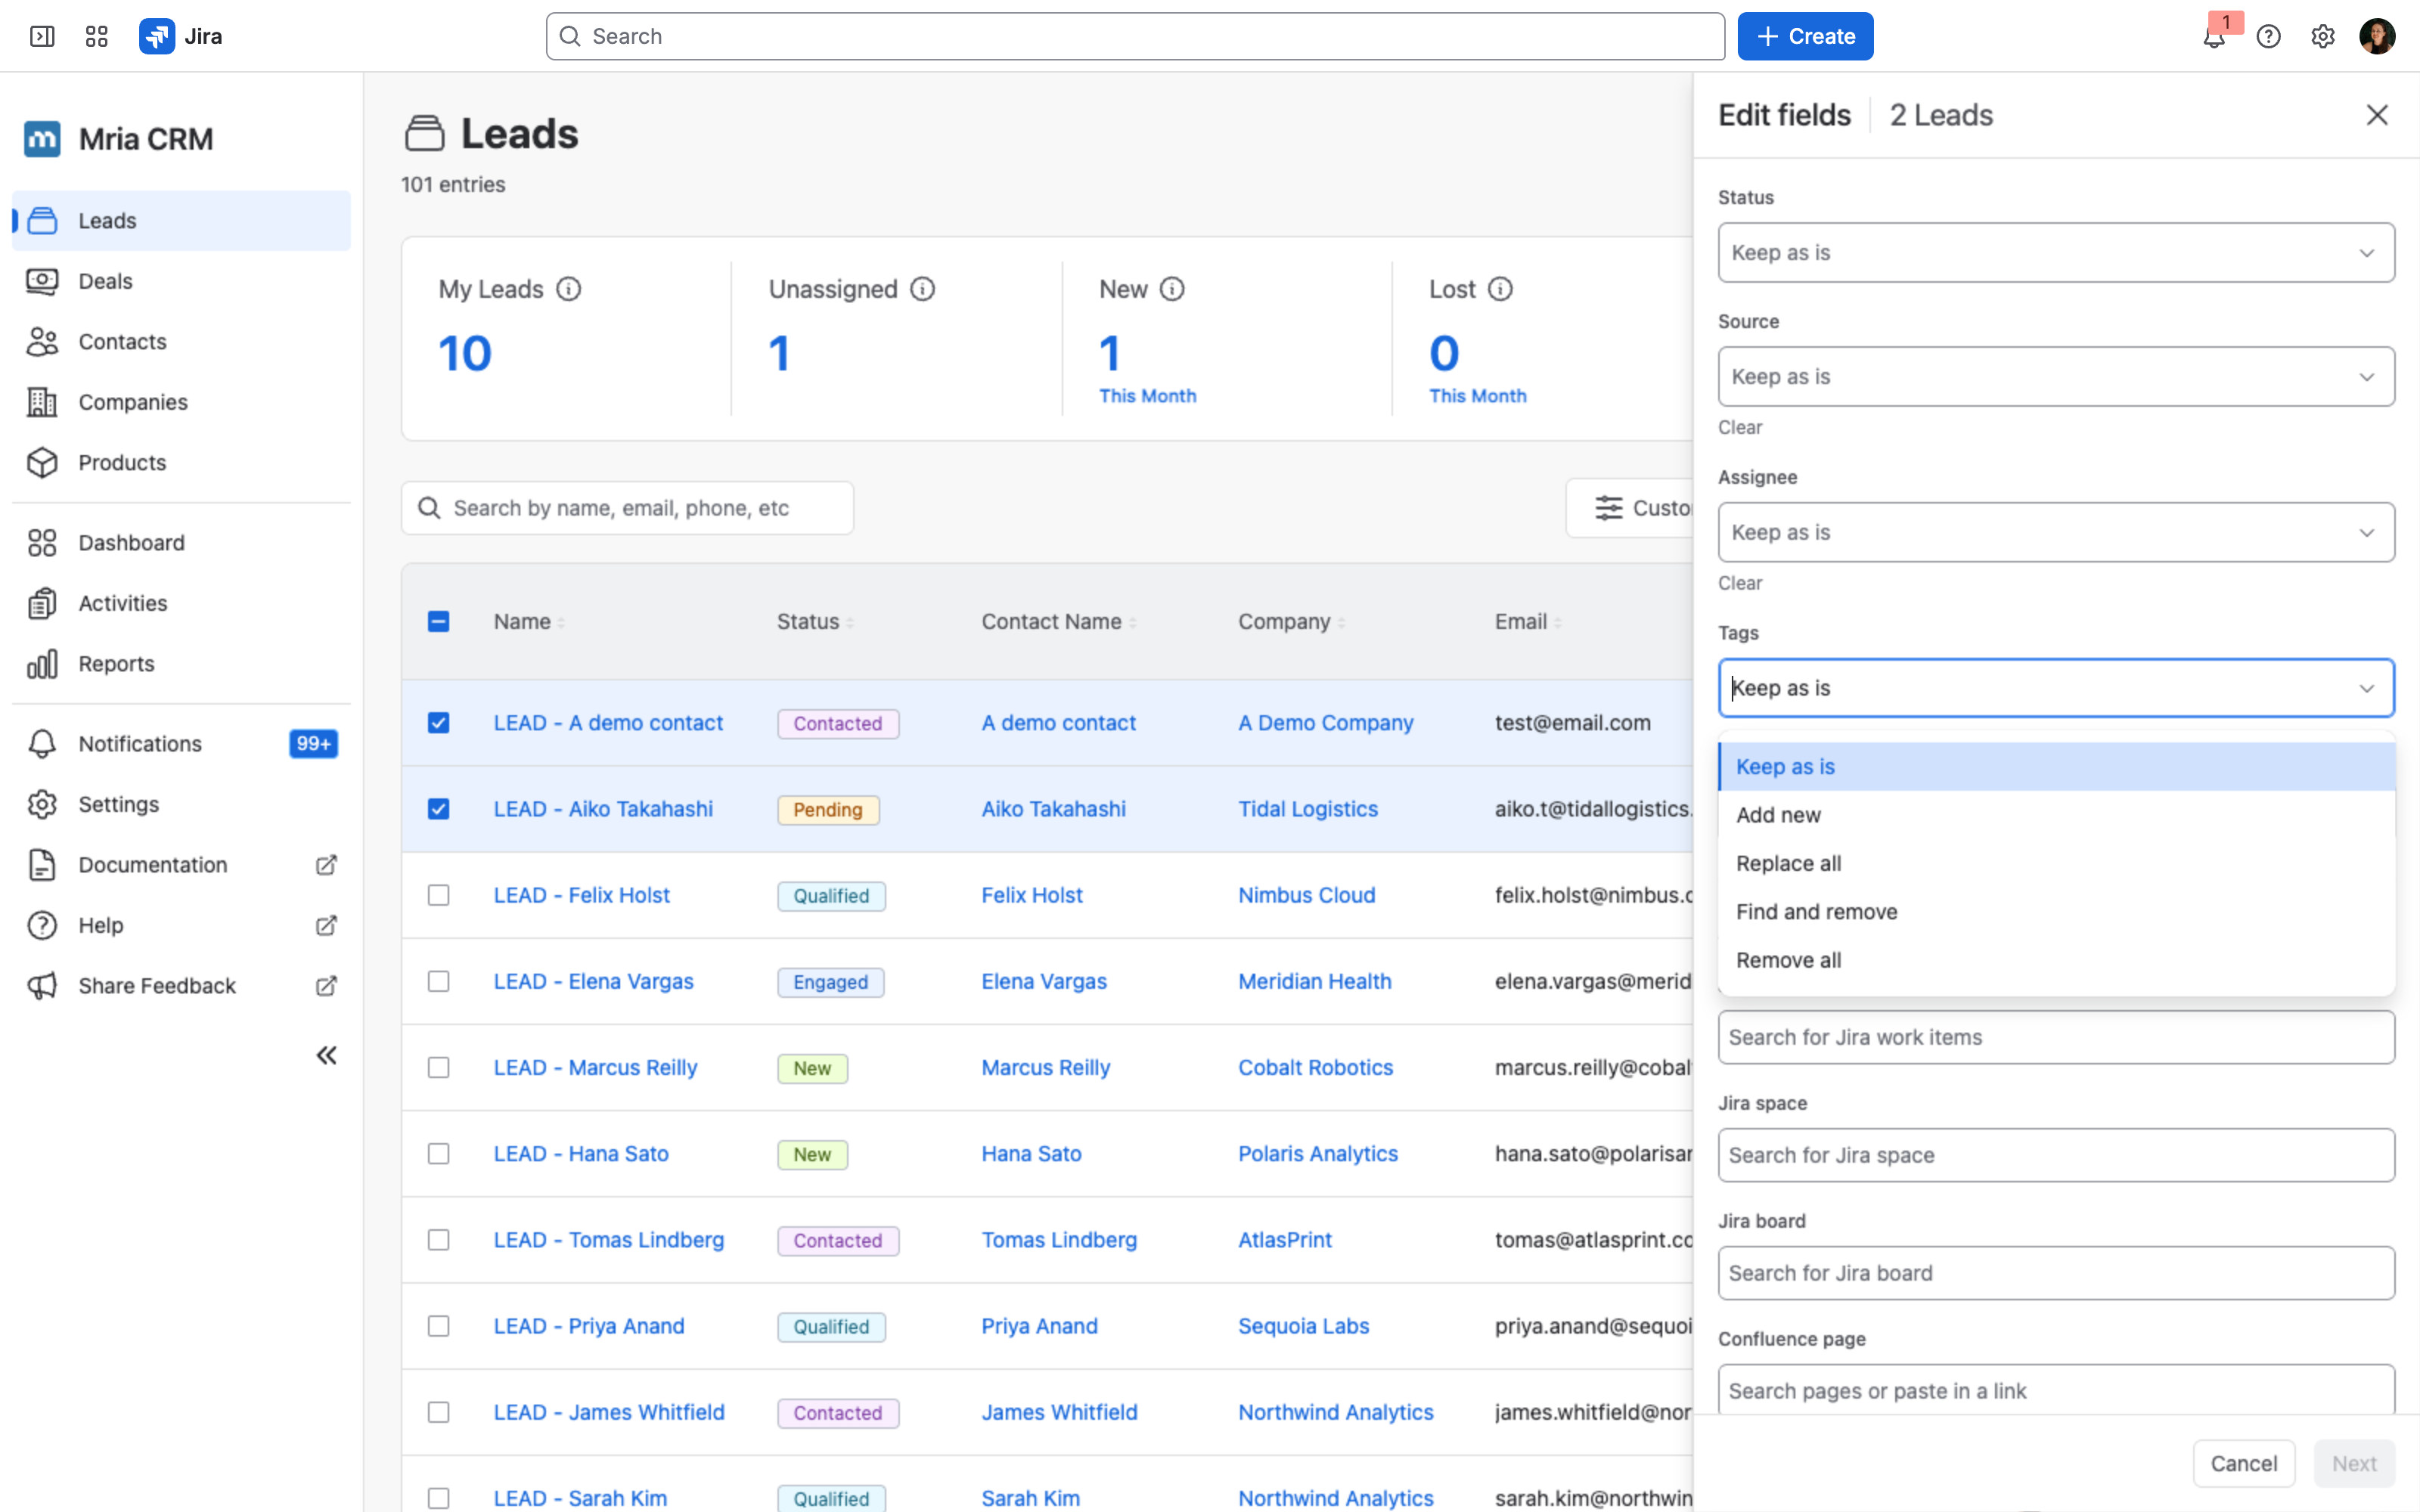
Below the fields, Add links attaches the same link to every selected Lead — a Jira work item, Jira space, Jira board, Confluence page, or Web link.
Click Next to review, then confirm to apply.
Changing a field in bulk is recorded on each Lead’s Timeline just like a manual edit, so a bulk re-assignment stays traceable per record.
Delete #
Click Delete in the bulk actions bar and confirm.
Bulk delete is permanent and cannot be undone. Review your filters and the selected count before confirming.
Bulk actions work the same way on Deals, Contacts, Companies, and Products, each with its own set of editable fields. On those entities some records are protected from deletion — for example, a Contact still used on a Deal. In that case the operation skips the protected record and continues with the rest instead of failing, so one blocked record never stops the whole batch.
✅ Next Steps: After Leads, we’ll cover Deals (turning qualified Leads into opportunities).


