ℹReusable emails you can insert from any record #
Email Templates let you save an email once and reuse it from any Contact, Lead, or Deal. Merge fields fill in the recipient’s name, their company, and the record you’re working from, so a saved template still reads as a personal message.
There is no admin setup, but creating a template needs the Create grant on Email templates — Administrator and User have it, Viewer does not (see Roles & Permissions). Visibility then decides who else can use it.
1. Where to find them #
Templates are managed under Settings → Email Templates, and used from the email composer on a record’s Emails tab.
Sending email requires a connected mailbox — see Gmail Integration or Outlook Integration.
2. The template list #
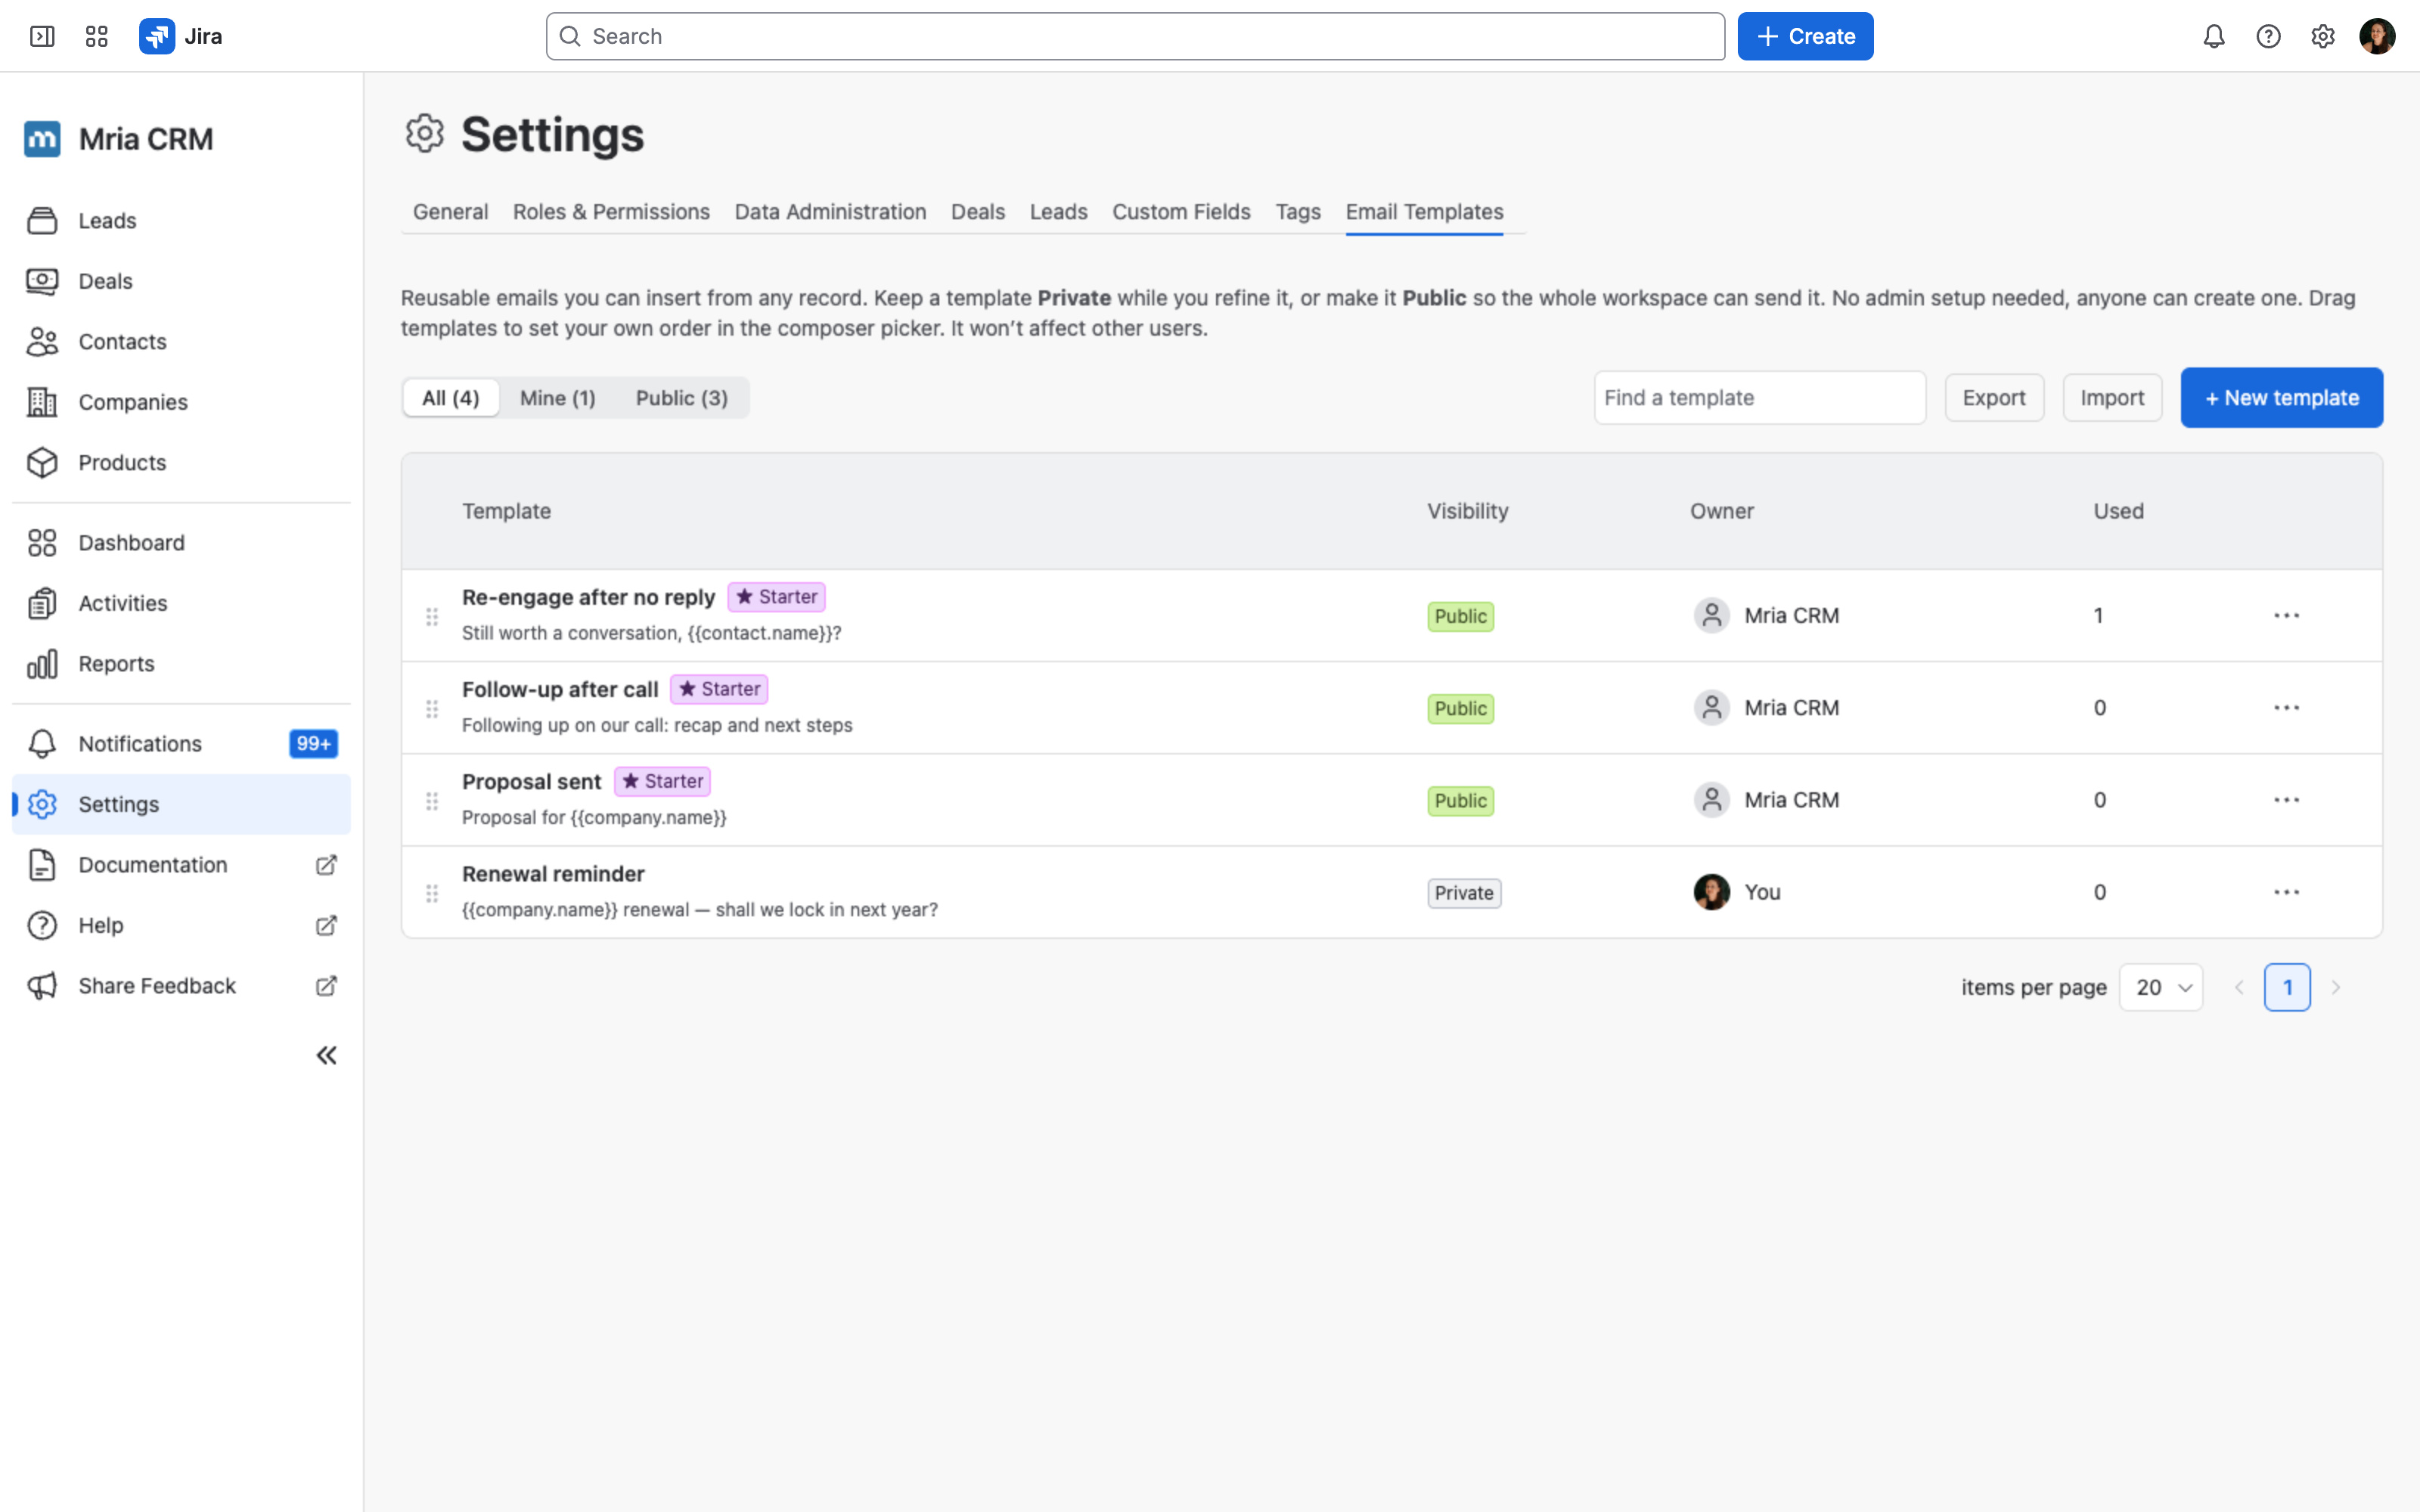
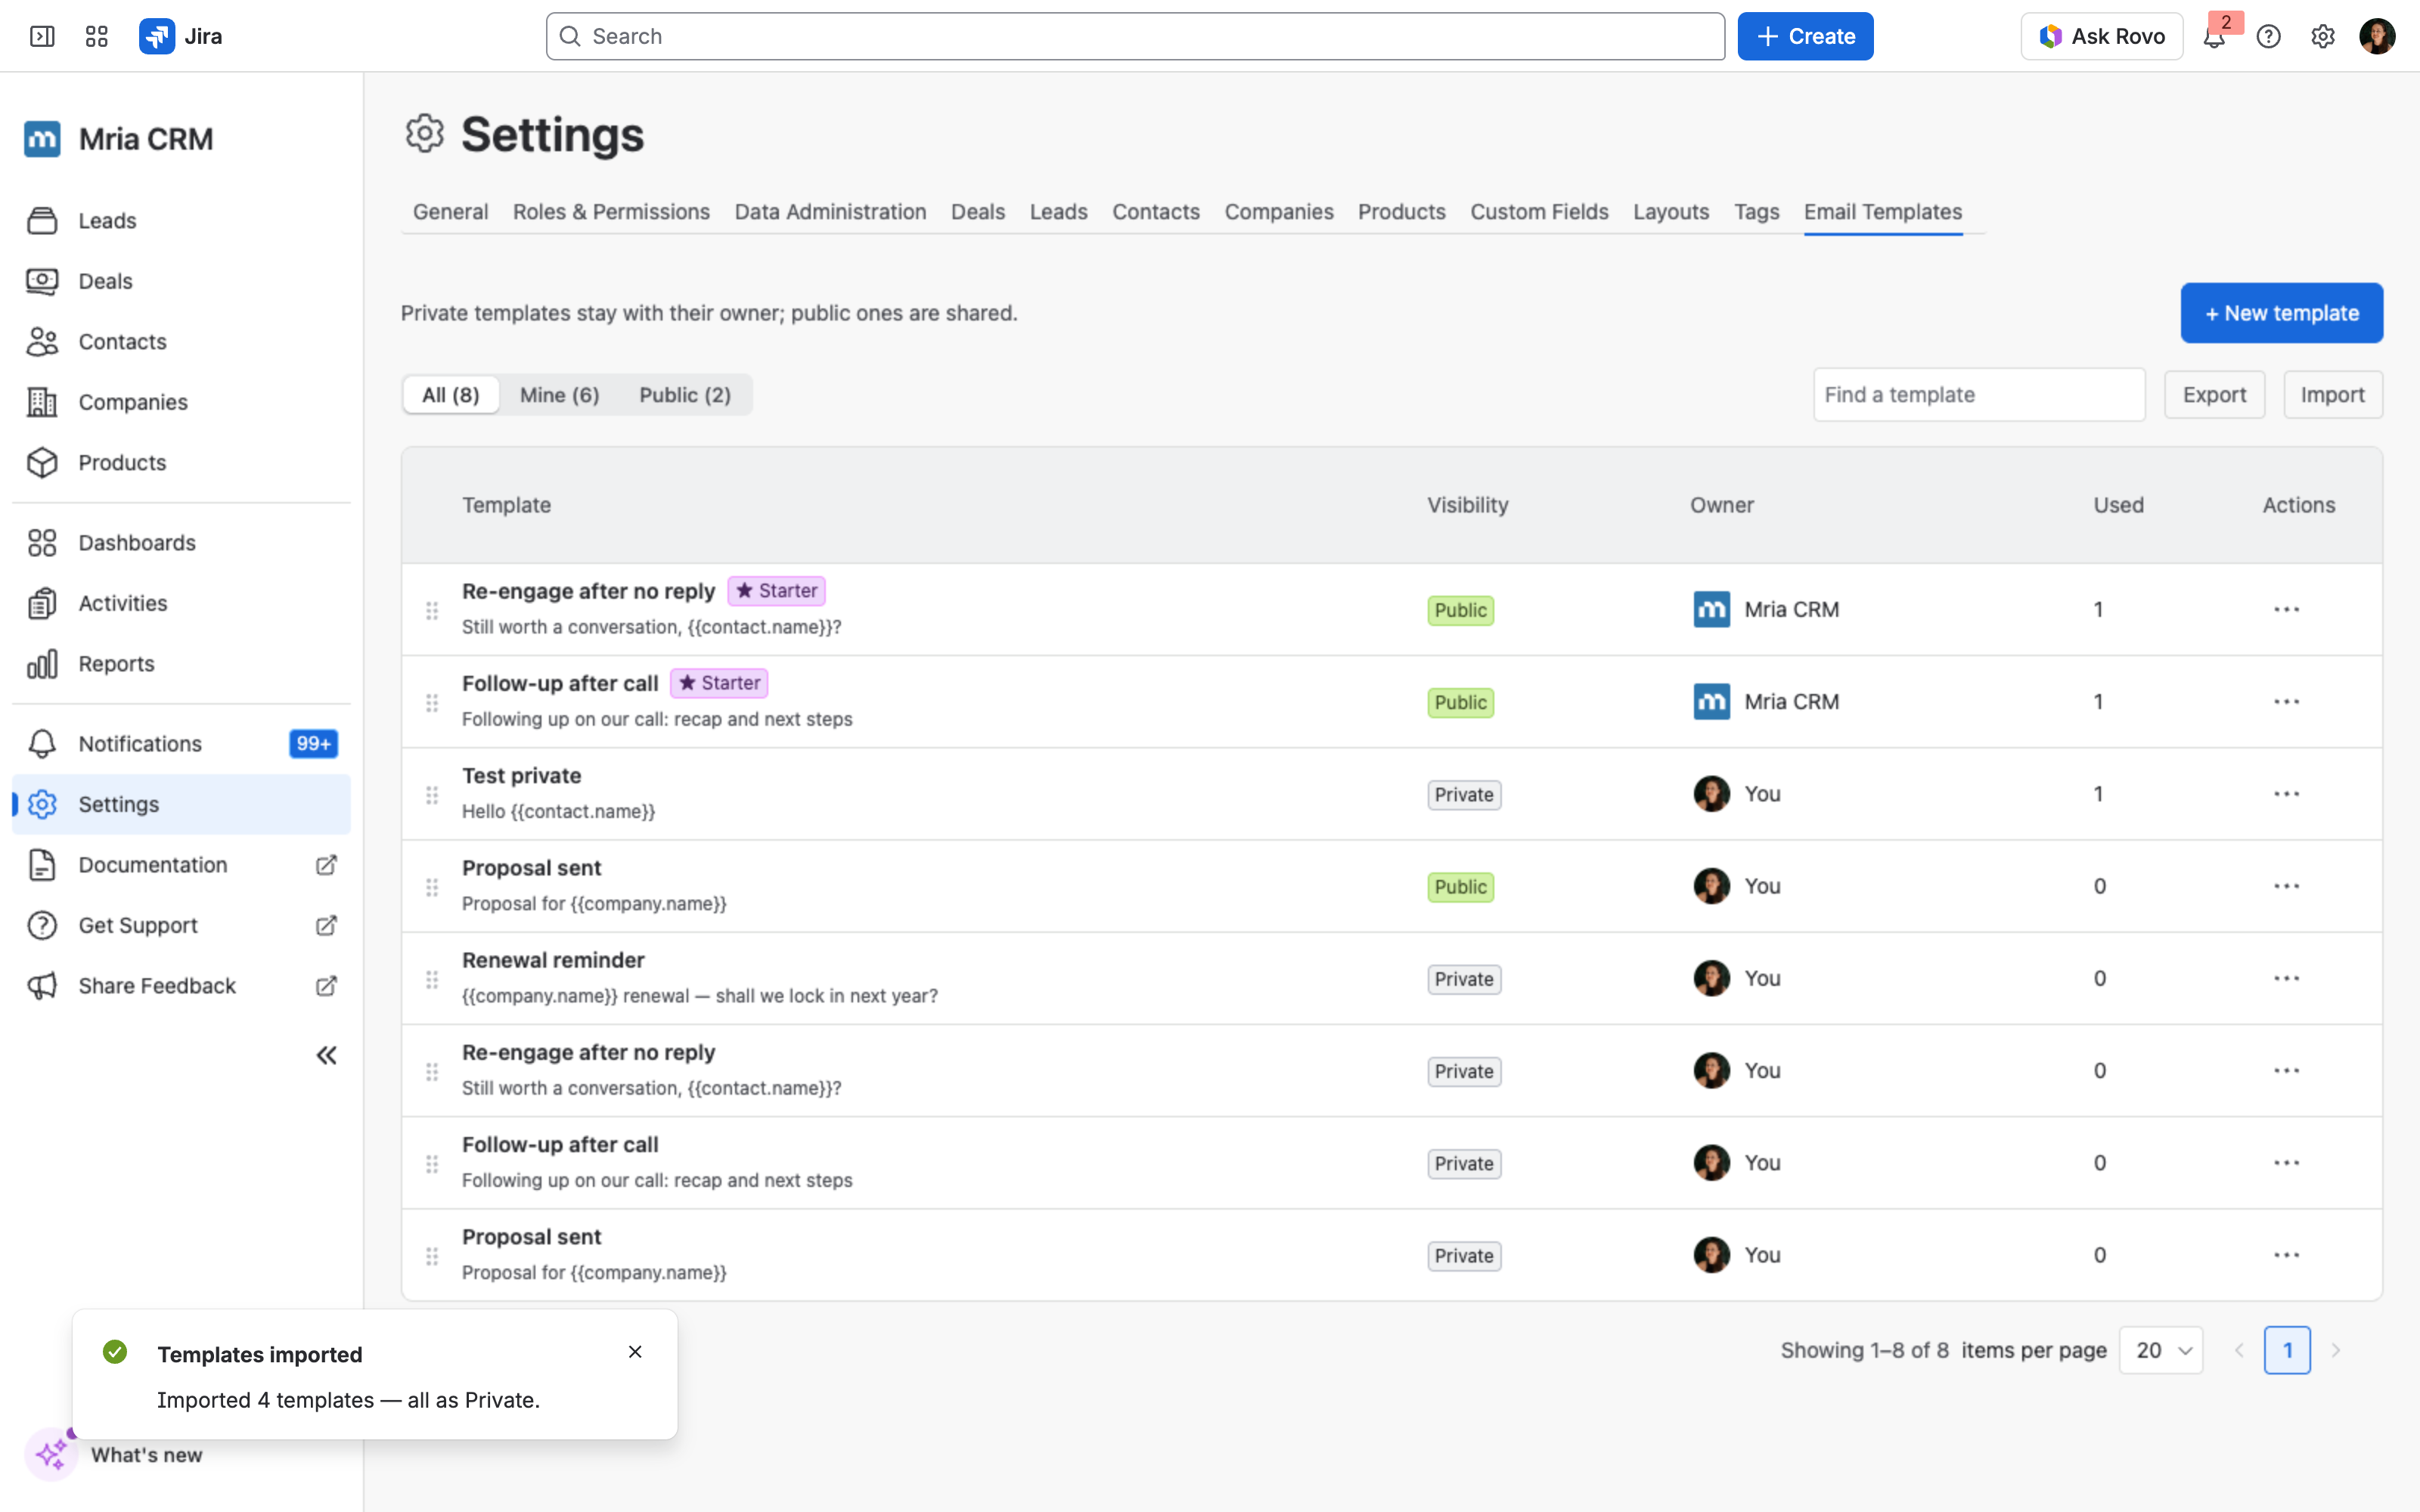
Each row shows:
| Column | What it shows |
|---|---|
| Template | The template name, with its subject line underneath as a preview. Workspace starter templates carry a ★ Starter badge. |
| Visibility | Private or Public — see Visibility below. |
| Owner | Who created it. Your own templates show as You; the starter templates are owned by Mria CRM. |
| Used | How many times the template has been inserted — a quick signal for which ones are actually earning their place. |
Finding a template #
- Filter tabs — All, Mine, and Public, each with a count.
- Find a template — search by name.
Reordering #
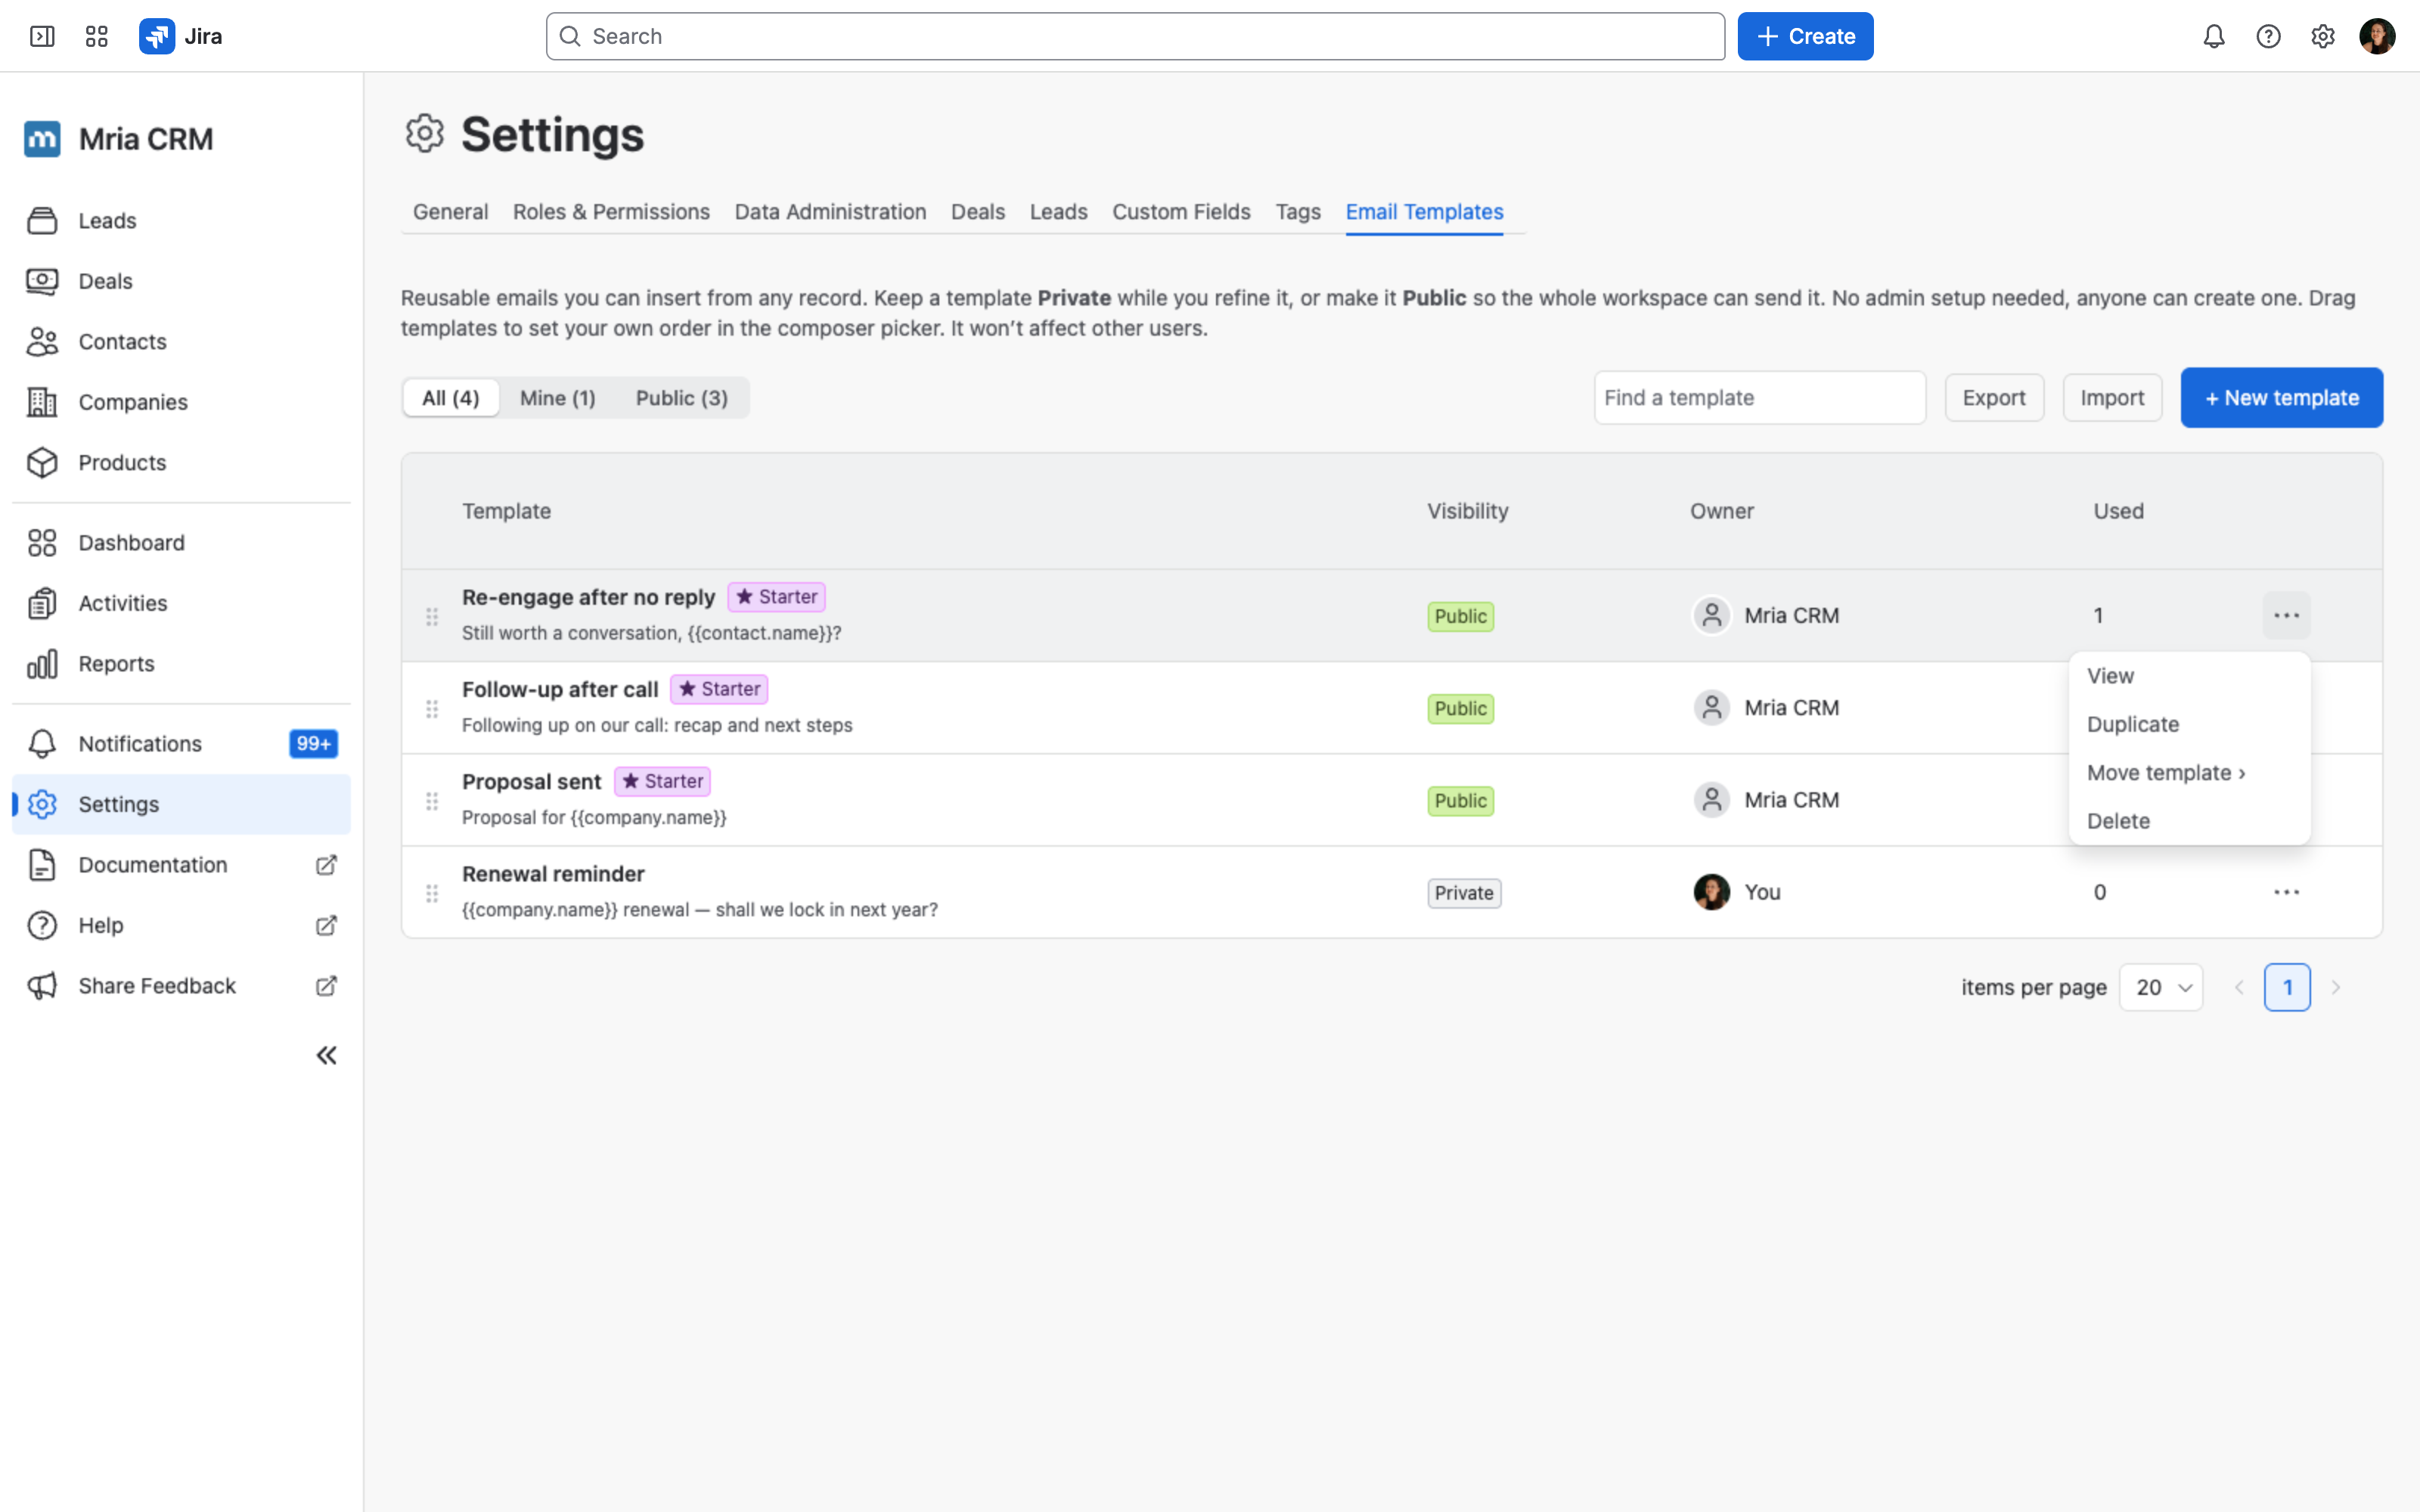
Drag a row by the handle on its left to change the order. You can also use Move template in the row’s ... menu.
Order is per user. The order you set controls how templates are listed for you in the composer picker. It does not change the order anyone else sees, so putting your three most-used templates at the top costs your colleagues nothing.
3. Visibility #
Every template is either Private or Public. You choose when you create it, and you can change it later.
| Visibility | Who can use it | Who can edit it |
|---|---|---|
| Private | Only you. Not visible to admins either. | Only you. |
| Public | Everyone in the workspace. | Only you, the owner. |
The practical pattern: keep a template Private while you’re still working out the wording, then switch it to Public once it’s good enough for the team to send.
Public means usable by everyone, not editable by everyone. If you want to change someone else’s Public template, Duplicate it and edit your copy.
4. Creating a template #
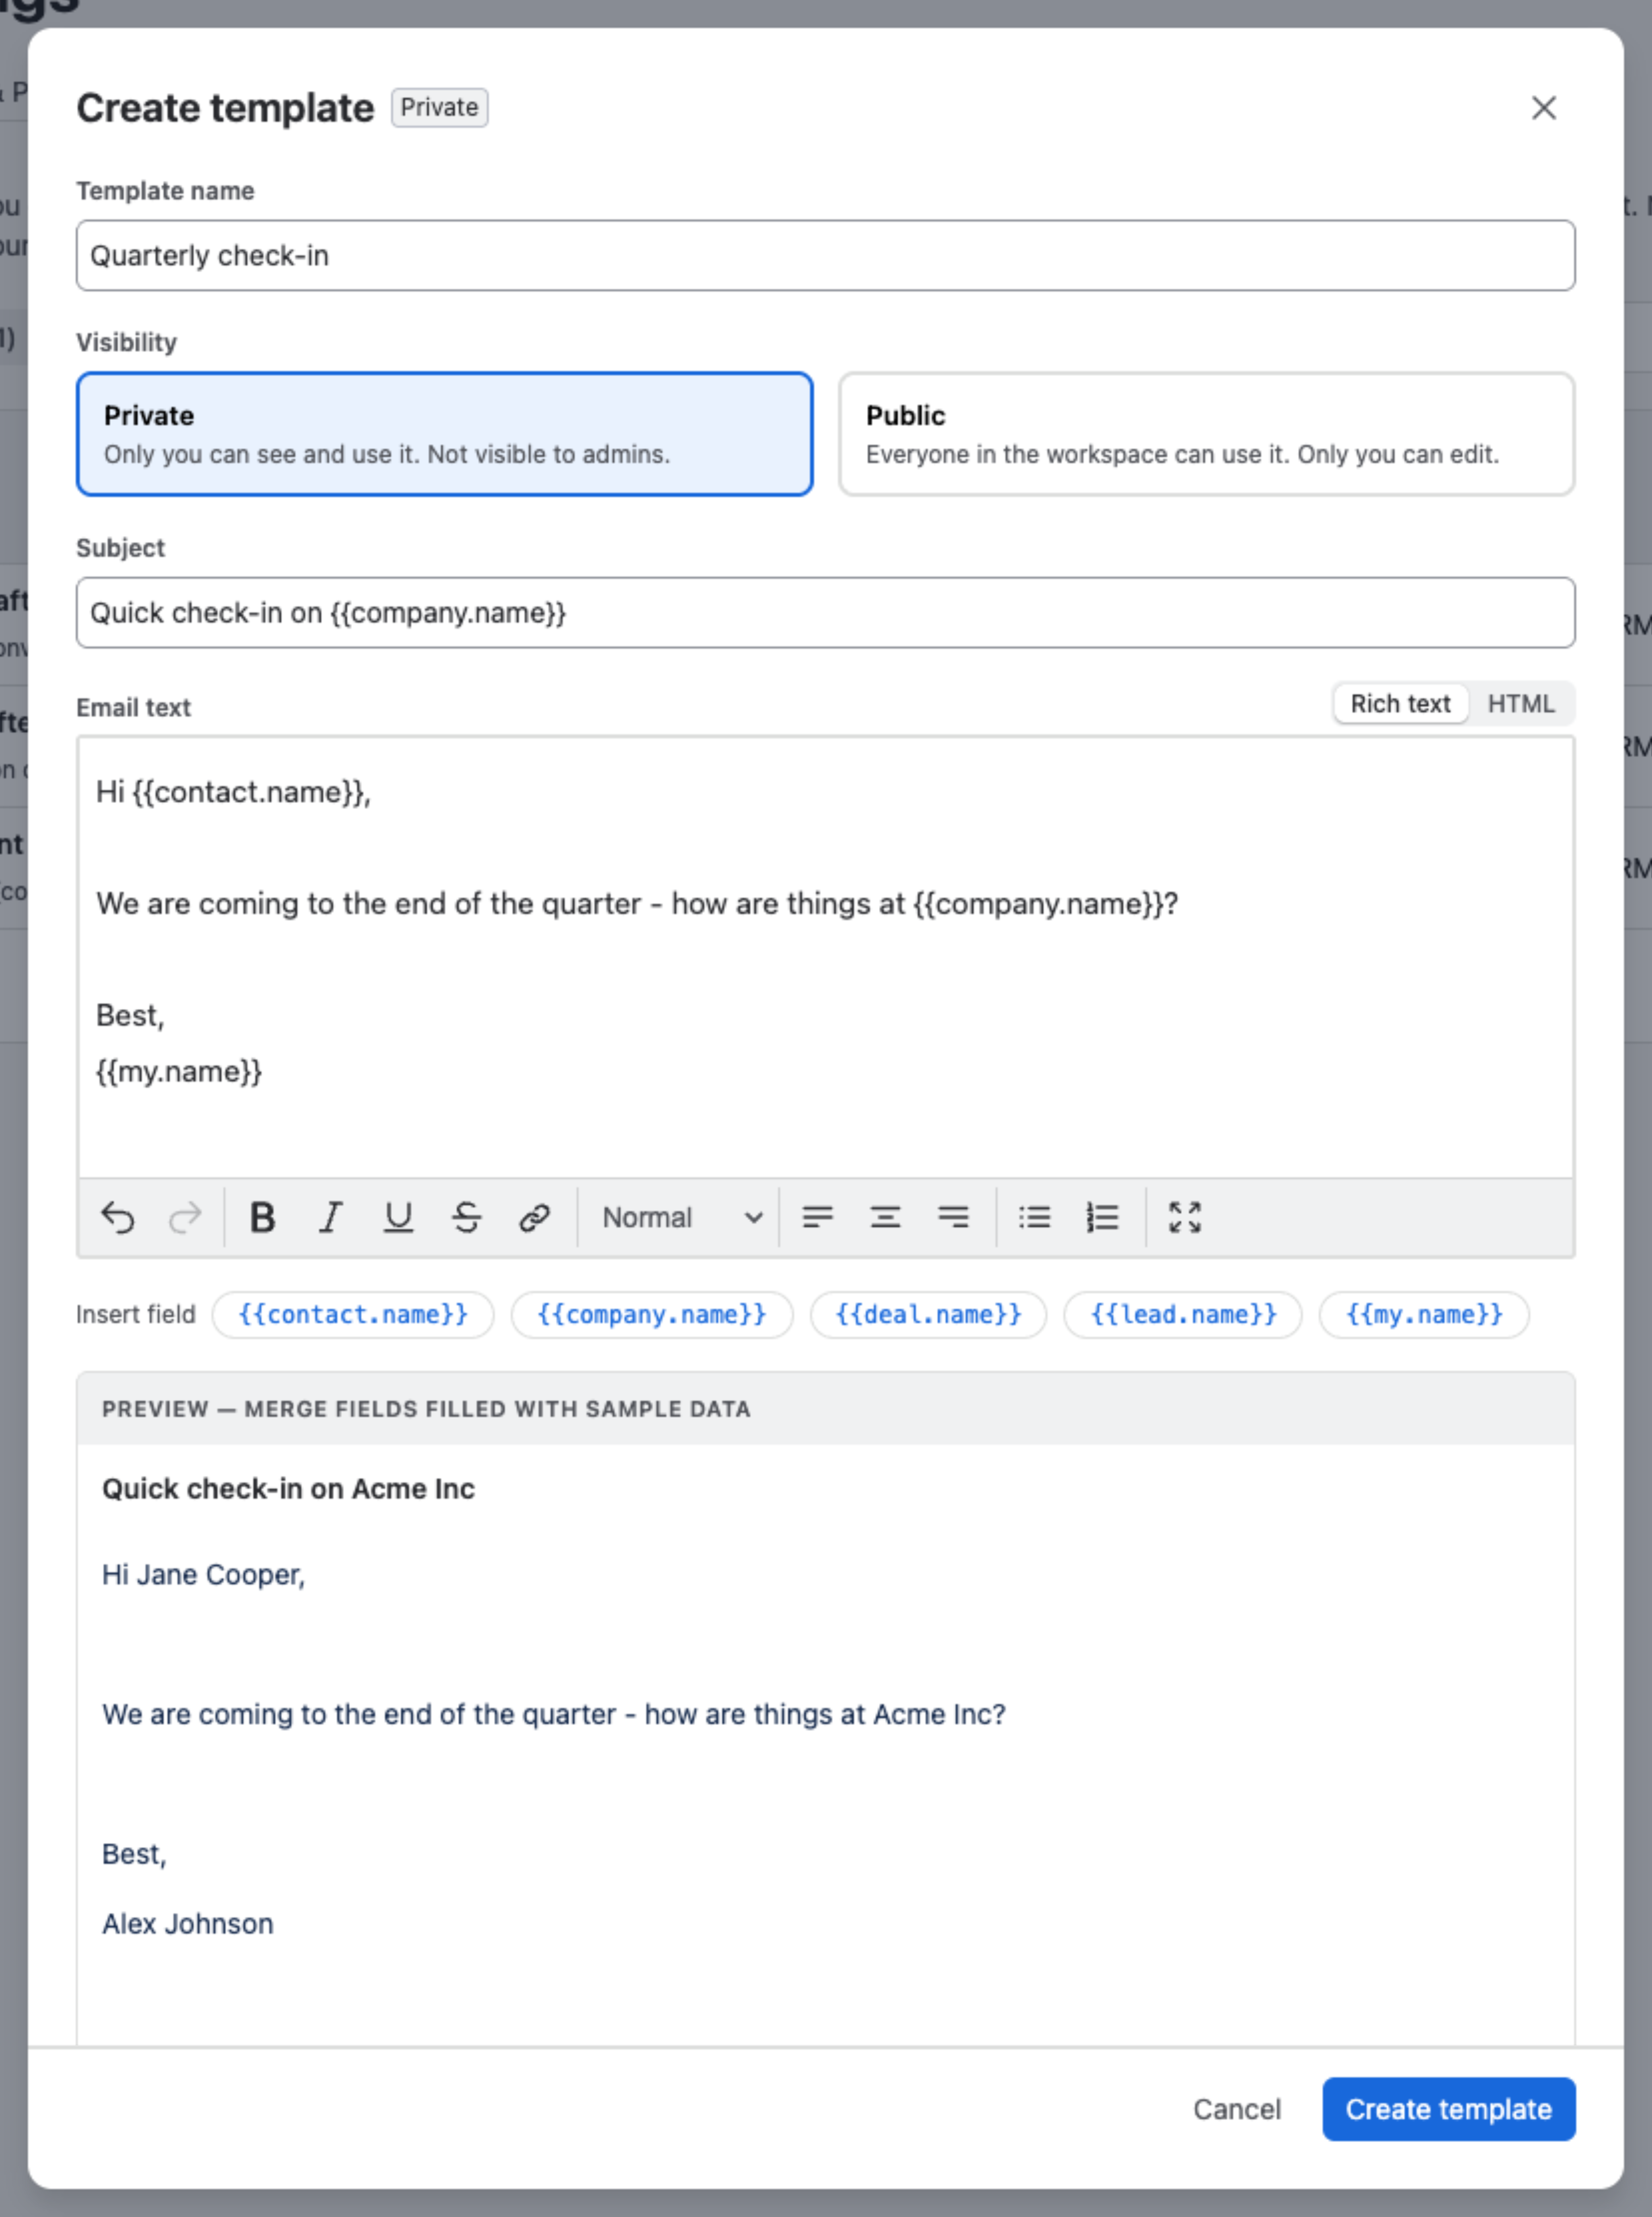
- Go to Settings → Email Templates and click + New template.
- Give it a Template name — this is what you’ll see in the composer picker, so make it describe the moment you’d send it (“Follow-up after call” beats “Template 3”).
- Choose Visibility — Private or Public.
- Write the Subject. Merge fields work here too.
- Write the Email text. The editor has two modes, switched with the Rich text / HTML toggle above the box:
- Rich text — bold, italic, underline, strikethrough, links, headings, alignment, and bulleted or numbered lists.
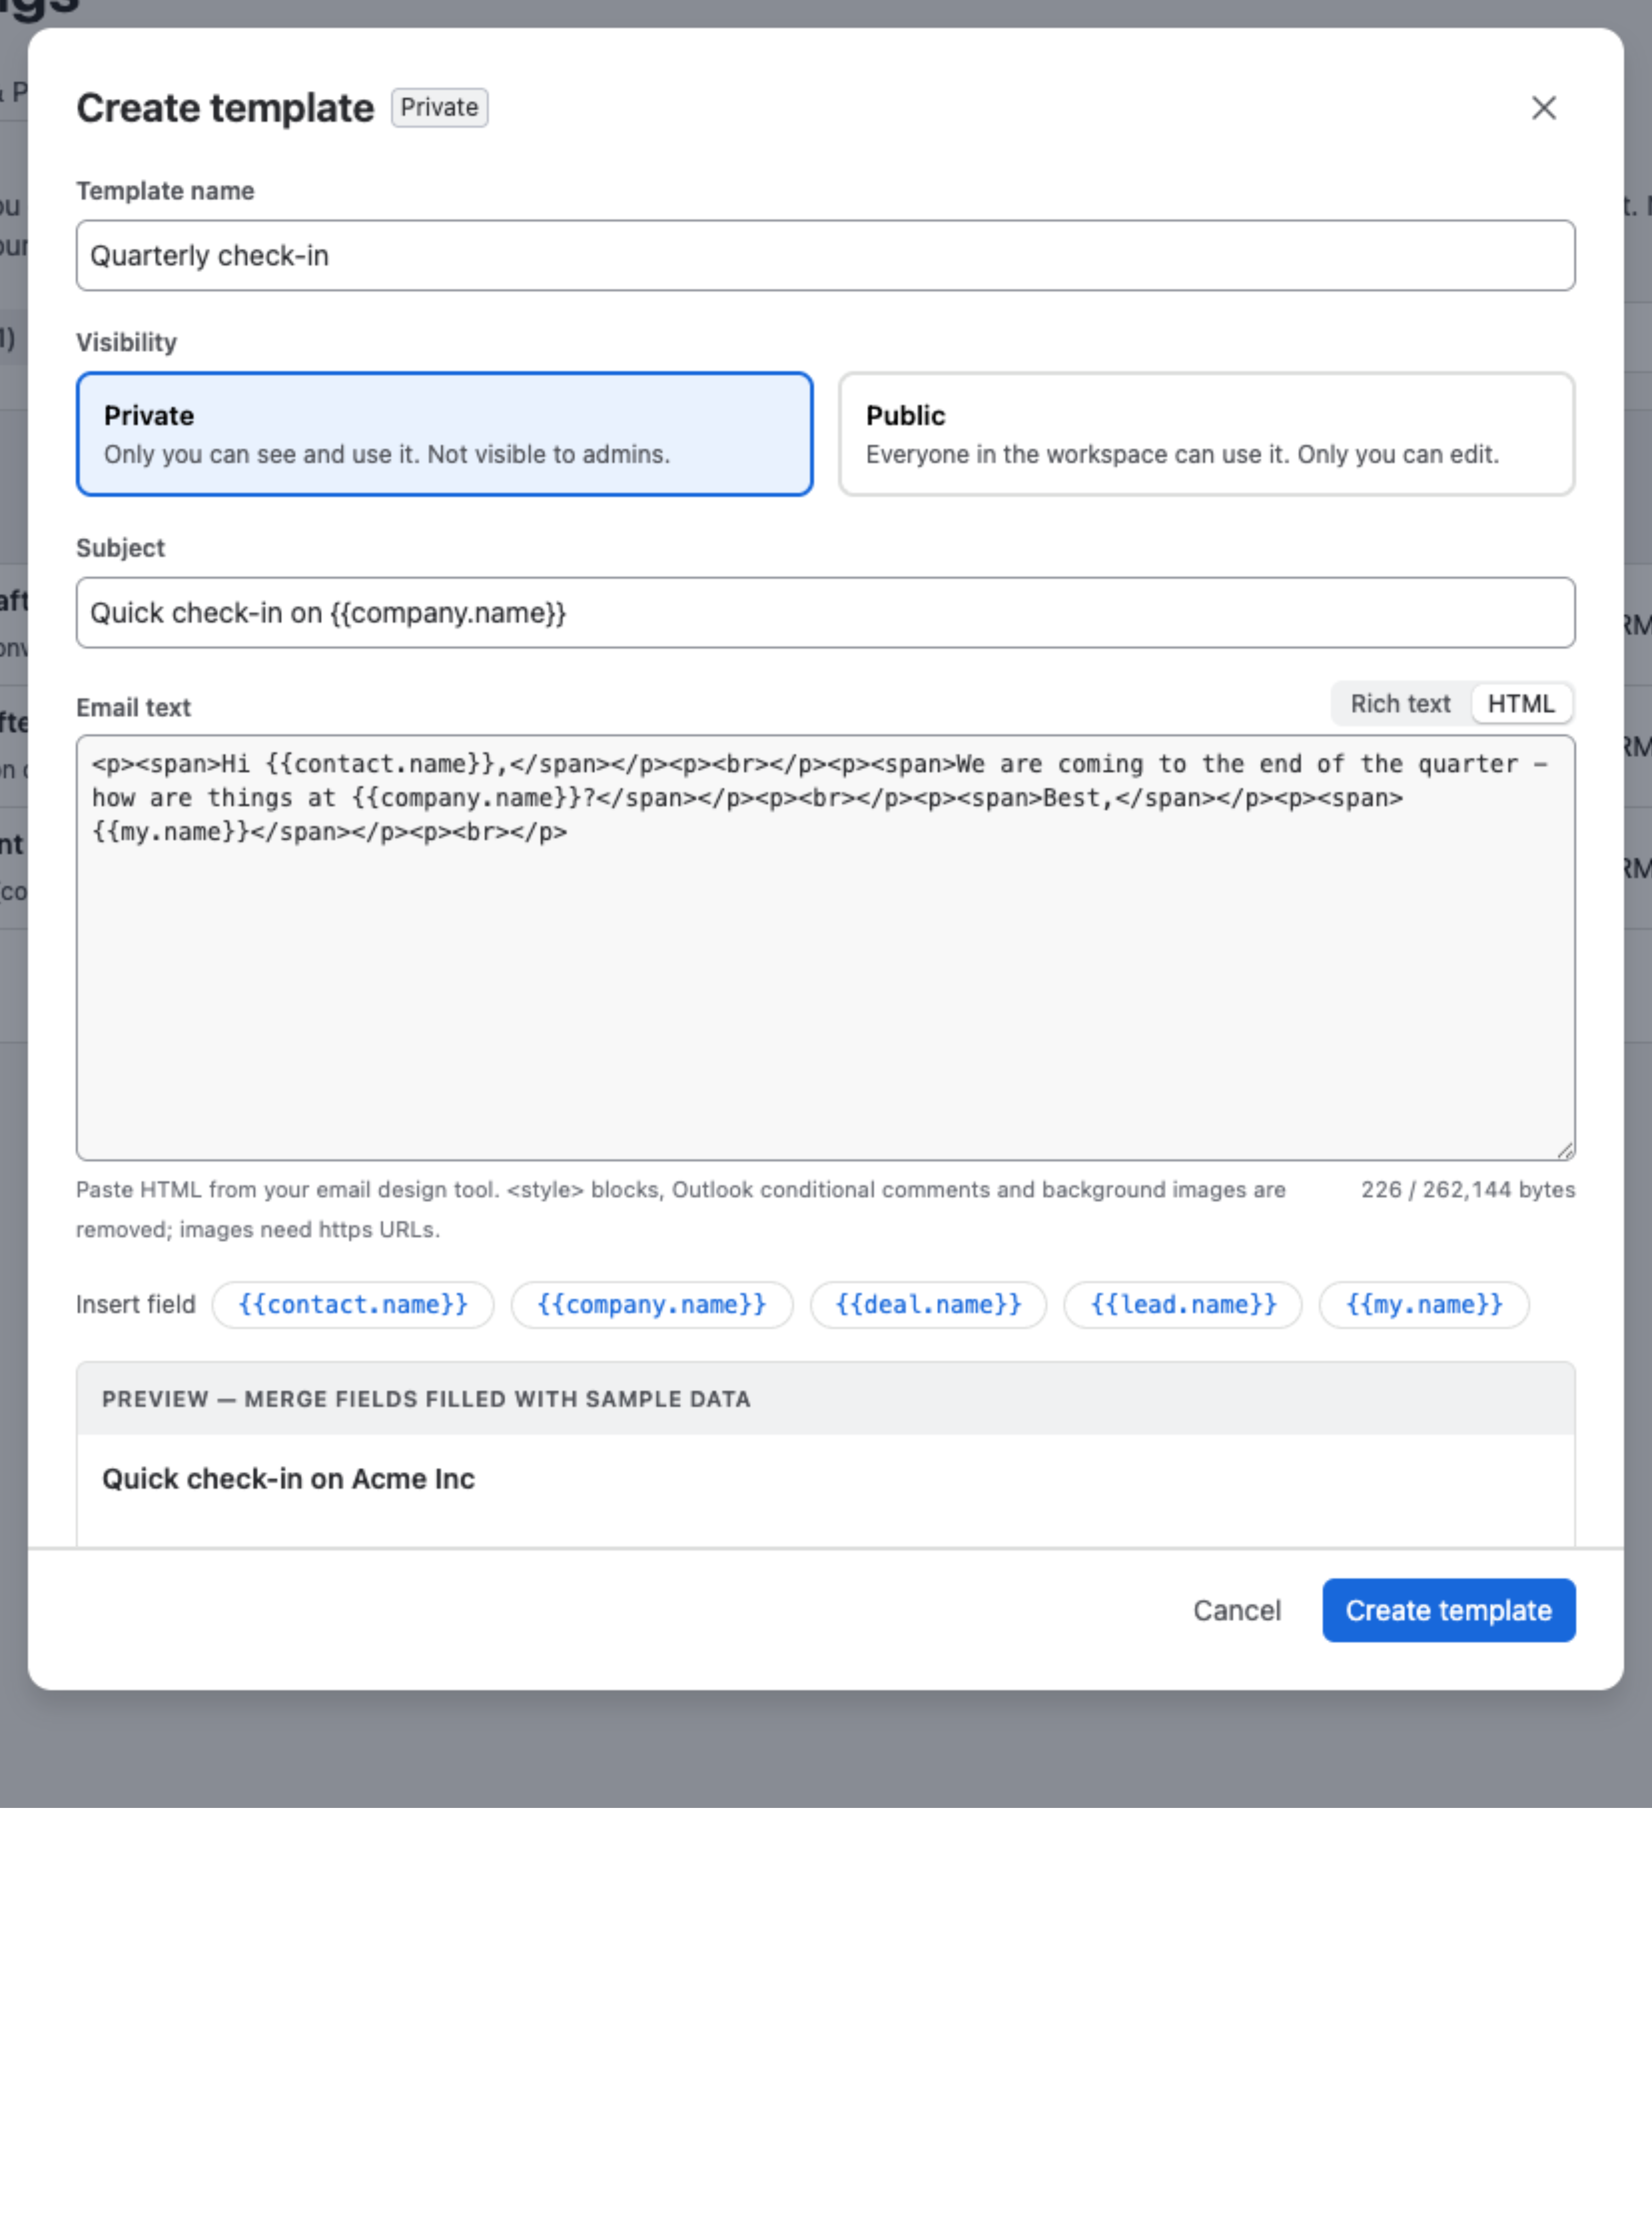
- HTML — paste markup straight out of an email design tool. Useful when marketing already has a designed template and you do not want to rebuild it by hand.
- Watch the preview underneath. It renders the template with sample data, so merge fields like
{{company.name}}show as real values while you write. - Click Create template. When you reopen an existing template the same button reads Save changes.
Pasting HTML #
Switch the Email text box to HTML to work on the markup directly. The pane accepts up to 262,144 bytes and shows a running byte count, and the preview underneath keeps rendering as you edit.
Pasted markup is sanitized on save. Three things are stripped, because they break in common mailboxes:
<style>blocks — style inline instead, withstyle=attributes.- Outlook conditional comments.
- Background images.
Images have to be served over https — a reference to a local file or an http URL will not render for the recipient.
Sanitizing is not a privacy filter. Remote https images are kept, which is what makes hosted images work — and it is also how a tracking pixel works. If you paste a template from a marketing tool, assume any remote image in it may report back when the mail is opened. Strip the markup yourself if that matters; the editor will not do it for you. Links are not rewritten or checked either.
Switching between the two modes converts the content, so the markup you get back after a round trip through Rich text may be tidied up rather than byte-identical to what you pasted. If a designed template matters, keep the original somewhere outside Mria CRM too.
The editor footer shows how many times the template has been used, so when you reopen an old one you can see whether anyone relies on it before you rewrite it.
5. Merge fields #
Merge fields are placeholders that resolve against the record you send from. Insert them with the Insert field buttons under the editor, or type them by hand.
| Field | Resolves to |
|---|---|
{{contact.name}} | The Contact’s name. |
{{company.name}} | The Company’s name. |
{{deal.name}} | The Deal’s name, when you’re sending from a Deal. |
{{lead.name}} | The Lead’s name, when you’re sending from a Lead. |
{{my.name}} | Your own name — useful for sign-offs. |
Fields work in both the Subject and the Email text. The composer’s preview shows them already filled in for the record you’re on, so you can check a template reads correctly before inserting it.
Use the field that matches where you’ll send from. {{deal.name}} has nothing to resolve against on a Contact who isn’t attached to a Deal — if a template is meant for use anywhere, stick to {{contact.name}}, {{company.name}}, and {{my.name}}.
6. Starter templates #
Every workspace ships with a few Public starter templates, owned by Mria CRM and badged ★ Starter, so the picker isn’t empty on day one:
- Re-engage after no reply
- Follow-up after call
- Proposal sent
Treat them as a starting point — Duplicate one and edit the copy to match how your team actually writes.
You can also delete them. The Delete action is available on starter templates the same as on your own, so they do not have to sit in the list forever.
7. Managing templates #
The ... menu on each row offers:
- Edit — open the template editor.
- Duplicate — create a copy you own. This is how you adapt a starter template or a colleague’s Public one.
- Move template — reposition it in your own ordering, as an alternative to dragging.
- Delete — remove it.
Starter templates behave slightly differently: because they are owned by Mria CRM rather than by you, their menu offers View instead of Edit — you can read the wording but not change it in place. Duplicate gives you an editable copy.
The Delete action also works on starter templates, so a workspace that has written its own set can clear the shipped ones away.
8. Exporting and importing templates #
The Export and Import buttons sit above the list, next to the search box. Export writes the templates into one JSON file; Import reads such a file and adds its templates to your list as new rows. Use the pair to keep a backup before a round of edits, to carry a set of templates from a test site to production, or to hand your wording to a colleague on another site.

Exporting #
- Go to Settings → Email Templates.
- Click Export. There is nothing to configure: the browser downloads the file straight away, named
mria-email-templates-<date>.json— for examplemria-email-templates-2026-11-06.json.
The file holds every template on the All tab — the Public ones, your own Private ones and the starter templates — whatever filter tab or search is active. Nobody else’s Private templates are in it, because you cannot see them. Export is disabled while the list is empty.
What the file contains #
A plain JSON text file with a format version and a templates array, one object per template:
{
  "version": 2,
  "templates": [
    {
      "name": "Proposal sent",
      "subject": "Proposal for {{company.name}}",
      "bodyHtml": "<p>Hi {{contact.name}},</p><p>Attaching the proposal for {{deal.name}}. It covers scope, timeline and pricing.</p><p>Best,<br>{{my.name}}</p>",
      "visibility": "PUBLIC",
      "bodyFormat": "RICH"
    }
  ]
}| Key | In the export | On import |
|---|---|---|
version | Always 2. | Required. Files with version 1 or 2 are accepted; anything else fails with “Unsupported export format version.” |
name | The template name. | Required, up to 255 characters. |
subject | The subject line. Omitted when the template has none. | Optional, up to 500 characters. |
bodyHtml | The email text as HTML. Merge fields are kept exactly as written, so {{contact.name}} still resolves after a round trip. | Required, up to 262,144 characters. |
visibility | PUBLIC or PRIVATE. | Optional. Checked for a valid value, but not applied: every imported template is created as Private (see below). |
bodyFormat | RICH or HTML — the editor mode the template was last saved in. | Optional, RICH or HTML. |
The file carries nothing else. The owner, the ★ Starter badge, the Used count and your ordering are not exported, so none of them can come back through an import.
Importing #
Importing needs the Create grant on Email templates (Roles & Permissions). Without it the Import button is not shown, while Export is available to anyone who can open the list.
- Go to Settings → Email Templates and click Import.
- Pick the
.jsonfile in the file dialog. There are no further steps or options: the import runs as soon as the file is chosen. - A flag confirms the result — Templates imported: “Imported 4 templates — all as Private.”
What the import does with the file:
- Every template in the file is created as a new template. Nothing already in the list is updated or replaced, even when a name matches — importing the site’s own export therefore gives you a second copy of every template, including the starters.
- You become the Owner, and every imported template is Private, whatever the file said. Switch the ones you want to share to Public afterwards.
- Imported copies carry no ★ Starter badge, start with a Used count of 0, and are appended at the end of your list.
- Name, subject, email text and editor mode come through unchanged.
Moving templates between sites. Export on the source site, then Import on the target site — one file, one click each. Visibility is reset, so the person importing ends up owning everything as Private, and re-publishes what the team should see. A Public template that already exists on the target is duplicated rather than merged, so delete the extras after an import.
Limits and error messages #
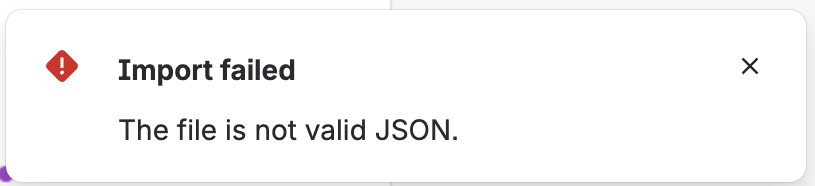
The whole file is checked before anything is created. If any template fails, nothing is imported and an Import failed flag names the problem; templates are referred to by their position in the file, as “Template #1”, “Template #2” and so on.
| Limit | Message |
|---|---|
| File size up to 4 MB. | “The file is larger than 4 MB.” |
| Up to 50 templates per file. | “A single import is limited to 50 templates.” |
| The file must be JSON, and a template export. | “The file is not valid JSON.” / “The file is not a template export.” / “Unsupported export format version.” |
| At least one template. | “The file contains no templates.” |
| Name up to 255 characters, body up to 262,144, subject up to 500. | “Template #1 needs a name up to 255 characters.” / “…needs a body up to 262144 characters.” / “…has an invalid subject (up to 500 characters).” |
| Visibility and body format values. | “Template #1 has an invalid visibility (use PRIVATE or PUBLIC).” / “…has an invalid bodyFormat (use RICH or HTML).” |
Larger sets go in several files of up to 50 templates each.
9. Using a template in the composer #
- Open a Contact, Lead, or Deal and switch to the Emails tab.
- Click Template, to the right of the Subject field.
- The picker opens with a searchable list on the left, grouped into Your templates and Public in workspace.
- Select one. The right-hand pane shows a preview filled in for the record you’re on — merge fields already resolved, so you see the actual email that will go out.
- Click Insert template. The subject and body are filled into the composer, where you can still edit them before sending.
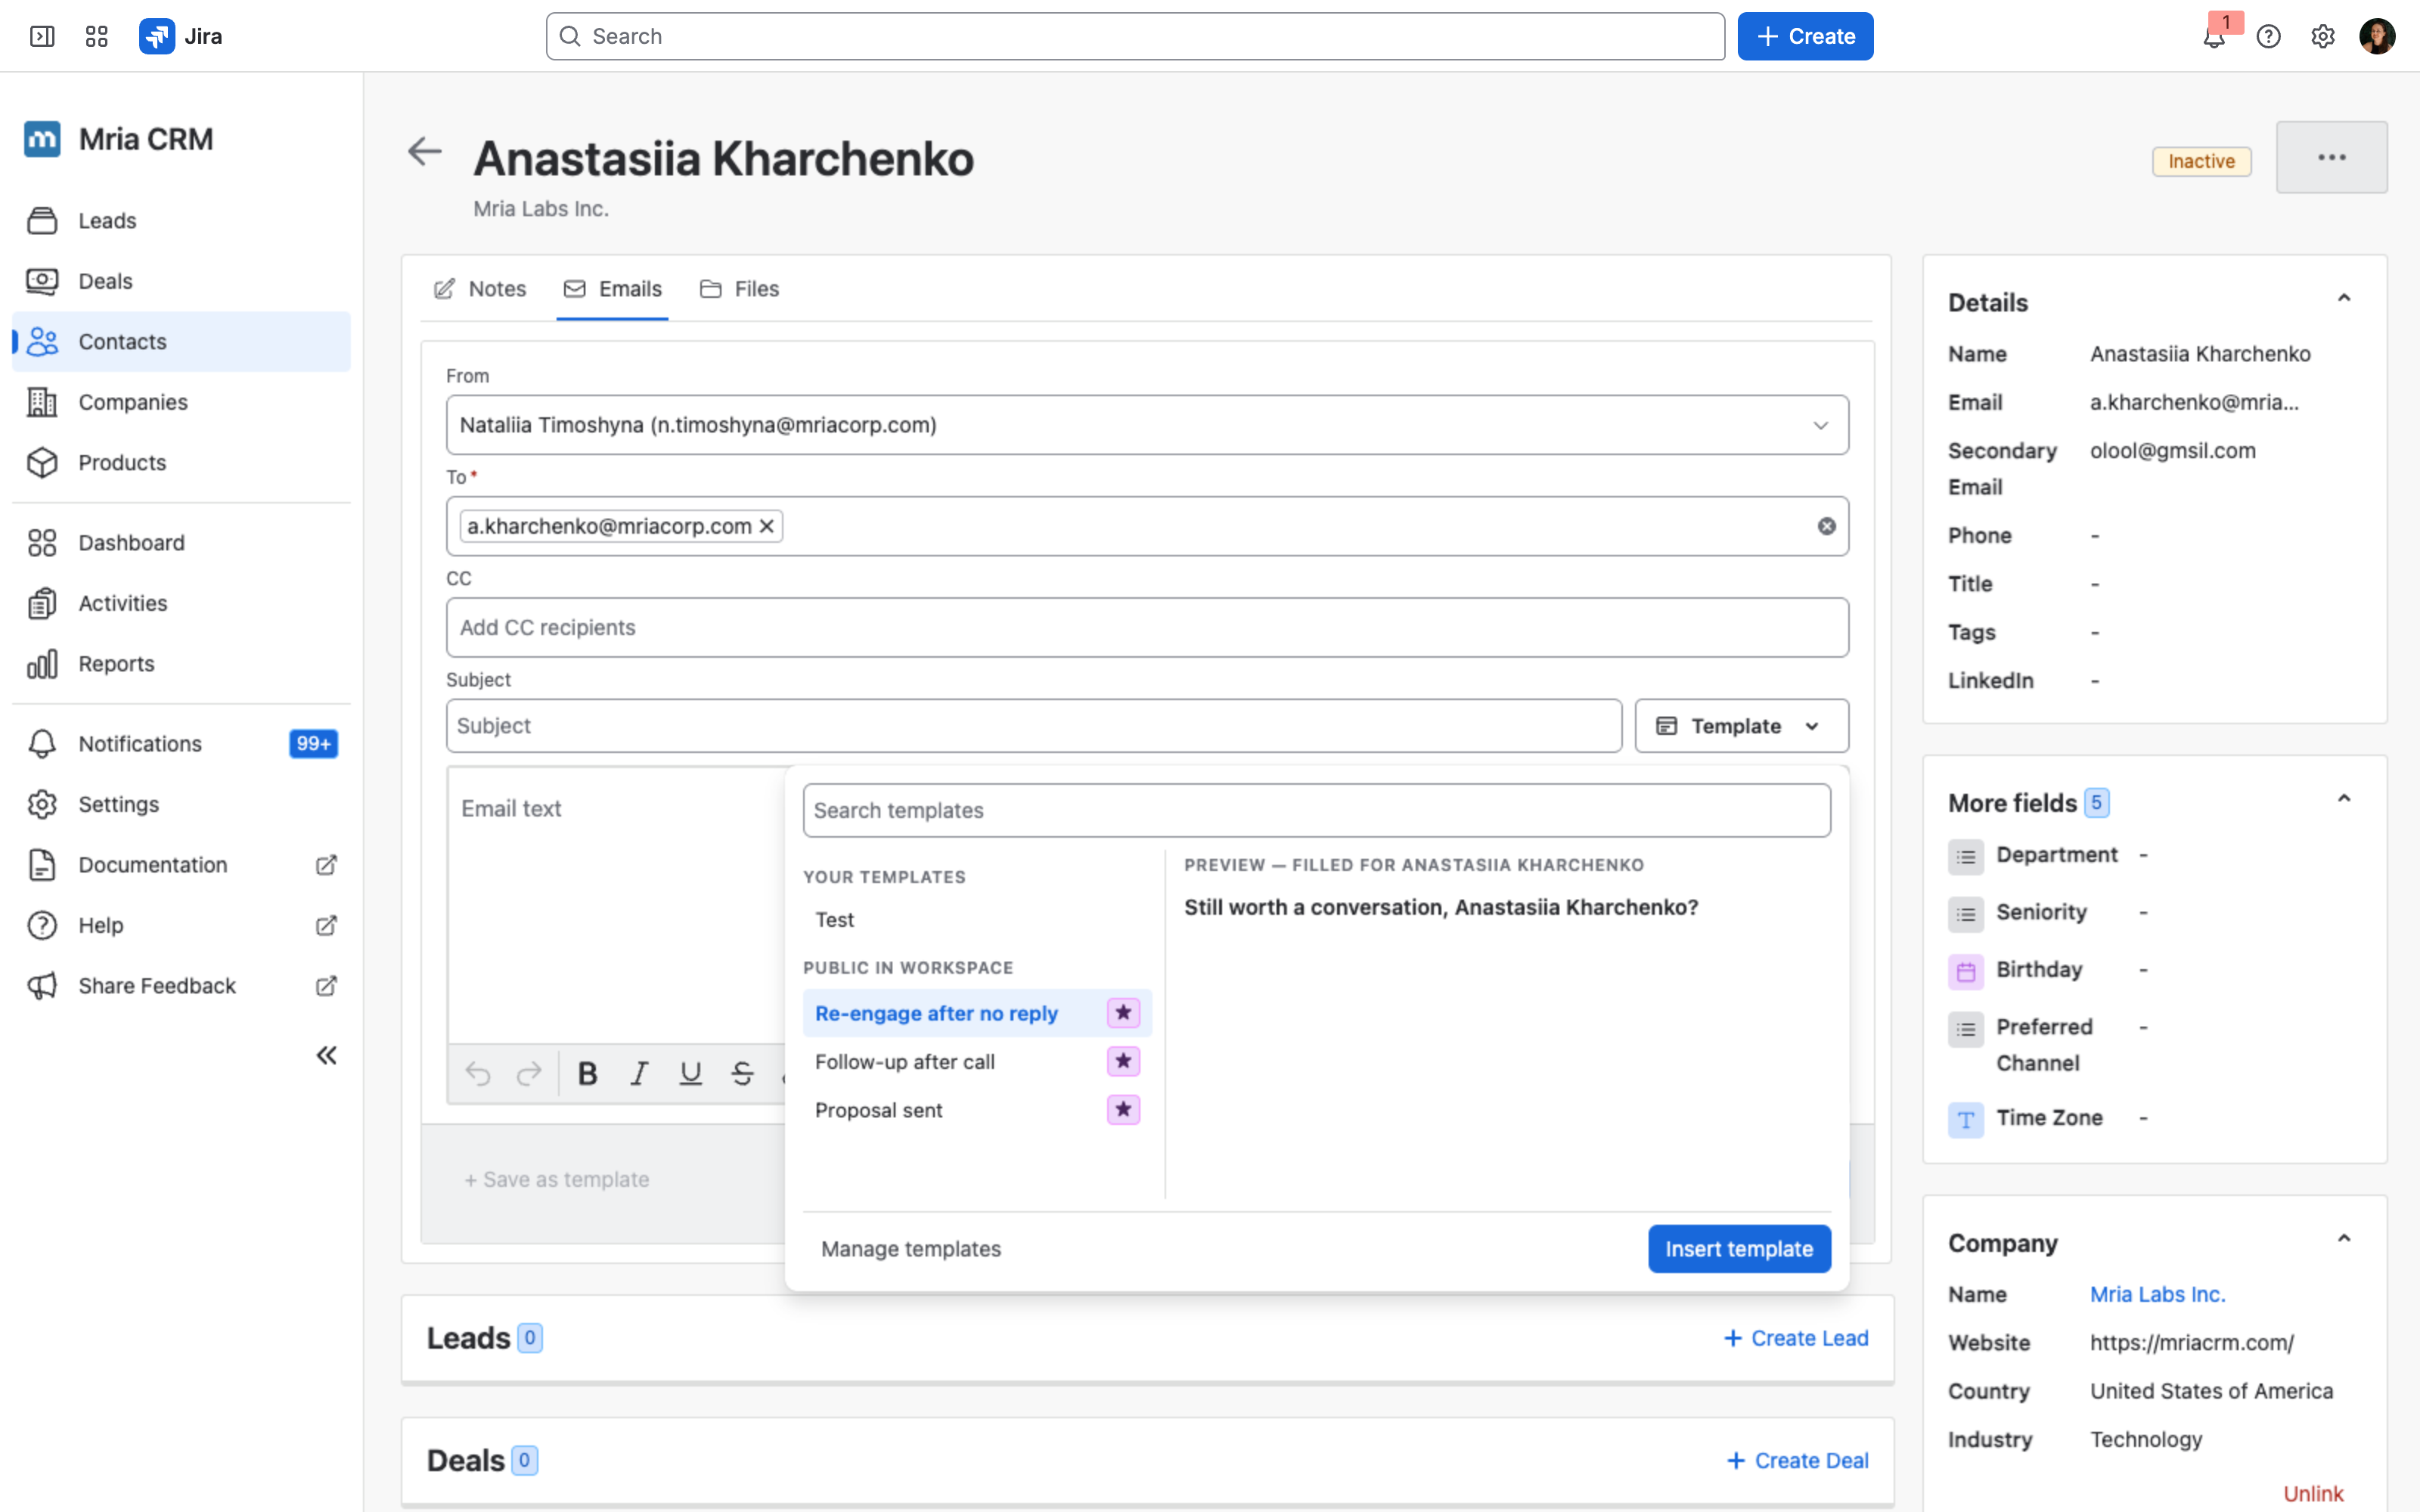
The picker also has a Manage templates link, which takes you straight to Settings → Email Templates.
Inserting a template replaces the subject and body in the composer. Insert first, then write your specific edits on top of it.
Saving a draft as a template #
If you’ve just written something worth keeping, click + Save as template in the composer footer, then give it a name and choose its visibility.
Saving a draft does not automatically turn names into merge fields. If your draft says “Hi Anastasiia”, the template will keep saying “Hi Anastasiia” for every recipient — swap the specifics for {{contact.name}} before you save, or edit the template afterwards.
Related Pages #
- Gmail Integration — connecting a mailbox and sending from a record.
- Outlook Integration — the same for Outlook.
- Settings — the rest of the configuration pages.


